| Section |
Page |
| Nokia PC Suite 5.1 User Guide |
1 |
| and PC/PDA Connectivity Guide for the following Nokia phones: 5100, 6100, 6200, 6610, 6800, 7210,... |
1 |
| Legal notices |
2 |
| Trademarks |
2 |
| Export Controls |
2 |
| FCC/Industry Canada Notice |
2 |
| Table of Contents |
3 |
| 1 Introduction 1 |
3 |
| 2 Nokia PC Suite 5.1 3 |
3 |
| 3 Nokia Connection Manager 6 |
3 |
| 4 Nokia Content Copier 7 |
3 |
| 5 Nokia Sound Converter 10 |
3 |
| 6 Nokia PC Sync 13 |
3 |
| 7 Nokia Image Converter 18 |
3 |
| 8 Nokia Application Installer 22 |
3 |
| 9 Nokia Phone Browser 23 |
3 |
| 10 Nokia Phone Editor 25 |
3 |
| 11 Wireless modem setup 30 |
4 |
| 12 Configure your data and fax software 35 |
4 |
| 13 PalmOS device configuration 42 |
4 |
| 14 Pocket PC device configuration 44 |
4 |
| 15 Index 49 |
4 |
| 1 Introduction |
5 |
| • Observe system requirements |
5 |
| • Learn about compatible PIM applications |
5 |
| • Understand requirements for digital data calls |
5 |
| • Print this guide |
5 |
| • Observe terms |
6 |
| • Comply with safety notes |
6 |
| • Learn about IR communications |
6 |
| Enable IR communications |
6 |
| Interruptions to IR communications |
6 |
| Learn about IR time-out |
6 |
| 2 Nokia PC Suite 5.1 |
7 |
| • Learn about PC Suite versions |
7 |
| • Install PC Suite |
7 |
| Install DKU-5 data cable software and hardware |
7 |
| Install PC Suite software |
7 |
| 1 Double-click the PC Suite installation file that you downloaded to your PC. |
7 |
| 2 Select the desired language for your software installation, then click OK. |
7 |
| 3 Click Next to begin the software installation, then read the end-user software agreement. |
7 |
| 4 Click the I accept the terms... option to accept the agreement, then click Next. |
7 |
| 5 Review the safety notes, then click Next. |
7 |
| 6 Click Next to confirm the default installation location. |
7 |
| 7 Observe the list of available PC Suite components, then click Next to install all PC Suite comp... |
8 |
| Select modem connection options |
8 |
| Select PC Suite connection method |
8 |
| 1 Select Cable connection, then click Next. |
8 |
| 2 Click Next to confirm the detection of your phone on the correct COM port (as needed). |
8 |
| 3 Continue through the installation wizard, then click Finish to restart your PC. |
8 |
| • Assign a familiar name |
8 |
| • Update your installation |
8 |
| 1 Connect your phone to your PC using the DKU-5 data cable. |
8 |
| 2 From the Windows Control Panel, double-click Add/Remove Programs. |
8 |
| 3 Click Nokia PC Suite 5 in the list of installed programs, then select Add/ Remove (Windows 98/M... |
8 |
| 4 Select the Modify option from the PC Suite installation wizard, then click Next. |
8 |
| 5 Proceed through the wizard until the Cable connection screen appears. |
8 |
| 6 Click the Cable connection option, then click Next. |
8 |
| 7 Continue the process by clicking Next. |
8 |
| 8 Click Finish to complete the setup. |
8 |
| 9 Restart your computer. |
8 |
| • Change language or remove PC Suite |
9 |
| 3 Nokia Connection Manager |
10 |
| Select the connection type |
10 |
| 1 Establish the appropriate connection between your phone and PC (using IR or cable), then double... |
10 |
| 2 Click the button that corresponds to the desired connection type: |
10 |
| 3 Allow Nokia Connection Manager to detect your phone, then click OK to return to Nokia PC Suite ... |
10 |
| Disable Connection Manager for wireless modem use |
10 |
| 4 Nokia Content Copier |
11 |
| • Learn about compatible phones |
11 |
| • Understand Content Copier basics |
11 |
| Use Content Copier |
11 |
| Copy data from the source phone |
12 |
| Save the source phone data |
12 |
| 1 Click the Save Data button. |
12 |
| 2 Navigate to the location on your hard drive where you want the information stored. |
12 |
| 3 Click Next to complete this process. |
12 |
| 4 Click New Action to return to the beginning of the Content Copier wizard (to perform a differen... |
12 |
| Copy information to the target phone |
12 |
| 1 Launch Nokia Content Copier, then click Next. |
12 |
| 2 Click Copy data from a PC to a phone, then click Next. |
12 |
| 3 Click the Select Source Folder button, then locate the directory containing the information you... |
12 |
| 4 Click Next to begin copying data from your PC to your phone. |
12 |
| IR connection time-out |
12 |
| Nokia Content Copier log |
13 |
| • Other phones |
13 |
| 5 Nokia Sound Converter |
14 |
| • Learn about MIDI files |
14 |
| Use SP MIDI files |
14 |
| Use Standard MIDI Files (SMF) |
14 |
| • Learn about Nokia Sound Converter |
14 |
| Open a GM file |
15 |
| 1 Establish a connection between your phone and PC. |
15 |
| 2 Launch Nokia PC Sync (click Start, point to Programs, point to Nokia PC Suite 5, then click Nok... |
15 |
| 3 Use the dialog box to highlight the MIDI file you want to convert, then click Open. |
15 |
| 4 Confirm that your phone appears as the selected destination, and note the number of simultaneou... |
15 |
| 5 Click Next. |
15 |
| Use Simple channel priority options |
15 |
| Listen to a MIDI channel |
15 |
| Change channel priority |
15 |
| Listen to your MIDI file |
15 |
| Use Advanced channel priority options |
16 |
| Save your SP MIDI file |
16 |
| 1 Click Next. |
16 |
| 2 Click the Save File button. Use the Save As dialog box to save your file with a different file ... |
16 |
| Transfer to phone |
16 |
| 1 From the Save dialog, click the Update to phone button. |
16 |
| 2 Make any changes to the MIDI file title using the Update As dialog box, then click OK. |
16 |
| 3 Click Finish to return to the beginning of the Nokia Sound Converter wizard, or click the close... |
16 |
| 6 Nokia PC Sync |
17 |
| • Configure PC Sync |
17 |
| 1 Establish a connection between your phone and PC using IR or cable. |
17 |
| 2 Launch Nokia PC Sync by clicking Start, point to Programs, point to Nokia PC Suite 5, then clic... |
17 |
| 3 Select your PIM application from the drop-down list, then click OK. |
17 |
| 4 Click the More button to view a summary of current or default settings. |
17 |
| Set General synchronization properties |
17 |
| 1 Click the General tab, then select the information you want to synchronize. |
17 |
| 2 Click the desired Automatic Synchronization option (for example, Every connection). |
17 |
| 3 Click the Advanced button to specify additional options, including resolving synchronization co... |
17 |
| Synchronization conflicts |
17 |
| Set Calendar and Contacts properties |
17 |
| 1 Click the Calendar/To-do tab. |
17 |
| 2 Use the drop-down lists to define the range of time PC Sync uses during synchronization. |
17 |
| 3 Click the Contacts tab. |
18 |
| 4 Select the details you want synchronized with your phone. |
18 |
| Contact deletions |
18 |
| Set PIM properties |
18 |
| Synchronizing for the first time |
18 |
| 1 Click the Summary tab. |
18 |
| 2 Click the Synchronize Now button. |
18 |
| 3 Observe the synchronization status indicator. |
18 |
| 4 Click the OK button when synchronization is complete. |
18 |
| • Understand the basics of Synchronization |
18 |
| Start PC Sync |
18 |
| To enable PC Sync on startup |
19 |
| 1 Establish a connection between your phone and PC. |
19 |
| 2 Launch PC Sync from the Start menu. |
19 |
| 3 Right-click the PC Sync tray icon, then click Enable On Startup |
19 |
| View other PC Sync options |
19 |
| • Begin synchronization |
19 |
| Synchronize using the Nokia DCV-14 |
19 |
| • Use the New Synchronization command |
19 |
| • Create a custom contact list |
19 |
| Configure for Outlook users |
19 |
| Create a new folder for phone contacts |
20 |
| 1 Click File, point to Folder, then click New Folder. |
20 |
| 2 Type the name of your new folder (for example, Phone list). |
20 |
| 3 Click the Folder contains drop-down arrow, then click Contact Items. |
20 |
| 4 Select a location for your new folder (for example, click Contacts to make Phone list a subfold... |
20 |
| 5 Click OK to confirm your selection. |
20 |
| Copy contacts to custom phone list |
20 |
| 1 Click the Contacts button on your Outlook bar . |
20 |
| 2 Select the contacts you want to appear in your custom list. |
20 |
| 3 Click Edit, then click Copy. |
20 |
| 4 Select your custom folder from the Folder List (for example, Phone list). |
20 |
| 5 Click Edit, then click Paste.to place copies of the selected contacts into the new folder. |
20 |
| Update Outlook settings in PC Sync |
20 |
| 1 Establish a connection between your phone and PC. |
20 |
| 2 Launch Nokia PC Sync from your PC Start menu. |
20 |
| 3 Right-click the PC Sync tray icon, then click Properties. |
20 |
| 4 Click the Microsoft Outlook tab. |
20 |
| 5 Click the Contacts browse button , then select your custom folder. |
20 |
| 6 Click OK to confirm your selection. |
20 |
| 7 Click the Summary tab, then click Synchronize Now to synchronize your phone and custom phone list. |
20 |
| Configure for other PIM applications |
20 |
| Create a new Lotus Organizer database file |
20 |
| 1 With Lotus Organizer running, click File, then click New. |
20 |
| 2 Click File, then click Save As. |
20 |
| 3 Enter a name for your custom phone list (for example, Phone list). |
20 |
| Copy contacts to custom phone list |
20 |
| 1 From the Lotus File Manager, open your default Organizer database (c:\\lotus\\work\\organize\\<file... |
20 |
| 2 Click the Contacts tab, then click the desired alphabet tab. |
20 |
| 3 Select the desired contacts for your custom list. |
20 |
| 4 Continue by clicking subsequent alphabet tabs and selecting the desired contacts. |
21 |
| 5 Click the Copy button. |
21 |
| 6 Use the Windows Task Bar to switch back to your new contacts list, then click the Contacts tab. |
21 |
| 7 Click the Paste button to paste copies of the selected contacts into the new list. |
21 |
| Update Lotus Organizer settings in PC Sync |
21 |
| 1 Establish a connection between your phone and PC. |
21 |
| 2 Launch Nokia PC Sync from the Start menu. |
21 |
| 3 Right-click the PC Sync tray icon, then click Properties. |
21 |
| 4 Click the Lotus Organizer tab. |
21 |
| 5 Click the Contacts browse button , then select your custom folder. |
21 |
| 6 Click OK to confirm your selection. |
21 |
| 7 Click the Summary tab, then click Synchronize Now to synchronize your phone and custom phone list. |
21 |
| 7 Nokia Image Converter |
22 |
| • Begin converting an image |
22 |
| 1 Launch Nokia Image Converter (click Start, point to Programs, point to Nokia PC Suite 5, then c... |
22 |
| 2 Click Open New Image. |
22 |
| 3 Select the image you want to convert, then click Open. |
22 |
| 4 Click Next and proceed to the Preferences screen. |
22 |
| Tour Nokia Image Converter |
22 |
| Explore image options |
23 |
| 1 Click the Select phone drop-down arrow, then select the model of your Nokia phone from the list. |
23 |
| 2 Click Image resizing (optional), then drag the slider to resize your image. |
23 |
| 3 Click OK to confirm the new image size. |
23 |
| 4 Click Next to continue. |
23 |
| Cropping |
23 |
| 1 Click the button associated with the type of picture you are trying to create (for example, Wal... |
23 |
| 2 Use your mouse to drag the highlighted area over the portion of the image you want to use. |
23 |
| 3 Use the adjustment handles on the corners (or on the sides) of the highlighted area to adjust t... |
23 |
| 4 Click the Crop button to complete the process (or double-click anywhere inside the highlighted ... |
23 |
| 5 Click Next. |
23 |
| Effects |
23 |
| 1 Click the desired effect (for example, Emboss). |
23 |
| 2 Use the Emboss options screen to adjust the various effects settings. |
23 |
| 3 Click OK to apply your changes. |
23 |
| 4 Click the Undo button if you want to modify the effect settings or if you decide to select a di... |
24 |
| Enhancements |
24 |
| Save your work |
24 |
| 1 Click the Save to file button, then enter a name for your converted image. |
24 |
| 2 Select the desired file type (for example, .jpg) from the Save as type drop-down list, then cli... |
25 |
| 3 Click Update to phone. |
25 |
| 4 Modify the file name (if desired) and confirm JPEG as the file type, then click OK. |
25 |
| 5 Confirm the file size settings you specified when you saved your file, then click OK. |
25 |
| 6 Click OK to accept the confirmation message indicating that the file transfer was successful. |
25 |
| 8 Nokia Application Installer |
26 |
| • About Java applications |
26 |
| • Install an application |
26 |
| 1 Establish a connection between your phone and PC (IR or cable). |
26 |
| 2 Launch Nokia Application Installer. |
26 |
| 3 Click the Install button , or select Install from the File menu. |
26 |
| 4 Locate and select the .jad file saved on your PC, then click Install. |
26 |
| 5 Click OK to complete the installation process. |
26 |
| • Erase an application |
26 |
| 1 Press Menu 1-0-1 (Applications > Select app.). |
26 |
| 2 Scroll to highlight the application you wish to erase, then press Options. |
26 |
| 3 Scroll to Erase, then press Select. |
26 |
| 4 Press OK to complete the process. |
26 |
| • Learn about multiple phones |
26 |
| 9 Nokia Phone Browser |
27 |
| • Tour Nokia Phone Browser |
27 |
| • Learn about folders |
27 |
| Local folders |
27 |
| Phone folder |
27 |
| Phone subfolders |
28 |
| Copy files between phone and PC |
28 |
| 1 Make sure both the subfolder containing your files and the destination folder are visible in th... |
28 |
| 1 Select the subfolder containing the files you want to copy from the Folders list. |
28 |
| 2 Select the files you want to copy in the pane to the right of the Folders list. |
28 |
| 3 Click Edit, then click Copy to copy the files. |
28 |
| 4 Select the destination subfolder for your files. |
28 |
| 5 Click Edit, then click Paste to move a copy of the files to the destination folder. |
28 |
| Use Update |
28 |
| 10 Nokia Phone Editor |
29 |
| • Phone memory and PC storage locations |
29 |
| • Tour Nokia Phone Editor and Contacts window |
29 |
| • Manage contacts using Phone Editor |
30 |
| Add a new contact |
30 |
| 1 Click the New Contact button on the toolbar, or select New Contact from the shortcut menu. |
30 |
| 2 Enter the name of the new contact, then press Tab. |
30 |
| 3 Enter the phone number, then press Enter to save your work. |
30 |
| Add additional information to a contact card |
30 |
| 1 Click the Type drop-down arrow, then select the type of data you want to add from the list. |
30 |
| 2 Press Tab, then enter the information in the Data field. |
30 |
| 3 Click Add and Create to save the data. |
30 |
| 4 Repeat steps 1—3 to add additional data. |
30 |
| 5 Click OK only when you are finished editing the selected contact. |
30 |
| Add numbers or information to an existing card |
30 |
| 1 Select the contact to edit from the list. |
30 |
| 2 Click the Add Entry button, then follow the instructions above to add new information to the se... |
30 |
| Edit contact information |
30 |
| 1 Select the contact to edit from the list. |
30 |
| 2 Click the contact name, number, or the field you want to edit in the contact card viewer. |
30 |
| 3 Make the necessary changes, then press ENTER to save your changes. |
30 |
| Delete a contact |
30 |
| Change the memory location for a contact |
30 |
| 1 Click the contact you want to change. |
30 |
| 2 Click Contacts, point to Change Memory, then click either Phone or SIM. |
30 |
| Copy and move contacts |
31 |
| 1 Click the folder containing the contacts you want to copy or move (for example, Phone ). |
31 |
| 2 Click the contact you wish to copy or move. |
31 |
| 3 Click the Copy button to copy, or click the Cut button to move (not copy) the selected contacts. |
31 |
| 4 Click the folder where you want the contacts stored (for example, PC folder ). |
31 |
| Add a contact to a caller group |
31 |
| 1 Right-click the contact you wish to assign to a caller group, then click Caller Group. |
31 |
| 2 Click the drop-down arrow, then click the desired caller group. |
31 |
| 3 Click OK to change the caller group assignment. |
31 |
| Create a contact group |
31 |
| 1 Click the + next to the PC folder, then click the Contact Groups folder. |
31 |
| 2 Click Contact, point to New, then click Contact Group. |
31 |
| 3 Type the name of the new contact group folder, then press Enter. |
31 |
| 4 Add members to the contact group by copying or moving contacts into this folder (see “Copy and ... |
31 |
| • Tour the Messages window |
31 |
| • Send and manage SMS messages |
32 |
| Write and send a text message |
32 |
| 1 Click the Write Message button . |
32 |
| 2 Enter your message in the Message field, observing the character counter visible above the Mess... |
32 |
| 3 Enter the first few letters of the recipient name (as stored in your contacts list), then click... |
32 |
| 4 Click the Send button on the toolbar. |
32 |
| Linked text messages |
32 |
| Work with text messages |
32 |
| Copy and move messages |
33 |
| 1 Click the folder containing the messages you want to copy or move (for example, Inbox ). |
33 |
| 2 Click the message you wish to copy or move (or hold CTRL, then click to select multiple messages). |
33 |
| 3 Click the Copy button to copy (or click the Cut button to move). |
33 |
| 4 Click the folder where you want the messages stored, for example, PC folder . |
33 |
| Create a new folder |
33 |
| 1 Click the PC folder . |
33 |
| 2 Click Message, then click New Folder |
33 |
| 3 Type the name for your new folder, then press ENTER to complete the process. |
33 |
| Save a message as a text file |
33 |
| • Edit Settings |
33 |
| • Launch other PC suite applications |
33 |
| 11 Wireless modem setup |
34 |
| • Select Nokia Modem Option |
34 |
| 1 Select the methods of connection between phone and PC for wireless modem installation, then cli... |
34 |
| 2 Observe the notes regarding your cable connection, then click Next. |
34 |
| 3 Confirm that the installation program has located your phone connected to the virtual COM port ... |
34 |
| 4 Observe any Windows notifications relating to the modem installation process, then click Finish... |
34 |
| 5 Verify that your Nokia phone appears in the list of modems in the Modems Control Panel after re... |
35 |
| • Perform hardware installation for IR |
35 |
| 1 Click Next when Windows informs you that new hardware has been detected. |
35 |
| 2 Clear any check boxes, then click Next and allow Windows to automatically locate the modem soft... |
35 |
| 3 Click Next to confirm that Windows has located the correct software for your phone. |
35 |
| 4 Accept any Windows alert messages regarding digital signatures or hardware compatibility and co... |
35 |
| 5 Click Finish to complete the IR modem installation. |
36 |
| • IR and Windows XP (Home and Professional) |
36 |
| Update the modem device driver |
36 |
| 1 Establish an IR connection between your phone and PC. |
36 |
| 2 Click Start, then click Control Panel. |
36 |
| 3 Click the Switch to Classic View link if you are in Category View. |
36 |
| 4 Double-click the Phone and Modem Options icon, then click the Modems tab. |
36 |
| 5 Double-click the Standard Modem over IR link entry. |
36 |
| 6 Click the Driver tab, then click the Update Driver button. |
36 |
| 7 Select the Install from a list or specific location (Advanced) option, then click Next. |
36 |
| 8 Select the Don’t search. I will choose option, then click Next. |
36 |
| 9 Select the Nokia xxxx (IrDA) option (where xxxx is the model number of your phone), then click ... |
37 |
| 10 Click Continue Anyway when notified about Windows logo compatibility. |
37 |
| 11 Click Finish when Windows XP informs you that the hardware update is complete, then click Clos... |
37 |
| • IR and Windows 2000 Professional operating system |
37 |
| Locate Security Update, August 19, 2001 |
37 |
| 1 Point your Web browser to: http://www.microsoft.com/windows2000/downloads/ |
37 |
| 2 Using the site search utility, locate the Microsoft Knowledge Base article: Q252795. |
37 |
| 3 Click the link to access Security Update, August 19, 2001, located in the list of search results. |
37 |
| 4 Follow the instructions for downloading the software to your PC hard drive. |
37 |
| 5 Double-click the software update icon to begin the installation. |
37 |
| 6 Reboot your computer to insure the changes take effect. |
37 |
| • Learn about Nokia Modem Option Control Panel |
38 |
| 12 Configure your data and fax software |
39 |
| • Observe the following requirements |
39 |
| • Learn about digital data |
39 |
| Circuit switched data (CSD) |
39 |
| General packet radio service (GPRS) |
39 |
| Enhanced data rates for GSM evolution (EDGE) (Nokia 6200 only) |
39 |
| Use GPRS/EDGE to access the Internet |
39 |
| Access corporate network and e-mail using a VPN |
39 |
| Choose the type of data services you need |
40 |
| GPRS/EDGE |
40 |
| CSD |
40 |
| • Configure your phone for GPRS/EDGE data |
40 |
| Acquire GPRS/EDGE modem settings |
40 |
| Enter GPRS/EDGE modem settings |
40 |
| 1 From the Start screen, press Menu. |
40 |
| 2 Locate and select the following menu options: Connectivity > GPRS > GPRS modem settings > Edit ... |
40 |
| 3 Scroll to GPRS access point, then press Edit. |
40 |
| 4 Enter the name of the GPRS access point (supplied by your service provider), then press OK. |
40 |
| 5 Scroll to Alias for access point, then press Rename. |
40 |
| 6 Enter a user-friendly name for this configuration (for example, My Internet), then press OK. |
40 |
| Activate an access point |
40 |
| 1 From the Start screen, press Menu 12-2-2-1 (Connectivity > GPRS > GPRS modem settings > Active ... |
40 |
| 2 Press Select again to view the list of available access point configurations. |
40 |
| 3 Scroll to the desired access point alias, then press Activate. |
40 |
| • Use Microsoft Dial-up Networking for GPRS/EDGE data |
41 |
| Create a new connection (Windows 98/ME) |
41 |
| 1 Double-click the My Computer icon, then double-click the Dial-up Networking folder. |
41 |
| 2 Double-click the Make New Connection icon. |
41 |
| 3 Type a name for your new connection (for example, Internet-GPRS). |
41 |
| 4 Click the drop-down arrow and select your Nokia phone as the modem to use, then click Next. |
41 |
| 5 Enter the GPRS network access code, *99# , then click Finish. |
41 |
| Create a new connection (Windows 2000) |
41 |
| 1 Click Start, point to Settings, then click Network and Dial-up Connections. |
41 |
| 2 Double-click Make New Connection, then click Next to begin the Network Connection Wizard. |
41 |
| 3 Verify that Dial-up to private network is selected, then click Next. |
41 |
| 4 Select only your Nokia phone as the active modem, then click Next. |
41 |
| 5 Enter the GPRS network access code, *99# , then click Next. |
41 |
| 6 Select the connection availability, then click Next. |
41 |
| 7 Type a name for your new connection (for example, Internet-GPRS), then click Finish. |
41 |
| Create a new connection (Windows XP) |
41 |
| 1 Click Start, then click Control Panel. |
41 |
| 2 Double-click Network Connections. |
41 |
| 3 Click Create a new connection in the Network Tasks pane, then click Next to begin the New Conne... |
41 |
| 4 Verify that the Connect to the Internet option is selected, then click Next. |
41 |
| 5 Click the Set up my connection manually option, then click Next. |
42 |
| 6 Click the Connect using a dial-up modem option, then click Next. |
42 |
| 7 Select only your Nokia phone as the active modem, then click Next. |
42 |
| 8 Type a name for your new connection (for example, Internet-GPRS), then click Next. |
42 |
| 9 Enter the GPRS network access code, *99# , then click Next. |
42 |
| 10 Enter the username and/or password as supplied by your wireless service provider (if required). |
42 |
| 11 Cancel any of the options on the Internet Account Information dialog box that you do not need,... |
42 |
| 12 Click Finish to complete the Wizard. |
42 |
| Connect to the GPRS/EDGE network |
42 |
| 1 Double-click the new connection (for example, Internet-GPRS). |
42 |
| 2 Remove any user name or password, then click Connect. |
42 |
| • Configure America Online to connect using GPRS/EDGE |
42 |
| 1 From the AOL Sign On screen, click SETUP. |
42 |
| 2 Click Expert Setup, then click the Locations tab. |
42 |
| 3 Click the Add Location button. |
42 |
| 4 Enter a name for this location (for example, TCP/IP for GPRS). |
42 |
| 5 (Windows 98/ME) Click the Add a custom connection option, then click Next. |
42 |
| 6 Enter a name for this type of connection in the Add number (Connection) screen (for example, GP... |
42 |
| 7 Verify that TCP/IP is the type of connection selected, then click OK. |
42 |
| 8 Click Close to close the Connection Setup window. |
42 |
| Connect to AOL |
42 |
| 1 Double-click the Dial-up Networking configuration for GPRS data (for example, Internet-GPRS). |
42 |
| 2 Click Connect and establish a connection to the Internet. |
42 |
| 3 Launch the AOL program. |
42 |
| 4 Select the TCP/IP location option on the Sign On screen (for example, TCP/IP for GPRS), then cl... |
42 |
| • Configure your data software for CSD |
42 |
| • Create Dial-up Networking connection for CSD |
43 |
| Gather configuration information |
43 |
| Create a new CSD connection |
43 |
| 1 Enter the phone number for your local ISP or corporate network instead of the GPRS access number. |
43 |
| 2 Complete the Dial-up Networking Wizard, then click Finish to save the new configuration in your... |
43 |
| 3 Configure any necessary network parameters for this connection prior to dialing (IP address of ... |
43 |
| Connect to the network |
43 |
| 1 Double-click the new connection (for example, Internet-Nokia phone). |
43 |
| 2 Enter your user name and password, then click Connect. |
43 |
| 3 Observe the notifications on your phone screen during the connection process. |
43 |
| • Configure AOL for CSD |
43 |
| Modem setup |
43 |
| 1 From the Sign On screen, click SETUP. |
43 |
| 2 Click Expert Setup, then click the Devices tab. |
43 |
| 3 Click the Expert Add button. |
43 |
| 4 Verify that Modem (telephone line connection) is selected as the type of connection device you ... |
43 |
| 5 Select the generic modem option (for example, Standard (Hayes Compatible)) from the list of mod... |
43 |
| 6 Select the COM port assigned to your PC IR COM port. |
43 |
| 7 Set the port speed to 14400 bps, then click OK. |
43 |
| Modify AOL Locations |
44 |
| 1 From the Connection Setup screen, click the Locations tab. |
44 |
| 2 Double-click the number for the location you wish to use with your Nokia phone. |
44 |
| 3 Click the Connect using drop-down arrow, then click Modem: Standard (Hayes compatible) on COMnn... |
44 |
| 4 Click the Speed drop-down arrow, then click 14400 bps. |
44 |
| 5 Click OK to confirm your changes, then click Close to return to the Sign On screen. |
44 |
| • Other data applications |
44 |
| • Configure your fax software |
44 |
| Select the correct modem |
45 |
| Confirm hardware settings |
45 |
| Observe important notes about data and fax calls |
45 |
| 13 PalmOS device configuration |
46 |
| • Learn about your phone as a wireless modem |
46 |
| Learn about GPRS, EDGE, and CSD |
46 |
| • Use an IR connection |
46 |
| • Modify Connections preferences |
46 |
| 1 Tap the Applications icon, then tap Prefs |
46 |
| 2 Tap the Categories drop-down menu, then tap Connection. |
46 |
| 3 Tap New. Enter the name of the new connection device (for example, Nokia). |
46 |
| 4 Click the Connection Method drop-down arrow, then click IrCOMM to Modem. |
46 |
| 5 Click Details. |
47 |
| 6 Set speed to 57,600 bps and flow control to Automatic. |
47 |
| 7 Click OK when finished, then click OK to close the Edit window. |
47 |
| • Make a dial-up connection |
47 |
| Create a GPRS/EDGE data connection |
47 |
| 1 Tap the Applications icon, then tap Prefs. |
47 |
| 2 Tap the Categories drop-down menu, then tap Network. |
47 |
| 3 Tap the menu button, then tap New. |
47 |
| 4 Enter a name for this service (for example, GPRS). Leave user name and password fields blank. |
47 |
| 5 Tap the Connection drop-down arrow, then tap the name of the connection device (for example, No... |
47 |
| 6 Enter the GPRS network access code, *99# , in the Phone field. |
47 |
| Connect to the network |
47 |
| 1 Establish a connection between your phone and handheld device, then tap Connect. |
47 |
| 2 Tap the Applications menu, then launch the desired application (Web browser, e-mail, etc.). |
47 |
| Create a CSD data connection |
47 |
| 1 Tap the Applications icon, then tap Prefs. |
47 |
| 2 Tap the Categories drop-down menu, then tap Network. |
47 |
| 3 Tap the Services drop-down arrow, then tap Windows RAS. |
47 |
| 4 Tap the Connection drop-down arrow, then tap the name of the connection device (for example, No... |
47 |
| 14 Pocket PC device configuration |
48 |
| • Learn about your phone as a wireless modem |
48 |
| Learn about GPRS, EDGE, CSD |
48 |
| • Use an IR connection |
48 |
| • Configure a GPRS/EDGE modem connection |
48 |
| Create a modem connection |
48 |
| 1 Tap the Start icon , then tap Settings. |
48 |
| 2 Tap the Connections tab, then tap Modem. |
48 |
| 3 Tap New Connection, then enter a name for the connection (for example, Internet-GPRS). |
49 |
| 4 Click the modem selection drop-down arrow, then select the IrCOMM or Generic IrDA option. |
49 |
| 5 Set the baud rate to 57600, then tap Next. |
49 |
| 6 Enter the GPRS network access code, *99# , in the Phone number field, then click Next. |
49 |
| 7 Tap Wait for dial tone to deselect this option, then tap Finish. |
49 |
| Use your new GPRS/EDGE modem connection |
49 |
| 1 Tap the Start icon , then tap Programs. |
49 |
| 2 Tap Connections, then tap your new modem connection (for example, Internet-GPRS). |
49 |
| 3 Verify that the GPRS access number is displayed correctly, then tap Connect. |
50 |
| 4 Launch your browser or e-mail application. |
50 |
| Before you make a digital data call |
50 |
| • Configure a modem connection-CSD |
50 |
| Creating a modem connection |
50 |
| 1 Tap the Start icon , then tap Settings. |
50 |
| 2 Tap the Connections tab, then tap Modem. |
50 |
| 3 Tap New Connection, then enter a name for the connection (for example, Internet-Nokia phone). |
50 |
| 4 Click the modem selection drop-down arrow, then select the IrCOMM or Generic IrDA option (for IR). |
50 |
| 5 Tap Advanced to access additional configuration properties for Port Settings, TCP/IP, and Name ... |
50 |
| 6 Tap OK to close the Advanced properties window, then tap Next. |
50 |
| 7 Enter the area code (if necessary) and phone number, then tap Next. |
51 |
| 8 Tap Wait for dial tone to deselect this option, then tap Finish. Your new dialing configuration... |
51 |
| Use your new CSD modem connection |
51 |
| 1 Tap the Start icon , then tap Programs. |
51 |
| 2 Tap Connections, then tap your new modem connection (for example, Internet-Nokia phone). |
51 |
| 3 Enter your user name, password, and domain (if necessary). |
51 |
| 4 Click Connect. |
51 |
| 5 Launch your browser or e-mail application. |
51 |
| Before you make a digital data call |
52 |
| 15 Index |
53 |
| A |
53 |
| C |
53 |
| D |
53 |
| E |
53 |
| F |
53 |
| G |
53 |
| I |
53 |
| M |
53 |
| N |
54 |
| O |
54 |
| P |
54 |
| R |
54 |
| S |
54 |
| T |
54 |
| U |
54 |
| V |
54 |

 1
1 4
4 5
5 6
6 7
7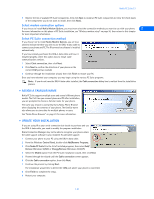 8
8 9
9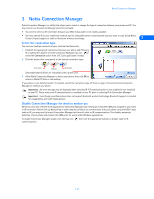 10
10 11
11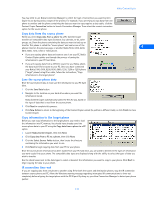 12
12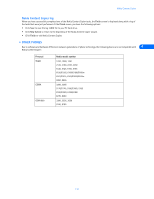 13
13 14
14

