Nokia N72 User Guide - Page 33
You in the picture—, The flash, Adjust still image camera settings, High - Print
 |
View all Nokia N72 manuals
Add to My Manuals
Save this manual to your list of manuals |
Page 33 highlights
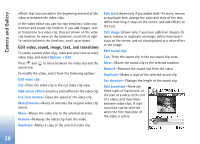
Camera and Gallery self-timer is activated, a maximum of six pictures can be captured. The pictures are automatically saved in Gallery. You in the picture-self-timer Use the self-timer to delay the taking of a picture so that you can include yourself in the picture. To set the self-timer delay, select Options > Activate self timer > 10 seconds, 20 seconds, or 30 seconds. To activate the self-timer, select Activate. The self-timer indicator ( ) blinks and the device beeps when the timer is running. The camera takes the picture after the selected delay has elapsed. You can also use the Activate self timer in the sequence mode. See 'Take pictures in a sequence', p. 32. The flash Keep a safe distance when using the flash. Do not use the flash on people or animals at close range. Do not cover the flash while taking a picture. The camera has an LED flash for low light conditions. The following flash modes are available: Automatic ( ), On/ forced ( ), and Off ( ). Select Options > Image setup > Flash > On/forced to use the flash. If the flash is set to Off or Automatic during bright conditions, the flash still emits a low light when an image is captured. This allows the subject of the picture to see when the picture is taken. There is no flash effect on the resultant picture. Adjust still image camera settings There are two kinds of settings for the still image camera: Image setup settings and main settings. To adjust Image setup settings, see 'Adjust color and lighting', p. 34. The setup settings return to the default settings after you close the camera, but the main settings remain the same until you change them again. To change the main settings, select Options > Settings and from the following: Image quality-High - Print, Med. - E-mail, or Low Multimedia. The better the image quality, the more memory the image consumes. The quality of a zoomed picture is lower than that of a non-zoomed picture. If you want to print the image, select High - Print (resolution 1600x1200). If you want to send it through e-mail, select Med. - E-mail (resolution 1024x768). To send the image through MMS, select Low - Multimedia (resolution 640x480). Glossary: Resolution is a measure of sharpness and clarity of an image. Resolution refers to the number of 33
-
 1
1 -
2
-
3
-
4
-
5
-
6
-
7
-
8
-
9
-
10
-
11
-
12
-
13
-
14
-
15
-
16
-
17
-
18
-
19
-
20
-
21
-
22
-
23
-
24
-
25
-
26
-
27
-
 28
28 -
 29
29 -
 30
30 -
 31
31 -
 32
32 -
 33
33 -
 34
34 -
 35
35 -
 36
36 -
 37
37 -
 38
38 -
39
-
40
-
41
-
42
-
43
-
44
-
45
-
46
-
47
-
48
-
49
-
50
-
51
-
52
-
53
-
54
-
55
-
56
-
57
-
58
-
59
-
60
-
61
-
62
-
63
-
64
-
65
-
66
-
67
-
68
-
69
-
70
-
71
-
72
-
73
-
74
-
75
-
76
-
77
-
78
-
79
-
80
-
81
-
82
-
83
-
84
-
85
-
86
-
87
-
88
-
89
-
90
-
91
-
92
-
93
-
94
-
95
-
96
-
97
-
98
-
99
-
100
-
101
-
102
-
103
-
104
-
105
-
106
-
107
-
108
-
109
-
110
-
111
-
112
-
113
-
114
-
115
-
116
-
117
-
118
-
119
-
120
 |
 |
