NordicTrack 1750 Treadmill English Manual
NordicTrack 1750 Treadmill Manual
 |
View all NordicTrack 1750 Treadmill manuals
Add to My Manuals
Save this manual to your list of manuals |
NordicTrack 1750 Treadmill manual content summary:
- NordicTrack 1750 Treadmill | English Manual - Page 1
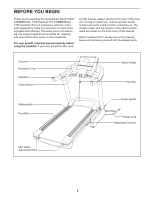
on the back cover of this manual) before contacting Customer Care. CALL TOLL-FREE: 1-800-TO-BE-FIT (1-800-862-3348) Mon.-Fri. 6 a.m.-6 p.m. MT Sat. 8 a.m.-4 p.m. MT ON THE WEB: www.nordictrackservice.com CAUTION Read all precautions and instructions in this manual before using this equipment. Save - NordicTrack 1750 Treadmill | English Manual - Page 2
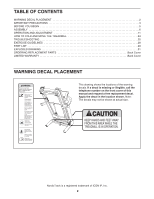
DECAL PLACEMENT 2 IMPORTANT PRECAUTIONS 3 BEFORE YOU BEGIN 5 ASSEMBLY 6 OPERATION AND ADJUSTMENT 11 HOW TO FOLD AND MOVE THE TREADMILL 24 TROUBLESHOOTING 25 EXERCISE GUIDELINES 28 PART LIST 29 EXPLODED DRAWING 31 ORDERING REPLACEMENT PARTS Back Cover LIMITED WARRANTY Back Cover WARNING - NordicTrack 1750 Treadmill | English Manual - Page 3
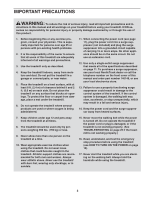
a single-outlet surge suppressor that meets all of the specifications described on page 11. To purchase a surge suppressor, see your local NordicTrack dealer or call the telephone number on the front cover of this manual and order part number 146148, or see your local electronics store. 13. Failure - NordicTrack 1750 Treadmill | English Manual - Page 4
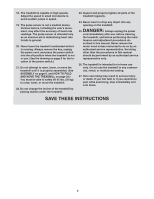
hood unless instructed to do so by an authorized service representative. Servicing other than the procedures in this manual should be performed by an authorized service representative only. 26. The treadmill is intended for in-home use only. Do not use the treadmill in any commercial, rental - NordicTrack 1750 Treadmill | English Manual - Page 5
for selecting the revolutionary NordicTrack® COMMERCIAL 1750 treadmill. The COMMERCIAL 1750 treadmill offers an impressive selection of features designed to make your workouts at home more enjoyable and effective. And when youʼre not exercising, the unique treadmill can be folded up, requiring less - NordicTrack 1750 Treadmill | English Manual - Page 6
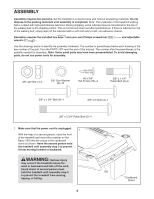
assembly hardware. The number in parentheses below each drawing is the key number of the part, from the PART LIST near the end of this manual person hold the treadmill until assembly step 3 to prevent it from moving forward or backward. WARNING: Serious injury may occur if the treadmill moves for- - NordicTrack 1750 Treadmill | English Manual - Page 7
are no wires on the left side. 2 91 92 93 Wire Tie 3. With the help of a second person, lower the treadmill off the cardboard stand. The stand will be used again in assembly step 9. Identify the Right Upright Sleeve (90) and the Left Upright Sleeve (89), which are labeled "Right" and "Left - NordicTrack 1750 Treadmill | English Manual - Page 8
. IF YOU DO NOT CONNECT THE CONNECTORS PROPERLY, THE CONSOLE MAY BECOME DAMAGED WHEN YOU TURN ON THE POWER. Remove the wire tie from the Upright Wire. Insert the connectors down into the Right Upright (92). Console Assembly 91 88 93 93 Wire Tie 88 92 5. Insert the brackets on the Handrail - NordicTrack 1750 Treadmill | English Manual - Page 9
Left Upright (91). Firmly tighten all six 3/8" x 1 1/4" Patch Bolts (2). 6 91 2 6 2 6 92 7. Slide the Right Upright Sleeve (90) up against the console assembly. Attach the Right Upright 7 Sleeve with two #8 x 3/4" Tek Screws (24). Attach the Left Upright Sleeve (not shown) to the console - NordicTrack 1750 Treadmill | English Manual - Page 10
the four 3/8" x 3 3/4" Patch Bolts (5). With the help of the second person, lower the treadmill off the cardboard stand. 103 5 5 Cardboard Stand 10. Make sure that all parts are properly tightened before you use the treadmill. Keep the included hex keys in a secure place; one of the hex keys is - NordicTrack 1750 Treadmill | English Manual - Page 11
wear. HOW TO PLUG IN THE POWER CORD that is properly installed and grounded in accordance with all local codes and ordinances. IMPORTANT: The treadmill is not compatible with GFCI-equipped outlets. This product is for use on a nominal 120-volt circuit (see drawing 1). A temporary adapter may be - NordicTrack 1750 Treadmill | English Manual - Page 12
, track your workout results, and access many other features. See www.iFit.com for complete information. You can also listen to your favorite workout music or audio books with the consoleʼs premium stereo sound system while you get in shape. To turn on the power, see page 13. To use the manual mode - NordicTrack 1750 Treadmill | English Manual - Page 13
MANUAL MODE IMPORTANT: If the treadmill has been exposed to cold temperatures, allow it to warm to room temperature before turning ready for use. 2. Select the start menu. Each time the key is inserted, the start menu will appear. If you have selected instructions in this manual refer to miles. 13 - NordicTrack 1750 Treadmill | English Manual - Page 14
Start button. 4. Change the incline of the treadmill as desired. To change the incline of the treadmill, The incline level of the treadmill • The speed of the walking belt • A track representing 1/4 mile (400 meters shows the desired information. Note: The manual mode does not have a time remaining - NordicTrack 1750 Treadmill | English Manual - Page 15
press the Pause button. To continue the workout, press the Resume button or the Start button. To end the workout and select a new workout, press the New Workout in to www.iFit.com. If the symbol does not appear, your treadmill is not connected to your wireless network. 6. Measure your heart rate if - NordicTrack 1750 Treadmill | English Manual - Page 16
will function in the same way as the manual mode (see pages 13 to 15). The number of calories that you burn will depend on your weight. 5. Monitor your progress. See step 5 on pages step 7 on page 15. 4. Start the workout. Press the Start Workout button to start the workout. A moment after you - NordicTrack 1750 Treadmill | English Manual - Page 17
, press the Trail button at the top of the screen. 4. Start the workout. Press the Start Workout button to start the workout. A moment after you press the button, the walking moment to alert you. The treadmill will then automatically adjust to the speed and/or incline settings for the next segment - NordicTrack 1750 Treadmill | English Manual - Page 18
you burn will depend on your weight. In addition, if you manually change the speed or incline of the treadmill during the workout, the number of button or the Start button. The walking belt will begin to move at 1 mph. When the next segment of the workout begins, the treadmill will automatically - NordicTrack 1750 Treadmill | English Manual - Page 19
track your workout results, and access many other features. See www.iFit.com for complete information. 1. Connect your treadmill to your own wireless network. See steps 1 and 2 on pages 20 and 21. Part ); visit www.iFit.com/support; or send email to [email protected]. This equipment has - NordicTrack 1750 Treadmill | English Manual - Page 20
your treadmill to your own wireless network and to log in to your iFit Live account. The settings mode also allows you to turn on and turn off an 802.11b router with SSID broadcast enabled (hidden networks are not supported). If your wireless network is unencrypted and does not require a password, - NordicTrack 1750 Treadmill | English Manual - Page 21
problems turn off the display demo mode, first press the Demo Mode button. Next, press the On button or the Off button. Then, press the Back button. 5. View the unit of measurement. Note: If you have questions after following these instructions, go to www.iFit.com/support purchased your treadmill in - NordicTrack 1750 Treadmill | English Manual - Page 22
the maintenance mode. minimum incline level and then return to the starting position. This will recalibrate the incline system. When the incline return to the maintenance mode. If you press the Begin button, the treadmill will automatically rise to the maximum incline level, lower to the When - NordicTrack 1750 Treadmill | English Manual - Page 23
will return to the start menu. 9. Exit the maintenance mode. To exit the maintenance mode, press the Back button repeatedly. 6. Calibrate the speed of the treadmill. Calibrate the speed of the treadmill only if instructed to do so by an authorized service representative. Note: The Calibrate - NordicTrack 1750 Treadmill | English Manual - Page 24
: Do not hold the frame by the plastic foot rails. Make sure to bend your legs and keep your back straight. HOW TO MOVE THE TREADMILL Before moving the treadmill, fold it as described at the left. CAUTION: Make sure that the latch knob is locked in the storage position. Moving the - NordicTrack 1750 Treadmill | English Manual - Page 25
TROUBLESHOOTING Most treadmill problems can be solved by following the steps below. Find the problem that applies, and follow the steps listed. If further assistance is needed, please see the front cover of this manual. PROBLEM: The power does not turn on SOLUTION: a. Make sure that the power - NordicTrack 1750 Treadmill | English Manual - Page 26
available (see step 7 on page 23). PROBLEM: The walking belt slows when walked on SOLUTION: a. Use only a single-outlet surge suppressor that meets all of the specifications described on page 11. b. If the walking belt is overtightened, treadmill performance may decrease and the walking belt may - NordicTrack 1750 Treadmill | English Manual - Page 27
; if the walking belt has shifted to the right, turn the left idler roller bolt counterclockwise 1/2 of a turn. Be careful not to overtighten the walking belt. Plug in the power cord, insert the key, and run the treadmill for a few minutes. Repeat until the walking belt is cen- tered. b. If - NordicTrack 1750 Treadmill | English Manual - Page 28
age 35 or persons with pre-existing health problems. The pulse sensor is not a medical You can use your heart rate as a guide to find the proper intensity level. The chart in your training zone. WORKOUT GUIDELINES Warming Up-Start with 5 to 10 minutes of stretching and part of your everyday life. 28 - NordicTrack 1750 Treadmill | English Manual - Page 29
. NTL15809.2 To locate the parts listed below, see the EXPLODED DRAWING near the end of this manual. Key No. Qty. 1 Foot Insert Rear Foot Platform Cushion Cushion Track Warning Decal Walking Platform Key No. 98 2 99 9 100 1 Description Belt Guide Isolator Reed Switch Hood Mount Lift Arm Spacer - NordicTrack 1750 Treadmill | English Manual - Page 30
110 1 111 2 112 2 * - Description Console Plate Handrail Cap Handrail Handrail Grip Console Clamp Userʼs Manual Note: Specifications are subject to change without notice. For information about ordering replacement parts, see the back cover of this manual. *These parts are not illustrated. 30 - NordicTrack 1750 Treadmill | English Manual - Page 31
31 1 24 41 72 42 43 44 53 1 54 1 1 1 1 1 47 45 24 52 43 42 51 14 12 46 50 12 12 49 68 12 48 12 18 12 8 15 32 38 18 69 32 15 70 71 38 12 12 8 55 56 24 21 62 63 1 20 73 24 17 58 59 24 57 96 10 23 60 34 30 16 104 61 23 23 34 30 24 34 30 24 17 67 1 64 - NordicTrack 1750 Treadmill | English Manual - Page 32
EXPLODED DRAWING B-Model No. NTL15809.2 75 78 1 37 1 1 37 7 76 81 77 74 13 11 80 79 7 R1010A 1 82 19 83 19 19 84 19 95 7 19 3 32 85 19 7 4 87 - NordicTrack 1750 Treadmill | English Manual - Page 33
EXPLODED DRAWING C-Model No. NTL15809.2 R1010A 89 24 2 97 6 24 62 91 24 99 98 90 24 2 6 24 93 6 2 44 100 22 101 17 44 7 1 1 1 33 105 29 33 66 105 29 5 23 93 103 44 64 23 7 102 101 33 1 22 1 1 33 105 29 92 7 6 5 33 105 29 - NordicTrack 1750 Treadmill | English Manual - Page 34
EXPLODED DRAWING D-Model No. NTL15809.2 R1010A 26 28 9 107 1 16 1 108 26 1 1 109 26 1 107 9 26 28 1 1 16 109 110 111 40 112 1 25 112 25 111 40 34 - NordicTrack 1750 Treadmill | English Manual - Page 35
EXPLODED DRAWING E-Model No. NTL15809.2 1 1 1 27 86 1 R1010A 26 39 36 94 1 31 26 1 1 106 88 35 - NordicTrack 1750 Treadmill | English Manual - Page 36
usage, or repairs not provided by an ICON authorized service center; to products used for commercial or rental purposes or as store display models; or to products transported or purchased outside the US. No other warranty beyond that specifically set forth above is authorized by ICON. ICON is
-
 1
1 -
 2
2 -
 3
3 -
 4
4 -
 5
5 -
 6
6 -
 7
7 -
8
-
9
-
10
-
11
-
12
-
13
-
14
-
15
-
16
-
17
-
18
-
19
-
20
-
21
-
22
-
23
-
24
-
25
-
26
-
27
-
28
-
29
-
30
-
31
-
32
-
33
-
34
-
35
-
36
 |
 |
www.nordictrack.com
CAUTION
Read all precautions and instruc-
tions in this manual before using
this equipment. Save this manual
for future reference.
Serial
Number
Decal
Model No. NTL15809.2
Serial No.
Write the serial number in the space
above for reference.
QUESTIONS?
If you have questions, or if parts are
damaged or missing,
DO NOT CON-
TACT THE STORE; please contact
Customer Care.
IMPORTANT: Please register this
product (see the limited warranty
on the back cover of this manual)
before contacting Customer Care.
CALL TOLL-FREE:
1-800-TO-BE-FIT
(1-800-862-3348)
Mon.–Fri. 6 a.m.–6 p.m. MT
Sat. 8 a.m.–4 p.m. MT
ON THE WEB:
www.nordictrackservice.com
USER'S MANUAL