NordicTrack C 600 Treadmill English Manual - Page 14
Tip: It may
 |
View all NordicTrack C 600 Treadmill manuals
Add to My Manuals
Save this manual to your list of manuals |
Page 14 highlights
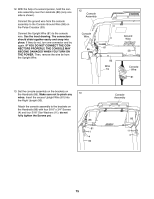
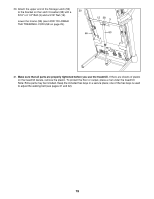
10. Identify the Right and Left Trays (27, 36). 10 Attach the Trays (27, 36) to the Console Base (64) with eight #8 x 1/2" Screws (1). Tip: It may be easier to start the two inside Screws and 1 then slide the Trays into place before tighten- ing the other six Screws. Tip: It may be necessary to rotate the Console Frame (18) upward when attaching the Trays (27, 36). 27 1 18 1 36 1 64 1 11. IMPORTANT: To avoid damaging the Pulse Crossbar (93), do not use power tools and do not overtighten the #10 x 3/4" Screws (9). Orient the Pulse Crossbar (93) as shown. Attach the Pulse Crossbar to the Handrails (86) with four #10 x 3/4" Screws (9) and four #10 Star Washers (5). First, start all four Screws. Next, slide the Crossbar as far as possible in the direction shown by the arrow. Then, tighten the Screws. Make sure not to pinch the Upright Wire (81). Firmly tighten the four 5/16" x 2 1/2" Screws (28). 11 9 86 5 28 93 9 86 81 5 28 14
-
 1
1 -
2
-
3
-
4
-
5
-
6
-
7
-
8
-
 9
9 -
 10
10 -
 11
11 -
 12
12 -
 13
13 -
 14
14 -
 15
15 -
 16
16 -
 17
17 -
 18
18 -
 19
19 -
20
-
21
-
22
-
23
-
24
-
25
-
26
-
27
-
28
-
29
-
30
-
31
-
32
-
33
-
34
-
35
-
36
-
37
-
38
-
39
-
40
 |
 |
