NordicTrack C 600 Treadmill English Manual - Page 16
Cover at an angle as you set it against
 |
View all NordicTrack C 600 Treadmill manuals
Add to My Manuals
Save this manual to your list of manuals |
Page 16 highlights
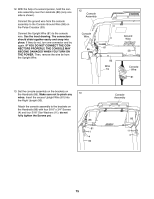
14. Attach the Pulse Crossbar (93) to the console assembly with six #8 x 1/2" Screws (1). Start all six Screws, and then tighten them. Firmly tighten the four 5/16" x 3/4" Screws (4). 14 Console Assembly 4 93 1 1 4 1 15. Check the gaps between the handrail assemblies (B, C) and the console assembly. If necessary, loosen the four #8 x 3/4" Screws (2) under the handrails and slide the handrails forward against the console assembly as indicated by the arrows. Then, retighten the Screws. Attach the Left Outside Upright Cover (87) and the Right Outside Upright Cover (96) to the Left and Right Uprights (89, 90) with two #8 x 3/4" Screws (2). Note: The top edge of each Outside Upright Covers needs to be inserted under the console assembly. Rotate each Cover at an angle as you set it against the Upright. Make sure not to overtighten the Screws. 15 Console Assembly 87 C 2 2 89 2 B 90 2 96 16
-
 1
1 -
2
-
3
-
4
-
5
-
6
-
7
-
8
-
9
-
10
-
 11
11 -
 12
12 -
 13
13 -
 14
14 -
 15
15 -
 16
16 -
 17
17 -
 18
18 -
 19
19 -
 20
20 -
 21
21 -
22
-
23
-
24
-
25
-
26
-
27
-
28
-
29
-
30
-
31
-
32
-
33
-
34
-
35
-
36
-
37
-
38
-
39
-
40
 |
 |
