NordicTrack T9 Uk Manual
NordicTrack T9 Manual
 |
View all NordicTrack T9 manuals
Add to My Manuals
Save this manual to your list of manuals |
NordicTrack T9 manual content summary:
- NordicTrack T9 | Uk Manual - Page 1
36102 E-mail: www.iconsupport.eu Write: ICON Health & Fitness, Ltd. c/o HI Group PLC, Express Way Whitwood, West Yorkshire WF10 5QJ UK USER'S MANUAL CAUTION Read all precautions and instructions in this manual before using this equipment. Save this manual for future reference. www.iconeurope.com - NordicTrack T9 | Uk Manual - Page 2
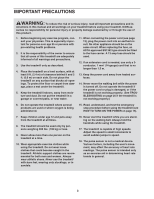
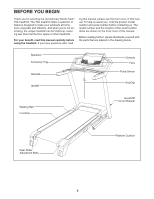
6 OPERATION AND ADJUSTMENT 13 HOW TO FOLD AND MOVE THE TREADMILL 23 TROUBLESHOOTING 25 EXERCISE GUIDELINES 28 PART LIST 29 missing or illegible, call the telephone number on the front cover of this manual and request a free replacement decal. Apply the decal in the location shown. Note: - NordicTrack T9 | Uk Manual - Page 3
in this manual and all warnings on your treadmill before using your treadmill. ICON assumes treadmill if the power cord or plug is damaged, or if the treadmill is not working properly. (See TROUBLESHOOTING on page 25 if the treadmill is not working properly.) 6. Do not operate the treadmill - NordicTrack T9 | Uk Manual - Page 4
procedures described in this manual. Never remove the motor hood un- less instructed to do so by an authorized ser- vice representative. Servicing other than the procedures in this manual should be performed by an authorized service representative only. 25. The treadmill is intended for in - NordicTrack T9 | Uk Manual - Page 5
NordicTrack® T9si treadmill. The T9si treadmill offers a selection of features designed to make your workouts at home more enjoyable and effective. And when youʼre not exercising, the unique treadmill can be folded shown on the front cover of this manual. Before reading further, please familiarize - NordicTrack T9 | Uk Manual - Page 6
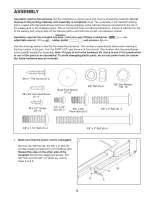
materials until assembly is completed. Note: The underside of the treadmill walking belt is coated with high-performance lubricant. During shipping, some number of the part, from the PART LIST near the end of this manual. The number after the parentheses is the quantity needed for assembly. Note: - NordicTrack T9 | Uk Manual - Page 7
2. With the help of a second person, carefully tip the treadmill onto its left side. Partially fold the Frame (57) so that the treadmill is more stable; do not fully fold the Frame yet. Remove and discard the two indicated bolts (A) and the shipping bracket (B). Cut the shipping ties securing the - NordicTrack T9 | Uk Manual - Page 8
86 95 6 92 10 25 88 97 25 6. With the help of a second person, carefully tip the treadmill onto its right side. Partially fold the Frame (57) so the treadmill is more stable; do not fully fold the Frame yet. Remove and discard the two indicated bolts (A) and the shipping bracket (B). Attach a Base - NordicTrack T9 | Uk Manual - Page 9
8. Set the console assembly face down on a soft surface to avoid scratching the console assembly. Identify the Right Handrail (105), which is marked with a sticker. Hold the Right Handrail near the console assembly. Next, insert the console wire through the indicated holes in the Right Handrail (105 - NordicTrack T9 | Uk Manual - Page 10
11. Identify the Left Accessory Tray (112) and the Right Accessory Tray (116). Attach the Left 11 Accessory Tray and the Right Accessory Tray to the console assembly with eight #8 x 1/2" Screws (2). 2 2 112 116 Console Assembly 12. Have a second person hold the console assembly near the - NordicTrack T9 | Uk Manual - Page 11
13. Attach the console assembly to the Uprights (85, 86) with four 3/8" x 1 1/4" Bolts (7) and four 3/8" Star Washers (10). Start all four Bolts before tightening any of them. See steps 5 and 7. Fully tighten the four 3/8" x 4" Bolts (6). 13 Console Assembly 10 10 7 10 7 85 7 86 10 7 14. - NordicTrack T9 | Uk Manual - Page 12
necessary to move the Frame back and forth to align the Storage Latch with the bracket. Lower the Frame (57) (see HOW TO LOWER THE TREADMILL FOR USE on page 24). 57 9 5 54 55 Large Barrel 36 95 9 5 16. Make sure that all parts are properly tightened before you use the - NordicTrack T9 | Uk Manual - Page 13
: If the power cord is damaged, it must be replaced with a manufacturer-recommended power cord. Socket on Treadmill See drawing 1. Plug the indicated end of the power cord into the socket on the treadmill. See drawing 2. Press the pins on the power cord into the metal clips in the adapter as - NordicTrack T9 | Uk Manual - Page 14
Each workout automatically controls the speed and incline of the treadmill as it guides you through an effective exercise session. You can even create www.iFit.com or call the telephone number on the front cover of this manual. iFit cards are also available at select stores. You can also listen to - NordicTrack T9 | Uk Manual - Page 15
. 2. Select the manual mode. Plug in the power cord (see page 13). Next, locate the reset/off circuit breaker on the treadmill frame near the power page 22. For simplicity, all instructions in this section refer to kilometers. To change the incline of the treadmill, press the Incline increase or - NordicTrack T9 | Uk Manual - Page 16
with the displays. The matrix-When you select the manual mode, the matrix will display a track that represents incline of the treadmill to the lowest setting. The incline must be at the lowest setting when you fold the treadmill to the storage position, or you may damage the treadmill. Next, remove - NordicTrack T9 | Uk Manual - Page 17
setting is too high or too low at any time during the workout, you can manually override the setting by pressing the Speed or Incline buttons; however, when the next segment of the workout begins, the treadmill will automatically adjust to the speed and incline settings for the next segment. To stop - NordicTrack T9 | Uk Manual - Page 18
pulse is not detected during the program, the speed and incline of the treadmill will not automatically adjust. When the first segment of the workout ends, high or too low at any time during the workout, you can manually override the setting by pressing the Speed or Incline buttons; however, when - NordicTrack T9 | Uk Manual - Page 19
setting can be programmed for each segment. To program speed and incline settings for the first segment, simply adjust the speed and incline of the treadmill as desired by pressing the Speed and Incline buttons. 6. Turn on the fans if desired. See step 7 on page 16. 7. When you are finished - NordicTrack T9 | Uk Manual - Page 20
the workout, press the Start button. The walking belt will begin to move at 2 KM/H. When the next segment of the workout begins, the treadmill will automatically adjust to the speed and incline settings programmed for the next segment. 4. Follow your progress with the displays. See step 5 on page - NordicTrack T9 | Uk Manual - Page 21
can manually override the setting by pressing the Speed or Incline buttons; however, when the next segment of the workout begins, the treadmill will decrease buttons on the console. During the workout, a personal trainer will guide you through the workout. If you are using a personal CD player - NordicTrack T9 | Uk Manual - Page 22
the walking belt has moved and the total number of hours that the treadmill has been used. The information mode also allows you to select miles chest pulse sensor, call the telephone number on the front cover of this manual. An "E" for English miles or an "M" for metric kilometers will appear - NordicTrack T9 | Uk Manual - Page 23
HOW TO FOLD AND MOVE THE TREADMILL HOW TO FOLD THE TREADMILL FOR STORAGE Before folding the treadmill, adjust the incline to the lowest position. If you do not do this, you may damage the treadmill when you fold it. Remove the key and unplug the power cord. CAUTION: You must be able to safely lift - NordicTrack T9 | Uk Manual - Page 24
USE 1. Hold the upper end of the treadmill with your right hand. Pull the latch knob to the left and hold it. It may be necessary to push the frame forward as you - NordicTrack T9 | Uk Manual - Page 25
TROUBLESHOOTING Most treadmill problems can be solved by following the steps below. Find the symptom that applies, and follow the steps listed. If further assistance is needed, please see the front cover of this manual. PROBLEM: The power does not turn on SOLUTION: a. Make sure that the power - NordicTrack T9 | Uk Manual - Page 26
treadmill for a few min- View utes to check for a correct speed reading. PROBLEM: The incline of the treadmill treadmill will automatically rise to the maximum incline level and then return to the minimum level. This will recalibrate the incline system. PROBLEM and run the treadmill for a few - NordicTrack T9 | Uk Manual - Page 27
PROBLEM: The walking belt is off-center or slips when walked on SOLUTION Be careful not to overtighten the walking belt. Then, plug in the power cord, insert the key, and run the treadmill for a few minutes. Repeat until the walk- ing belt is centered. b. If the walking belt slips when walked - NordicTrack T9 | Uk Manual - Page 28
important for persons over age 35 or persons with pre-existing health problems. The pulse sensor is not a medical device. Various factors may affect key to achieving results. You can use your heart rate as a guide to find the proper intensity level. The chart below shows recommended heart rates - NordicTrack T9 | Uk Manual - Page 29
the parts listed below, see the EXPLODED DRAWING near the end of this manual. Key No. Qty. Description Key No. Qty. Description 1 10 2 Left Foot Rail Warning Decal Walking Platform Cushion Walking Platform Walking Belt Cushion Track Belt Guide Isolator Frame Spacer 51 1 52 1 53 1 54 1 55 1 56 1 - NordicTrack T9 | Uk Manual - Page 30
M/F 8" Blue Wire, 2F 4" Black Wire, 2F 4" Black Wire, M/F 8" Green/Yellow Wire, F/R 4" Green/Yellow Wire, w/decal 8" White Wire, 2F 4" Red Wire, M/F Userʼs Manual Note: Specifications are subject to change without notice. For information about ordering replacement parts, see the back cover of this - NordicTrack T9 | Uk Manual - Page 31
EXPLODED DRAWING A-Model No. NETL99809.1 R1109A 31 26 26 2 42 26 47 49 34 48 28 27 26 28 44 K Niebergall 28 28 43 46 45 17 50 16 24 58 32 59 30 20 17 35 24 60 31 13 30 20 32 61 28 28 47 58 35 28 24 26 62 40 41 31 9 5 13 51 52 19 16 50 2 57 48 34 27 28 26 - NordicTrack T9 | Uk Manual - Page 32
EXPLODED DRAWING B-Model No. NETL99809.1 1 R1109A 37 1 37 1 37 63 64 65 24 67 24 33 24 33 68 70 66 29 72 73 24 71 18 74 24 75 76 77 12 15 12 78 14 12 79 14 32 18 24 80 12 81 82 84 83 - NordicTrack T9 | Uk Manual - Page 33
EXPLODED DRAWING C-Model No. NETL99809.1 10 97 7 R1109A 10 10 7 7 86 10 7 85 10 6 22 6 88 38 25 25 21 89 10 25 87 9 23 38 91 94 90 95 5 23 93 9 4 88 9 96 9 11 93 4 36 5 97 94 93 92 4 9 96 11 5 93 4 33 - NordicTrack T9 | Uk Manual - Page 34
EXPLODED DRAWING D-Model No. NETL99809.1 101 R1109A 100 2 2 104 99 2 3 2 2 2 10 8 2 102 2 103 2 2 1 105 2 106 2 107 2 108 10 2 8 3 2 1 34 - NordicTrack T9 | Uk Manual - Page 35
EXPLODED DRAWING E-Model No. NETL99809.1 24 114 24 109 111 98 R1109A 112 2 120 121 122 2 2 2 2 113 2 2 2 118 24 24 110 115 2 2 39 119 39 39 2 2 2 69 2 125 24 124 2 2 2 123 117 1 117 2 2 116 2 1 35 - NordicTrack T9 | Uk Manual - Page 36
) • the key number and description of the replacement part(s) (see the PART LIST and the EXPLODED DRAWING near the end of this manual) RECYCLING INFORMATION This electronic product must not be disposed of in municipal waste. To preserve the environment, this product must be recycled after its useful
-
 1
1 -
 2
2 -
 3
3 -
 4
4 -
 5
5 -
 6
6 -
 7
7 -
8
-
9
-
10
-
11
-
12
-
13
-
14
-
15
-
16
-
17
-
18
-
19
-
20
-
21
-
22
-
23
-
24
-
25
-
26
-
27
-
28
-
29
-
30
-
31
-
32
-
33
-
34
-
35
-
36
 |
 |
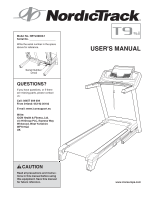
Serial Number
Decal
Model No. NETL99809.1
Serial No.
Write the serial number in the space
above for reference.
CAUTION
Read all precautions and instruc-
tions in this manual before using
this equipment. Save this manual
for future reference.
USER'S MANUAL
www.iconeurope.com
QUESTIONS?
If you have questions, or if there
are missing parts, please contact
us:
Call: 08457 089 009
From Ireland: 053 92 36102
E-mail: www.iconsupport.eu
Write:
ICON Health & Fitness, Ltd.
c/o HI Group PLC, Express Way
Whitwood, West Yorkshire
WF10 5QJ
UK