NordicTrack Walkfit 4000 Owners Manual - Page 4
Assembly
 |
View all NordicTrack Walkfit 4000 manuals
Add to My Manuals
Save this manual to your list of manuals |
Page 4 highlights
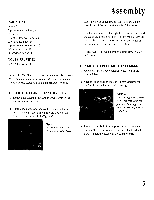
Assembly PARTS LIST Base (1) Upper-body exerciser (1) Bolts (4) Elevation legs with wheels (2) Elevation leg pins (2) Upper-body exerciser pin (1) Workout monitor (1) Information packet (1) TOOLS PROVIDED 5/32" Allen wrench (1) Unpack the WalkFit exerciser parts from the two large boxes. We recommend unpacking your WalkFit where you intend to use it. Please retain all packing materials for 30 days. 3. Place the elevation leg into the sleeve so the adjustment holes of the leg run the width of the WalkFit. 4. Insert an elevation pin through the elevation sleeve and the leg at the desired position. Be sure the pin extends through both sides of the outer sleeve. Rotate the pin against the tube to secure the leg in place. 5. Repeat steps 1 through 4 with the other elevation leg and sleeve. ATTACH THE UPPER -BODY EXERCISER 1. Attach the upper-body exerciser to the front of the treadmill base. 2. Align the four holes in the upper-body exerciser with the four holes in the treadmill base (Figure 2). ATTACH THE FRONT ELEVATION LEGS 1. Remove the elevation legs and the two elevation leg pins from the parts bag. 2. Tilt the WalkFit to one side so there is enough clearance to slide an elevation leg into the sleeve at the front of the treadmill deck (Figure 1). Figure 2: Attach the upper-body exerciser to the base. Align the four holes in the upper-body exerciser with thefour holes in the base. Figure 1: Tilt the WalkFit to insert the elevation legs with wheels. 3. Insert the four bolts from top to bottom through the holes in the upper-body exerciser and the treadmill base. Tighten the bolts with the Allen wrench. 3
-
 1
1 -
 2
2 -
 3
3 -
 4
4 -
 5
5 -
 6
6 -
 7
7 -
 8
8 -
 9
9 -
 10
10 -
11
-
12
-
13
-
14
-
15
-
16
-
17
-
18
-
19
 |
 |
