Oki B4350n PostScript 3 emulation Kit Installation Instructions - Page 2
Installation Instructions - okidata
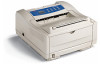 |
View all Oki B4350n manuals
Add to My Manuals
Save this manual to your list of manuals |
Page 2 highlights
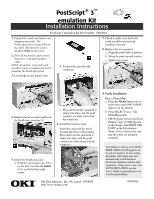
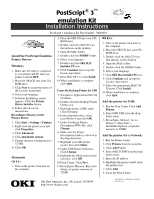
PostScript® 3™ emulation Kit Installation Instructions PostScript 3 emulation Kit Part Number: 70049601 Install the PostScript Emulation Printer Drivers Windows 1. Make sure the cable is connected to your printer and PC and your printer is turned OFF. 2. Place the OKI CD into your CDROM drive. 3. Click Next to accept the terms of the License Agreement. 4. Select your language. 5. Software Installation screen appears. Click the Printer Driver Installer button. 6. Follow the on-screen instructions. Reconfigure Memory in the Printer Driver 1. Click Start > Settings > Printers. 2. Right-click the printer icon and click Properties. 3. Click Advanced. 4. Click Installable options. 5. Change memory configuration to 32 MB. 6. Click OK. Macintosh OS 9.1+ 1. Turn on the printer, then turn on the computer. 2. Place the OKI CD into your CDROM drive. 3. Double-click the OKI CD icon that appears on the desktop. 4. Open the MAC folder. 5. Double-click the PSDRV folder. 6. Select your language. 7. Double-click the OKI MAC Installer PS icon. 8. Click Continue and accept the license agreement. 9. Select MAC OS 9.1+. Click Install. 10.When installation is complete, click Quit. Create the Desktop Printer for USB 1. Navigate to Applications/Mac OS 9 Utilities. 2. Double-click the Desktop Printer Utility icon. 3. Highlight printer (USB) under Create Desktop. 4. In the drop-down box, select LaserWriter 8 and click OK. 5. Under PostScript Printer Description (PPD) file, click Change. 6. Make sure the Printer Descriptions folder is selected in the drop-down box. 7. Highlight your OKI printer model, then click Select. 8. Under USB Printer Selection, Click Change. 9. Highlight the OKI printer model you have, click OK. 10.Click Create. Click Save. 11.Reconfigure Memory: Run Auto Setup; set printer memory to 32MB. OS X.1+ 1. Turn on the printer, then turn on the computer. 2. Place the OKI CD into your CDROM drive. 3. Double-click the OKI CD icon that appears on the desktop. 4. Open the MAC folder. 5. Double-click the PSDRV folder. 6. Select your language. 7. Click OKI Mac Installer PS icon. 8. Click Continue and accept the License Agreement. 9. Select the appropriate MAC OS X driver. Click Install. 10.When installation is complete, click Quit. Add the printer for USB: 1. Run the Print Center. Click Add Printer. 2. Select OKI USB from the dropdown menu. 3. Reconfigure Memory: Go to Printers > Show Info > Installable Options; set printer memory to 32MB. Add the printer for a Network: 1. Run the Printer Center. 2. Click Printers from the menu bar. 3. Click Add Printer 4. Select OKI TCP/IP from the drop down menu. 5. Enter the IP address 6. Highlight the printer model from the product list. 7. Click Add. 8. Close the Print Center. Oki Data Americas, Inc., Mt. Laurel, NJ 08054 http://www.okidata.com PostScript is a trademark of Adobe Systems Inc.
-
 1
1 -
 2
2
 |
 |
