Oki C5100n Memory DIMM Installation (English, Franais, Espa?ol, Portugu - Page 13
Utilice el tornillo de mariposa para fijar el panel., Vuelvacolocar el panel lateral de la impresora.
 |
View all Oki C5100n manuals
Add to My Manuals
Save this manual to your list of manuals |
Page 13 highlights
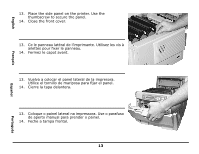
English 13. Place the side panel on the printer. Use the thumbscrew to secure the panel. 14. Close the front cover. c51_07_unscrewpanel.jpg 13. Ce le panneau latéral de l'imprimante. Utilisez les vis à ailettes pour fixer le panneau. 14. Fermez le capot avant. Français Español 13. Vuelva a colocar el panel lateral de la impresora. Utilice el tornillo de mariposa para fijar el panel. 14. Cierre la tapa delantera. Português 13. Coloque o painel lateral na impressora. Use o parafuso de aperto manual para prender o painel. 14. Feche a tampa frontal. 13
-
 1
1 -
2
-
3
-
4
-
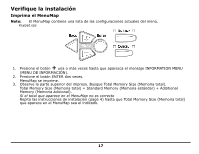
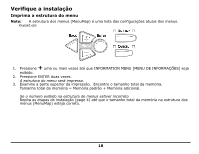
5
-
6
-
7
-
 8
8 -
 9
9 -
 10
10 -
 11
11 -
 12
12 -
 13
13 -
 14
14 -
 15
15 -
 16
16 -
 17
17 -
 18
18 -
19
-
20
-
21
-
22
-
23
-
24
-
25
-
26
-
27
-
28
-
29
-
30
-
31
-
32
-
33
-
34
 |
 |

13
English
Français
Español
Português
c51_07_unscrewpanel.jpg
13.
Place the side panel on the printer. Use the
thumbscrew to secure the panel.
14.
Close the front cover.
13.
Ce le panneau latéral de l’imprimante. Utilisez les vis à
ailettes pour fixer le panneau.
14.
Fermez le capot avant.
13.
Vuelva a colocar el panel lateral de la impresora.
Utilice el tornillo de mariposa para fijar el panel.
14.
Cierre la tapa delantera.
13.
Coloque o painel lateral na impressora. Use o parafuso
de aperto manual para prender o painel.
14.
Feche a tampa frontal.