Oki C9600n Changing the Inverter Unit for use with the 4-Tray Finisher - Page 1
Oki C9600n Manual
 |
View all Oki C9600n manuals
Add to My Manuals
Save this manual to your list of manuals |
Page 1 highlights
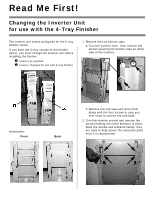
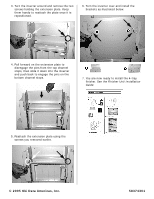
Read Me First! Changing the Inverter Unit for use with the 4-Tray Finisher The inverter unit comes configured for the 5-tray finisher option. If you have the 4-tray version of the finisher option, you must change the inverter unit before installing the finisher: X Inverter as supplied Y Inverter changed for use with 4-tray finisher. 1. Remove the two bottom caps: a. Turn the inverter over, then remove the screws securing the bottom caps on either side of the inverter. Orientation: Front Back b. Remove the end caps and store them along with the four screws in case you ever need to convert the unit back. 2. Turn the inverter around and remove the screws holding the metal brackets in place. Keep the screws and brackets handy: they are used to help secure the extension plate once it is repositioned.
-
 1
1 -
 2
2
 |
 |
