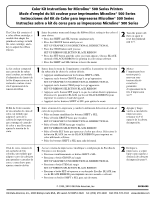
Oki ML591 Color Kit Instructions for Microline 500 Series Printers - Page 2
Important, Importante, ¡Importante, Important
 |
View all Oki ML591 manuals
Add to My Manuals
Save this manual to your list of manuals |
Page 2 highlights
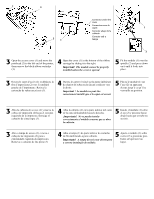
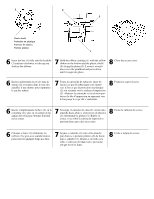
1 2 Connector under the cover Connecteur sous le capot 1 Conector abajo de la cubierta 3 1 Conector sob a tampa 2 3 Open the access cover (1) and move the printhead (2) to the left end of the printer, then remove the black ribbon cartridge (3). 4 Open the cover (1) in the bottom of the ribbon carriage by sliding it to the right. Important! The module cannot be properly installed unless the cover is opened. 5 Fit the module (1) over the spindle (2) and press down on it until it locks into place. 3 Ouvrez le capot d'accès (1) et déplacez la tête d'impression (2) vers l'extrémité gauche de l'imprimante. Retirez la cartouche de ruban encré noir (3). 4 Ouvrez le capot (1) situé sur la partie inférieure du chariot de ruban en le faisant coulisser vers la droite. Important ! Le module ne peut être correctement installé que si le capot est ouvert. 5 Placez le module (1) sur l'axe (2) en appuyant dessus jusqu'à ce qu'il se verrouille en position. 3 Abra la cubierta de acceso (1) y mueva la cabeza de impresión (2) hacia el extremo izquierdo de la impresora. Extraiga el cartucho de cinta negra (3). 4 Abra la cubierta (1) en la parte inferior del carro de la cinta deslizándolo hacia la derecha. ¡Importante! No se puede instalar correctamente el módulo a menos que se abra la cubierta. 5 Instale el módulo (1) sobre el eje (2) y presione hacia abajo hasta que se trabe en su sitio. 3 Abra a tampa de acesso (1) e mova o cabeçote de impressão (2) para a extremidade esquerda da impressora. Remova o cartucho de fita preta (3). 4 Abra a tampa (1) da parte inferior do cartucho de fita deslizando-a para a direita. Importante! A tampa deverá estar aberta para a correta instalação do módulo. 5 Ajuste o módulo (1) sobre o eixo (2) e pressione para baixo até que trave no lugar.
-
 1
1 -
 2
2 -
 3
3 -
 4
4
 |
 |
