Olympus C-720 Camedia Master 4.1 Instruction Manual (4.9MB) - Page 105
Saving a slide show as a screen saver
 |
UPC - 072874309558
View all Olympus C-720 manuals
Add to My Manuals
Save this manual to your list of manuals |
Page 105 highlights
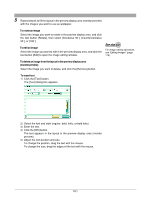
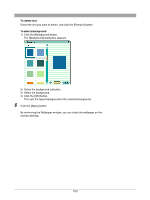
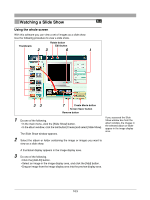
To select a sound file 1) Check the [Select File] box. 2) Click the [Browse] button. The [Select Sound] dialog box appears. 3) Select the [Album] or [Media] tab. 4) Click the w button, and select the album or folder containing the sound file. A list of sound files appears. 5) Select the sound file, and click the [Add] button. This adds the sound file to the list. 6) Click the [OK] button. 6 Click the [Preview] button. The slide show plays on the screen in the preview display area. When all the images have been shown, playback ends automatically. 7 Click the [Full Screen] button. This plays the slide show on the whole display screen. When you move the mouse, a controller comprising five playback control buttons (play,pause, previous, next, and stop) appears in the lower right of the monitor screen. To stop playback Click the stop button of the controller or press the Esc key. Saving a slide show as a screen saver After creating a slide show, click the [Screen Saver] button in the Slide Show window. • The screen saver function is not available in the Macintosh version. • Only one screen saver can be created. Detailed settings for the screen saver follow the operating system settings. 105
-
 1
1 -
2
-
3
-
4
-
5
-
6
-
7
-
8
-
9
-
10
-
11
-
12
-
13
-
14
-
15
-
16
-
17
-
18
-
19
-
20
-
21
-
22
-
23
-
24
-
25
-
26
-
27
-
28
-
29
-
30
-
31
-
32
-
33
-
34
-
35
-
36
-
37
-
38
-
39
-
40
-
41
-
42
-
43
-
44
-
45
-
46
-
47
-
48
-
49
-
50
-
51
-
52
-
53
-
54
-
55
-
56
-
57
-
58
-
59
-
60
-
61
-
62
-
63
-
64
-
65
-
66
-
67
-
68
-
69
-
70
-
71
-
72
-
73
-
74
-
75
-
76
-
77
-
78
-
79
-
80
-
81
-
82
-
83
-
84
-
85
-
86
-
87
-
88
-
89
-
90
-
91
-
92
-
93
-
94
-
95
-
96
-
97
-
98
-
99
-
 100
100 -
 101
101 -
 102
102 -
 103
103 -
 104
104 -
 105
105 -
 106
106 -
 107
107 -
 108
108 -
 109
109 -
 110
110 -
111
-
112
-
113
-
114
-
115
-
116
-
117
-
118
-
119
-
120
-
121
-
122
-
123
-
124
-
125
-
126
-
127
-
128
-
129
-
130
-
131
-
132
-
133
-
134
-
135
-
136
-
137
-
138
-
139
-
140
-
141
-
142
-
143
-
144
-
145
-
146
-
147
-
148
-
149
 |
 |
