Olympus DS-40 DS-40 Instructions (English)
Olympus DS-40 - Digital Voice Recorder Manual
 |
UPC - 050332159297
View all Olympus DS-40 manuals
Add to My Manuals
Save this manual to your list of manuals |
Olympus DS-40 manual content summary:
- Olympus DS-40 | DS-40 Instructions (English) - Page 1
VOICE RECORDER DS-50 DS-40 DS-30 INSTRUCTIONS EN INSTRUCTIONS ES Thank you for purchasing an Olympus Digital Voice Recorder. Please read these instructions for information about using the product correctly and safely. Keep the instructions handy for future reference. To ensure successful recordings - Olympus DS-40 | DS-40 Instructions (English) - Page 2
is found, please contact our Customer Support Center. ● Any liability for passive damages or damage of any kind occurred due to data loss incurred by a defect of the product, repair performed by the third party other than Olympus or an Olympus authorized service station, or any other reasons is - Olympus DS-40 | DS-40 Instructions (English) - Page 3
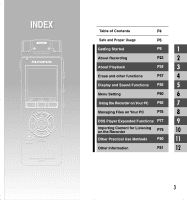
P47 4 Display and Sound Functions P55 5 Menu Setting P60 6 Using the Recorder on Your PC P65 7 Managing Files on Your PC P76 8 DSS Player Expanded Functions P77 9 Importing Content for Listening on the Recorder P79 10 Other Practical Use Methods P80 11 Other Information P81 12 - Olympus DS-40 | DS-40 Instructions (English) - Page 4
Function (Noise Cancel) ... 43 Set the Voice Filter (Voice Filter 45 4 Erase and other functions Erasing 47 Index Marks and Temp Marks 50 Formatting the Recorder (Format 52 5 Display and Sound Functions LCD Display Information 55 Guidance (Voice Guide 57 6 Menu Setting Menu Setting Method 60 - Olympus DS-40 | DS-40 Instructions (English) - Page 5
Contents 7 Using the Recorder on Your PC Saving Files in Your PC 65 Using DSS Player Software 67 Installing Software 69 Using Online Help 72 Connecting to Your PC 73 Running DSS Player 75 8 Managing Files on Your PC Copying Voice Guide Data 76 9 DSS Player Expanded Functions Upgrade Function - Olympus DS-40 | DS-40 Instructions (English) - Page 6
you can use an online expanded version of this instruction manual, allowing you to learn more about the digital voice recorder. If the DSS Player is installed, click on the [Start] button, select [All Programs], then [OLYMPUS DSS Player], then click on [DS-50/40/30 ONLINE INSTRUCTIONS]. You can read - Olympus DS-40 | DS-40 Instructions (English) - Page 7
). ● Keep the unit out of the reach of children. Recorded content in memory may be destroyed or erased by operating mistakes, unit malfunction, or during third party other than Olympus or an Olympus authorized service station, or any other reasons is excluded from the - Olympus DS-40 | DS-40 Instructions (English) - Page 8
to burn yourself, and; 2 call your dealer or local Olympus representative for service. 8 AC Adapter Warning • Do not attempt to disassemble, repair power outlet, and; 3 call your dealer or local Olympus representative for servicing. Continued use of the AC adapter under these circumstances could - Olympus DS-40 | DS-40 Instructions (English) - Page 9
audible content. The recorder stores highly compressed WMA (Windows Media Audio) format voice messages in integrated flash memory. (☞ P79) It can also play back WMA and MP3 (MPEG-1/MPEG-2 Audio Layer-3) format files. (☞ P34, 65) ● A exclusive remote control (supplied with the DS-50 only) can be - Olympus DS-40 | DS-40 Instructions (English) - Page 10
other similar noises while recording.(☞ P32) ● Index mark and temp USB microphone or USB speaker. ● The "DSS Player" can be upgraded to a "DSS Player Plus", which is equipped with a enhanced functionality (Option). (☞ P77) • If a commercial voice recognition software is utilized, the recorded voice - Olympus DS-40 | DS-40 Instructions (English) - Page 11
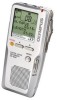
/Podcast button * OK/MENU button ( ERASE button ) EAR (Earphone) jack - MIC SENSE(Microphone 8 POWER/HOLD switch 9 Strap hole 0 Record/Play indicator light (LED) ! Display (LCD panel) @ LIST/INDEX button Sensitivity) switch = PC (USB) terminal q Battery cover w Power jack e Built-in speaker 11 - Olympus DS-40 | DS-40 Instructions (English) - Page 12
supplied with the DS-50 only) Recording and stop operations can be 1 performed by connecting the remote controller to the recorder. The remote ) Identification of Parts r t r MIC (Microphone) jack t REC/STOP switch y Clip 12 Display in the stereo recording mode Display in the playback mode 1 - Olympus DS-40 | DS-40 Instructions (English) - Page 13
appears on the display, replace the batteries as soon as possible. When the battery is too weak, "Battery Low" appears on the display and the recorder shuts down. When changing batteries, AAA alkaline batteries or Olympus Ni-MH batteries (☞P14) are recommended. 13 - Olympus DS-40 | DS-40 Instructions (English) - Page 14
Ni-MH rechargeable batteries from Olympus can be used in the recorder. Use them with the BU-400 1 Olympus Ni-MH Rechargeable Battery Charger in while recording using batteries, it may not be possible to play back the voice data being recorded. Warning • Always stop recording before connection or - Olympus DS-40 | DS-40 Instructions (English) - Page 15
appears, the power will be turned on. The resume function will bring the recorder back to the stop position in memory before power was turned off. Turning Off stop position before the power is turned off. Power save mode If the recorder is on and stops for 10 minutes or longer (default), the display - Olympus DS-40 | DS-40 Instructions (English) - Page 16
position, the current conditions will be preserved, and all buttons and switches will be disabled.This feature is useful when the recorder has to be carried in a bag or pocket. Set the recorder to HOLD mode Slide the POWER/HOLD switch to the HOLD position. After "Hold" appears on the display, the - Olympus DS-40 | DS-40 Instructions (English) - Page 17
is automatically stored for each file. Setting the date and time beforehand enables easier file management. When you use the recorder for the first time after purchasing it, or turn the power on after having removed the batteries for one minute or longer to 1 change them - Olympus DS-40 | DS-40 Instructions (English) - Page 18
1 Notes • If you press the OK button during the setup operation, the recorder will save the items that were set to that point. • After setup, a the guidance is not required, select "Off", and the screen goes into "Voice Guide" setup (☞P57). If you don't want the guidance feature, select "Off". - Olympus DS-40 | DS-40 Instructions (English) - Page 19
A" through "Folder E" are voice-recording folders, so choose one of these five folders when recording on this recorder. Up to 200 files can the "Music" folder including "Music" and "Podcast". • When using Windows Media Player 10, click [Start Sync] instead of setting the synchronization options. - Olympus DS-40 | DS-40 Instructions (English) - Page 20
the Audible mode. Open the "Podcast" folder While the recorder is stopped, press the Podcast button for one second or longer. ➥ If the "Podcast" folder under the "Music" folder is opened, a list of files and folders within the folder will appear. For "Podcast" 20 please see Online manual. - Olympus DS-40 | DS-40 Instructions (English) - Page 21
Play button while a list of files is on display. Selecting "Audible" folder Selecting "Chapter 3" The recorder switches to the Audible mode. When the PLAY button is pressed, the recorder starts to play back a file from the Playback Position. Selecting "Music" folder Selecting "Contents" folder - Olympus DS-40 | DS-40 Instructions (English) - Page 22
DS50 0001.WMA Extension 1 File number : A serial number automatically assigned by a Digital Voice Recorder. User ID : The name that has been set on the Digital Voice Recorder. The default name on the Digital Voice Recorder is "DS-50" , "DS-40" or "DS-30" . The user ID can be modified with DSS Player - Olympus DS-40 | DS-40 Instructions (English) - Page 23
, and exclusive remote control (provided with the DS-50 only). Choose a recording method according to your need. 2 Stereo recording using the exclusive stereo microphone Plug the exclusive stereo microphone into the recorder's MIC/ REMOTE jack for stereo recording in ST XQ and ST HQ modes and - Olympus DS-40 | DS-40 Instructions (English) - Page 24
Use the remote control for operation Plug the exclusive remote control into the recorder's MIC/REMOTE jack to use the remote control to operate the recorder. Connect the exclusive remote control to the recorder's MIC/REMOTE jack. 2 ➥ Use the REC/STOP switch on the exclusive remote control to - Olympus DS-40 | DS-40 Instructions (English) - Page 25
folder. 1 1 Press the FOLDER button to choose a folder in which to make a recording. 2 Every time the FOLDER button is pressed,folders will switch (☞ P20). Recording 2 Press the REC button to start recording. The record/play indicator light glows red. Turn the microphone in the direction of - Olympus DS-40 | DS-40 Instructions (English) - Page 26
be displayed when the memory or folder capacity is full. Delete any unnecessary files before recording any further (☞ P.47). Recording Pause Press the REC button while recording. ➥ "Rec Pause" will flash on the display. • The recorder will time out after 2 hours when left in "Rec Pause". Resume - Olympus DS-40 | DS-40 Instructions (English) - Page 27
be adjusted by pressing the VOLUME (+) or VOLUME (-) button. Connect the earphone to the EAR jack on the recorder. ➥ After recording has started, you can hear the sound being 2 Recording recorded through the earphone. If the earphone is connected, no sound will come from the speaker. ... Notes - Olympus DS-40 | DS-40 Instructions (English) - Page 28
threshold volume level, the built-in Variable Control Voice Actuator (VCVA) starts recording automatically, and stops when the volume drops below the threshold level. The VCVA feature extends recording time and conserves memory by stopping recording during silent periods, which helps the playback to - Olympus DS-40 | DS-40 Instructions (English) - Page 29
to the ambient (background) noise. b Level meter (varies according to the sound volume being recorded) c Start level (moves to the right/left according to the set level) Using the Variable Control Voice Actuator ...Notes • The start/stop actuation level also varies depending on the selected - Olympus DS-40 | DS-40 Instructions (English) - Page 30
stopped, press the MENU button for 1 second or longer. 1 "Rec Mode" will be displayed on the screen. (☞ P60, 62) 2 2 Press the OK or 9 button. The recording mode setup process begins. 3 Press the + or - button to choose from "ST XQ", "ST HQ", "HQ", "SP" and "LP". 4 4 Press the OK button to - Olympus DS-40 | DS-40 Instructions (English) - Page 31
is adjustable to meet recording needs. While the recorder is stopped or during recording, slide the Mic Sense switch and select DICT( ): Lowest recording sensitivity suitable for dictation. a Microphone sensitivity display ...Notes • When the speaker's voice is to be recorded clearly, set it - Olympus DS-40 | DS-40 Instructions (English) - Page 32
a Low Cut Filter function to minimize low-frequency sounds and record voices more clearly. This function can reduce noise from air conditioners, projectors and other similar noises. 2 2 1 While the recorder is stopped or during recording, press the MENU button for 1 second or longer. The menu - Olympus DS-40 | DS-40 Instructions (English) - Page 33
, press the 0 button to close the menu screen. Set the Low Cut Filter Recommended settings by recording condition Recording condition Microphone Recommended settings Microphone Recoding Modes Sensitivity Low Cut Filter Conferences with large crowds and lectures in large rooms Meetings - Olympus DS-40 | DS-40 Instructions (English) - Page 34
MP3 format files. To play back a file recorded with other machines, you need to transfer (copy) it from a computer. Files saved in the Audible folder can play back in the Audible mode. For operation methods in the Audible mode, see Online manual. 3 1 1 Press the FOLDER button to choose a folder - Olympus DS-40 | DS-40 Instructions (English) - Page 35
Press the PLAY or OK button to start playback. The record/play indicator light glows green. For files created using machines other than this recorder, the file format will appear on the display. ....MP3 change the display patterns (☞ P55). The displays indicated in this manual are default. 35 - Olympus DS-40 | DS-40 Instructions (English) - Page 36
will resume normal playback. • If there is an index mark or temp mark (☞P50) in the middle of the file, the recorder will stop at that location. • The recorder stops when it reaches the beginning of the file. Continue pressing the 0 button to proceed with the review from the end of the previous file - Olympus DS-40 | DS-40 Instructions (English) - Page 37
playback or fast playback. ➥ The previous file is cued and playback starts at the previously set speed.* • If there is an index mark or temp mark (☞P50) in the middle of the file, the recorder will stop at that location. * If the skip space is set at other than file skip, the - Olympus DS-40 | DS-40 Instructions (English) - Page 38
Playing 3 Playback Through Earphone An earphone can be connected to the EAR jack of the recorder for listening. ➥ When the earphone is used, the recorder speaker will be switched-off...Notes • To avoid irritation to the ear, insert the earphone after turning down the volume level. • When you listen - Olympus DS-40 | DS-40 Instructions (English) - Page 39
Play Mode (Play Mode) There are six play modes. You can choose whether to play by file or folder, or all files stored in the recorder. 2 1 While the recorder is stopped or during playback, press the MENU button for 1 second or longer. The menu opens. (☞ P60, 62) 1 2 Press the + or - button to - Olympus DS-40 | DS-40 Instructions (English) - Page 40
0 button is pressed, the setting will be canceled and it will return to the menu. 6 Press the STOP button to close the menu. If the recorder goes to the menu screen 3 5 during playback, press the 0 button to close the menu screen. An icon will appear on the display according to the - Olympus DS-40 | DS-40 Instructions (English) - Page 41
The " Play" message appears, and repeat playback will start. The recorder repeatedly plays back the segment until the segment repeat playback is canceled. speed can be changed during segment repeat playback as well. If an index mark and temp mark (☞ P50) are inserted or eliminated during segment - Olympus DS-40 | DS-40 Instructions (English) - Page 42
How to begin segment repeat playback ÅC@ancel the Segment Repeat Playback Function Press the OK button. ➥ Pressing the OK button will release segment repeat playback and stop playback. Press the STOP button. ➥ Pressing the STOP button will release segment repeat playback 3 and stop playback. - Olympus DS-40 | DS-40 Instructions (English) - Page 43
surroundings, adjust the Noise Cancel setting level. Noise will be reduced in the file when it's played back for better sound quality. 2 1 While the recorder is stopped or during playback, press the MENU button for 1 second or longer. The menu opens. (☞ P60, 62) 1 2 Press the + or - button to - Olympus DS-40 | DS-40 Instructions (English) - Page 44
Cancel Function (Noise Cancel) 6 Press the STOP button to close the menu. If the recorder goes to the menu screen during playback, press the 0 button to close the menu 6 fast playback/slow playback. • Noise Cancel is not available while the Voice Filter (☞ P45) is set. Noise Cancel Function 44 - Olympus DS-40 | DS-40 Instructions (English) - Page 45
filter setup process begins. 4 Press the + or - button to choose between "On" and "Off". On: Voice Filter will be turned on. 3 Off: Voice Filter will be canceled. If the recorder goes to the menu screen during playback, move the cursor to change playback sound accordingly. 5 5 Press the OK - Olympus DS-40 | DS-40 Instructions (English) - Page 46
Press the STOP button to close the menu. If the recorder goes to the menu screen 6 during playback, press the 0 button to close the menu screen. If it is set to "On", will appear on the display. a Voice Filter indicator 3 ...Note • Voice Filter is not available while Noise Cancel is set. Set - Olympus DS-40 | DS-40 Instructions (English) - Page 47
4 Erase and other functions Erasing Erasing One File at a Time A selected file can be erased from a folder. 1 Press the FOLDER button to choose a folder. 1 Every time the FOLDER button is pressed, it cycles through folders and the List display will appear (☞P20). 4 2 2 Press the + or - - Olympus DS-40 | DS-40 Instructions (English) - Page 48
{ Erasing Erasing Erase All Files from a Folder All files in a folder can be erased simultaneously. The locked files and the files set to read-only on the PC will not be erased. 1 1 Press the FOLDER button to select the folder in which you want to erase all files. 4 2 Press the ERASE button - Olympus DS-40 | DS-40 Instructions (English) - Page 49
to read-only will not be erased. • If an action is not selected within eight seconds on the "Cancel", "Erase", or "All Erase" screens, the recorder will return to stop status. • It may take over 10 seconds to complete erasing. Never turn the power off or remove batteries during this time - Olympus DS-40 | DS-40 Instructions (English) - Page 50
quickly find a location you want to listen to in fast forward and fast rewind (☞P36) and when cuing a file (☞P37). Index marks cannot be placed on files created on machines other than Olympus IC recorders, but temp marks can be placed instead to temporarily remember desired locations. Setting an - Olympus DS-40 | DS-40 Instructions (English) - Page 51
automatically move up. Temp marks are temporary markings, so if you move to another file, switch to the list screen, or connect the recorder to a computer, they will be automatically erased. ...Notes • Up to 16 index and temp marks can be set in a file. If you try to place more than 16 - Olympus DS-40 | DS-40 Instructions (English) - Page 52
these features will not be available in the future. If you erase data by mistake, connect the recorder to a computer and use DSS Player to copy it to the recorder (☞P76). 2 4 1 While the recorder is stopped, press the MENU button for 1 second or longer. ☞ The menu opens. ( P60, 62) 1 2 Press the - Olympus DS-40 | DS-40 Instructions (English) - Page 53
" will turn on. 5 { 4 6 6 Press the + button again to choose "Start". 7 7 Press the OK button. Formatting begins and an indicator flashes on the display. Formatting the Recorder { "Format Done" displays when formatting ends. 53 - Olympus DS-40 | DS-40 Instructions (English) - Page 54
during formatting because data may be corrupted. It may take over 10 seconds to complete erasing. • Never format the recorder from a PC. • After formatting, recorded audio file names may start from 0001. • Once the recorder is formatted, the music files with DRM may not be transferred to the - Olympus DS-40 | DS-40 Instructions (English) - Page 55
5 Display and Sound Functions LCD Display Information The LCD screen on the recorder can display 3 different format of information by pressing the DISPLAY button. This help review and confirm different recorder settings and file information. 1 Press the DISPLAY button. The LCD display views will - Olympus DS-40 | DS-40 Instructions (English) - Page 56
not been reached). The audio input level display varies, depending on a stereo recording or a monaural recording. 2 Remaining memory bars/ Remaining recording time/VCVA recording level meter Display in the stereo recording mode The remaining time is displayed in decremental figures, whereas the - Olympus DS-40 | DS-40 Instructions (English) - Page 57
volume of guidance announcements. 2 1 While the recorder is stopped, press the MENU button for 1 second or longer. The menu opens. (☞ P.60, 62) 1 2 Press the + or - button to choose "Voice Guide". 4 3 Press the OK or 9 button. The voice guide setup process begins. 5 Guidance 4 Press the - Olympus DS-40 | DS-40 Instructions (English) - Page 58
Guidance (Voice Guide) 1 "On/Off" setting 1 Press the + or - button to choose between "On" and "Off". On: Guidance will be provided. 2 Off: Guidance will be canceled. 2 Press the - Olympus DS-40 | DS-40 Instructions (English) - Page 59
Guidance (Voice Guide) 7 6 Press the OK button to complete the setup screen. If the 0 is turned On/Off (☞P15) can be canceled if you set the 5 guidance to Off. • If the recorder is formatted (☞P52), guidance data will also be erased and the feature will not be available in the future (☞P76 - Olympus DS-40 | DS-40 Instructions (English) - Page 60
can set each menu item as follows. 2 6 1 While the recorder is stopped, press the MENU button for 1 second or longer. The menu opens. (☞ P62 ) Menu items can be set during a recording or 1 playback. (☞ P64) 2 Press the + or - button to move to the - Olympus DS-40 | DS-40 Instructions (English) - Page 61
Menu Setting Method 4 3 Press the OK or 9 button. Moves to the setting of the selected item. 3 4 Press the + or - button to change the setting. 6 5 Press the OK button to complete the setup screen. If the 0 button is pressed, the setting will 6 be canceled and it will return to the menu. 5 - Olympus DS-40 | DS-40 Instructions (English) - Page 62
Menu List 6 *Please see online manual for details. 62 Menu List - Olympus DS-40 | DS-40 Instructions (English) - Page 63
Menu List 6 *Please see online manual for details. 63 Menu List - Olympus DS-40 | DS-40 Instructions (English) - Page 64
Menu List 6 *Please see online manual for details. Menu List * * *"Play Mode" and "Skip Space" cannot be set in the 64 Audible mode. - Olympus DS-40 | DS-40 Instructions (English) - Page 65
files on your PC. Audio files recorded using the recorder can be played using the DSS Player software included on the provided CD-ROM or Windows Media Player. • Playback voice files on your PC and on the recorder when connected via USB. Download files from the recorder to the PC or upload files - Olympus DS-40 | DS-40 Instructions (English) - Page 66
Files in Your PC ● Data can be written or uploaded to the recorder even though the attribute of the recorder drive is shown as Read-only by the operating system of the PC. ● As the noise may cause adverse effects on electronics devices nearby the recorder, unplug the earphone when you connect the - Olympus DS-40 | DS-40 Instructions (English) - Page 67
Using DSS Player Software Basic Operating Environment of DSS Player PC: Operating System: CPU: IBM PC/AT compatible PC Microsoft Windows 2000 Professional/XP Professional,Home Edition Intel Pentium II class 333 MHz processor or more (If recording to a hard disk directly with the WMA format, - Olympus DS-40 | DS-40 Instructions (English) - Page 68
Using DSS Player Software Notes • The support service will not cover if your PC has been updated from Windows 95/98/Me to Windows 2000/XP. • Any failure on a self-modified PC will not be covered under the operational warranty. 7 68 Using DSS Player Software - Olympus DS-40 | DS-40 Instructions (English) - Page 69
to your PC and use it, you must first install the DSS player software from the included Software CD. Applications included with "DSS Player" • DSS Player: Recorded voice files can be downloaded to the PC for complete file management and playback solution. Be sure to confirm the following before - Olympus DS-40 | DS-40 Instructions (English) - Page 70
Installing Software Installing DSS Player 5 Register user information. Enter your name, company name and serial number. For the serial number, see the label attached to the CD-ROM package provided with DSS Player. When entered, click [Next]. When the confirmation dialog appears, click [Yes]. 6 - Olympus DS-40 | DS-40 Instructions (English) - Page 71
the recorder to your PC for the first time after installing DSS Player, the recorder's driver will be installed automatically. If the driver is installed properly, DSS Player will start automatically. (For details about operation for DSS Player see pages from P75) Installing Software 7 Installing - Olympus DS-40 | DS-40 Instructions (English) - Page 72
Olympus DSS Player], then click [Help]. • While DSS Player is running, choose [Contents] from the [Olympus DSS Player Help] menu. • While DSS Player is running, press [F1] on the keyboard. Search by Contents 1 Once the Online Online Help 1 Once the Online Help screen appears, click the Index tab - Olympus DS-40 | DS-40 Instructions (English) - Page 73
installing DSS Player before connecting the recorder (☞ P69). Connecting to your PC using the USB cable 1 Turn the recorder's power ON. 2 Connect the USB connection cable to the USB port or the USB hub of the PC. 3 Confirm that the recorder has stopped and connect a USB cable to the connection - Olympus DS-40 | DS-40 Instructions (English) - Page 74
the data will be destroyed. • When the recorder is connected to a PC, the power will be supplied from the USB cable. • Refer to the user's manual for your PC regarding the USB port or USB hub on your PC. • Be sure that you connect the USB cable either directly to the USB port on your PC or the self - Olympus DS-40 | DS-40 Instructions (English) - Page 75
Running DSS Player By connecting the recorder to your PC, you can automatically start the 2 Player to reinstate again. 2 Manual start 3 7 Running DSS Player 1 Start Windows. 2 Click the [start] button, select [All Programs], then [Olympus DSS Player]. 3 Click [Olympus DSS Player]. 2 - Olympus DS-40 | DS-40 Instructions (English) - Page 76
using the USB cable" (☞ P.73). 3 Start DSS Player. If the recorder does not have voice guide data, the [File Transfer] dialog will appear. 4 8 4 Copy voice guide data. If you click the [Yes] button in the [File Transfer] dialog, it will start copying voice guide data, and a window indicating - Olympus DS-40 | DS-40 Instructions (English) - Page 77
addition to the DSS Player functions, voice recognition using voice recognition software, joining of files, sharing of files and the menu setting of this recorder can be utilized. Upgrade Function Purchase and Upgrade To purchase "DSS Player Plus" and upgrading from "DSS Player" is operated in the - Olympus DS-40 | DS-40 Instructions (English) - Page 78
When upgraded, the title of the main menu changes to [DSS Player Plus]. Also, you can confirm the upgrade by selecting [About DSS Player] from the [Help] menu on the tool bar. In the [About DSS Player] window, the [DSS Player Plus] should be displayed...Notes • To purchase the license number, it - Olympus DS-40 | DS-40 Instructions (English) - Page 79
Music File to the Recorder"(☞ ONLINE INSTRUCTIONS P139) for details. Import files using DSS Player • Import Podcast content from the Internet to a computer. ➥ Please see "Importing Podcast Content"(☞ ONLINE INSTRUCTIONS P142) for details. 10 Download Audible content using the Audible - Olympus DS-40 | DS-40 Instructions (English) - Page 80
"Connecting to Your PC using the USB cable" (☞ P73). 3 Open the Explorer window. The product's name is displayed. 4 Copy the data. While the data are being written or copied, the record/play indicator light on the recorder will flash. 11 5 Unplug the recorder from a computer. For how to unplug - Olympus DS-40 | DS-40 Instructions (English) - Page 81
to delete a locked file. Unlock the file. Index Full Index full The file is full of index marks Erase index marks that are no (maximum of 16 marks). so go to the store where you purchased the recorder or an memory Olympus service station for repair. Alarm Message List Licence Mismatch - Olympus DS-40 | DS-40 Instructions (English) - Page 82
a cell phone or fluorescent lamp while recording or during playback. Move the recorder. Troubleshooting Recording level The microphone sensitivity is too low. too low Set the microphone sensitivity to LECTURE or CONF mode and try again (☞ P31). Unable to set index marks, The maximum number of - Olympus DS-40 | DS-40 Instructions (English) - Page 83
Troubleshooting Symptom Cannot find the recorded voice Probable cause Wrong folder. Action Switch to the right folder. The recorder does the recorder using the DSS Player (☞P76). When copy the guidance data, the Alarm, Starting tune and Closing tune are also copied together. Troubleshooting - Olympus DS-40 | DS-40 Instructions (English) - Page 84
ear while phoning. The voice or conversation over the phone can be clearly recorded. AC adapter: A321 (US and Canada) or A322 (Europe except . Exclusive case: CS113 (supplied for the DS-50 only) Special case for the DS-30, DS-40, and DS-50. Protects the recorder from shocks and dirt. Belt loop on the - Olympus DS-40 | DS-40 Instructions (English) - Page 85
Playback: (All mode) Speaker playback: Approx. 9 hours Earphone playback: Approx. 20 hours Recording medium Built-in flash memory DS-50: 1 GB DS-40: 512 MB DS-30: 256 MB Speaker Built-in ø23 mm round dynamic speaker MIC jack ø3.5 mm mini-jack, impedance 680Ω 12 EAR jack ø3.5 mm mini-jack, impedance - Olympus DS-40 | DS-40 Instructions (English) - Page 86
The following are contact information for technical support for Olympus recorders and software only. ◆ Technical Hotline Number in the U.S. and Canada 1-888-553-4448 ◆ User Support E-mail address in the U.S. and Canada [email protected] ◆ Technical Hotline Number in Europe Toll free number - Olympus DS-40 | DS-40 Instructions (English) - Page 87
E1-BZ8198-01 AP0612
-
 1
1 -
 2
2 -
 3
3 -
 4
4 -
 5
5 -
 6
6 -
 7
7 -
8
-
9
-
10
-
11
-
12
-
13
-
14
-
15
-
16
-
17
-
18
-
19
-
20
-
21
-
22
-
23
-
24
-
25
-
26
-
27
-
28
-
29
-
30
-
31
-
32
-
33
-
34
-
35
-
36
-
37
-
38
-
39
-
40
-
41
-
42
-
43
-
44
-
45
-
46
-
47
-
48
-
49
-
50
-
51
-
52
-
53
-
54
-
55
-
56
-
57
-
58
-
59
-
60
-
61
-
62
-
63
-
64
-
65
-
66
-
67
-
68
-
69
-
70
-
71
-
72
-
73
-
74
-
75
-
76
-
77
-
78
-
79
-
80
-
81
-
82
-
83
-
84
-
85
-
86
-
87
 |
 |

DIGITAL VOICE
RECORDER
DS-50
DS-40
DS-30
INSTRUCTIONS
EN
INSTRUCTIONS
ES
Thank you for purchasing an Olympus
Digital Voice Recorder.
Please read these instructions for information
about using the product correctly and safely.
Keep the instructions handy for future reference.
To ensure successful recordings, we
recommend that you test the record function
and volume before use.