Olympus SP 500 SP-500 UZ Basic Manual (English, Français, Espa - Page 8
Step4 TRANSFER IMAGES, a. Install the software, b. Connect the camera to the computer
 |
UPC - 050332156173
View all Olympus SP 500 manuals
Add to My Manuals
Save this manual to your list of manuals |
Page 8 highlights
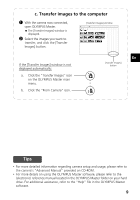
Step 4 Transfer Images TRANSFER IMAGES a. Install the software 1 Insert the OLYMPUS Master CD-ROM. 2 Windows: Click the "OLYMPUS Master" button. Macintosh: Double-click the En "Installer" icon. 3 Simply follow the on-screen instructions. b. Connect the camera to the computer 1 Connect the camera and computer using the USB cable (included). The monitor will turn on automatically. 1 USB Cable 2 Select [PC] on the monitor, and press Z. Your computer will now recognize your camera as a removable storage drive. 2 USB P C EASY PRINT CUSTOM PRINT EXIT SELECT GO OK 8
-
 1
1 -
2
-
 3
3 -
 4
4 -
 5
5 -
 6
6 -
 7
7 -
 8
8 -
 9
9 -
 10
10 -
 11
11 -
 12
12 -
 13
13 -
14
-
15
-
16
-
17
-
18
-
19
-
20
-
21
-
22
-
23
-
24
-
25
-
26
-
27
-
28
-
29
-
30
-
31
-
32
-
33
-
34
-
35
-
36
-
37
-
38
-
39
-
40
-
41
-
42
-
43
-
44
-
45
-
46
-
47
-
48
-
49
-
50
-
51
-
52
-
53
-
54
-
55
-
56
-
57
-
58
-
59
-
60
-
61
-
62
-
63
-
64
-
65
-
66
-
67
-
68
-
69
-
70
-
71
-
72
-
73
-
74
-
75
-
76
-
77
-
78
-
79
-
80
-
81
-
82
-
83
-
84
 |
 |

8
En
Step 4 Transfer Images
TRANSFER IMAGES
a. Install the software
1
Insert the OLYMPUS Master CD-ROM.
2
Windows:
Click the “OLYMPUS
Master” button.
Macintosh:
Double-click the
“Installer” icon.
3
Simply follow the on-screen
instructions.
b. Connect the camera to the computer
1
Connect the camera and computer using the USB cable (included).
The monitor will turn on automatically.
2
Select [PC] on the monitor, and press
Z
.
Your computer will now recognize your
camera as a removable storage drive.
USB Cable
1
2
P
C
USB
OK
CUSTOM PRINT
EXIT
EASY PRINT
SELECT
GO