Olympus Stylus 9000 Black STYLUS-9000 Instruction Manual (English) - Page 48
detailed printer settings for
 |
UPC - 050332167933
View all Olympus Stylus 9000 Black manuals
Add to My Manuals
Save this manual to your list of manuals |
Page 48 highlights
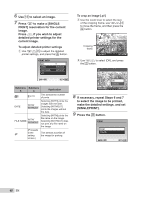
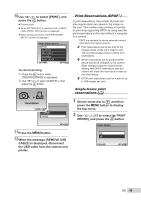
6 Use mn to select an image. 7 Press k to make a [SINGLE PRINT] reservation for the current image. Press l if you wish to adjust detailed printer settings for the current image. To adjust detailed printer settings 1 Use klmn to adjust the detailed printer settings, and press the button. PRINT INFO
-
 1
1 -
2
-
3
-
4
-
5
-
6
-
7
-
8
-
9
-
10
-
11
-
12
-
13
-
14
-
15
-
16
-
17
-
18
-
19
-
20
-
21
-
22
-
23
-
24
-
25
-
26
-
27
-
28
-
29
-
30
-
31
-
32
-
33
-
34
-
35
-
36
-
37
-
38
-
39
-
40
-
41
-
42
-
 43
43 -
 44
44 -
 45
45 -
 46
46 -
 47
47 -
 48
48 -
 49
49 -
 50
50 -
 51
51 -
 52
52 -
 53
53 -
54
-
55
-
56
-
57
-
58
-
59
-
60
-
61
-
62
-
63
-
64
-
65
-
66
-
67
-
68
-
69
-
70
-
71
-
72
-
73
-
74
-
75
-
76
-
77
-
78
 |
 |

48
EN
6
Use
mn
to select an image.
7
Press
k
to make a [SINGLE
PRINT] reservation for the current
image.
Press
l
if you wish to adjust
detailed printer settings for the
current image.
To adjust detailed printer settings
1
Use
klmn
to adjust the detailed
printer settings, and press the
button.
1
PRINT INFO
SET
OK
DATE
FILE NAME
<
x
P
WITHOUT
WITHOUT
EXIT
MENU
Submenu
5
Submenu
6
Application
<
×
0 to 10
This selects the number
of prints.
DATE
WITH/
WITHOUT
Selecting [WITH] prints the
images with the date.
Selecting [WITHOUT]
prints the images without
the date.
FILE NAME
WITH/
WITHOUT
Selecting [WITH] prints the
fi
le name on the image.
Selecting [WITHOUT] does
not print any
fi
le name on
the image.
P
(Proceeds
to the
setting
screen.)
This selects a portion of
the image for printing.
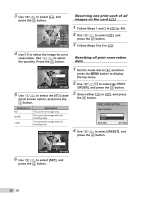
To crop an image [
P
]
1
Use the zoom lever to select the size
of the cropping frame, use
klmn
to move the frame, and then press the
button.
Cropping
frame
T
W
SET
OK
2
Use
kl
to select [OK], and press
the
button
.
P
SET
OK
MENU
BACK
CANCEL
OK
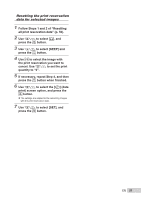
8
If necessary, repeat Steps 6 and 7
to select the image to be printed,
make the detailed settings, and set
[SINGLEPRINT].
9
Press the
button.
PRINT
SET
OK
MENU
BACK
PRINT
CANCEL