Onkyo A-9130 User Manual English etc. - Page 5
Rear Panel
 |
View all Onkyo A-9130 manuals
Add to My Manuals
Save this manual to your list of manuals |
Page 5 highlights
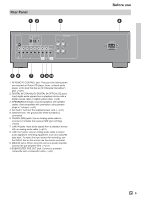
Rear Panel Before use 1. RI REMOTE CONTROL jack: This jack is for linking when you connect an Onkyo CD player, tuner, network audio player, or RI dock that has an RI ("Remote Interactive") jack. (p11) 2. DIGITAL IN COAXIAL D1/DIGITAL IN OPTICAL D2 jacks: Input digital audio signals from a playback device with a digital coaxial cable or digital optical cable. (p9) 3. SPEAKERS terminals: Connect speakers with speaker cables. (Not compatible with connection using banana plugs or Y plugs.) (p8) 4. AC INLET: Connect the supplied power cord. (p12) 5. GND terminal: The ground wire of the turntable is connected. 6. PHONO (MM) jacks: Use an Analog audio cable to connect a Turntable that uses an MM type cartridge. (p10) 7. LINE IN jacks: Input audio signals from a playback device with an analog audio cable. (p10) 8. LINE OUT jacks: Use an Analog audio cable to output audio signals to recording equipment, such as a cassette tape deck. To select the input source for recording, use the INPUT dial on this unit or use the remote controller. 9. MAIN IN jacks: When using this unit as a power amplifier, connect the pre-amplifier here. (p12) 10.SUBWOOFER PRE OUT jack: Connect a powered subwoofer with a subwoofer cable. (p9) En 5
-
 1
1 -
 2
2 -
 3
3 -
 4
4 -
 5
5 -
 6
6 -
 7
7 -
 8
8 -
 9
9 -
 10
10 -
 11
11 -
12
-
13
-
14
-
15
-
16
-
17
-
18
-
19
-
20
-
21
-
22
-
23
-
24
-
25
-
26
-
27
-
28
-
29
-
30
-
31
-
32
-
33
-
34
-
35
-
36
-
37
-
38
-
39
-
40
-
41
-
42
-
43
-
44
-
45
-
46
-
47
-
48
-
49
-
50
-
51
-
52
-
53
-
54
-
55
-
56
-
57
-
58
-
59
-
60
-
61
-
62
-
63
-
64
-
65
-
66
-
67
-
68
-
69
-
70
-
71
-
72
 |
 |
