Onkyo TX-NR7100 9.2-Channel THX Certified AV Receiver Instruction Manual - Eng - Page 3
Speaker Layout, Speaker Installation, Speaker Connections, Connections, Connecting the SUB Monitor
 |
View all Onkyo TX-NR7100 9.2-Channel THX Certified AV Receiver manuals
Add to My Manuals
Save this manual to your list of manuals |
Page 3 highlights
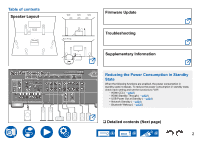
Before starting the procedure Firmware Update Update Information of the firmware Firmware Update Procedure Part Names Front Panel Display Rear Panel Remote Controller Inputting Characters Speaker Layout The listening room and the speaker layout 5.1 Channel System 7.1 Channel System 5.1.2 Channel System 7.1.2 Channel System 5.1.4 Channel System Speaker Installation Speaker Connections Speakers you can use with this unit and cable connections Connecting a Power Amplifier (For European, Australian and Asian models) 7 Connections 8 8 Notes regarding connections with HDMI cables 48 8 Connections 48 11 11 Connecting the TV To ARC/eARC TV 49 49 13 To Non-ARC TV 49 14 Connecting the SUB Monitor 51 16 SUB Monitor 51 18 Connecting Playback Devices Connections to BD/DVD and GAME with HDMI 52 jacks 52 20 Connecting a BD/DVD without HDMI Jack Mounted 53 21 Connecting an Audio Component 54 22 Connecting a Video Camera, etc. 55 23 Connecting a TV or Integrated Amplifier in a separate 24 room (Multi-zone) 56 25 Connecting a TV (ZONE 2) 56 Connecting an Integrated Amplifier (ZONE 2) 57 Connecting Antennas 58 Network Connection 59 Connecting External Control Devices 60 33 IR IN port 60 12V TRIGGER OUT jack 61 46 Connecting the Power Cord 62 3
-
 1
1 -
 2
2 -
 3
3 -
 4
4 -
 5
5 -
 6
6 -
 7
7 -
 8
8 -
 9
9 -
10
-
11
-
12
-
13
-
14
-
15
-
16
-
17
-
18
-
19
-
20
-
21
-
22
-
23
-
24
-
25
-
26
-
27
-
28
-
29
-
30
-
31
-
32
-
33
-
34
-
35
-
36
-
37
-
38
-
39
-
40
-
41
-
42
-
43
-
44
-
45
-
46
-
47
-
48
-
49
-
50
-
51
-
52
-
53
-
54
-
55
-
56
-
57
-
58
-
59
-
60
-
61
-
62
-
63
-
64
-
65
-
66
-
67
-
68
-
69
-
70
-
71
-
72
-
73
-
74
-
75
-
76
-
77
-
78
-
79
-
80
-
81
-
82
-
83
-
84
-
85
-
86
-
87
-
88
-
89
-
90
-
91
-
92
-
93
-
94
-
95
-
96
-
97
-
98
-
99
-
100
-
101
-
102
-
103
-
104
-
105
-
106
-
107
-
108
-
109
-
110
-
111
-
112
-
113
-
114
-
115
-
116
-
117
-
118
-
119
-
120
-
121
-
122
-
123
-
124
-
125
-
126
-
127
-
128
-
129
-
130
-
131
-
132
-
133
-
134
-
135
-
136
-
137
-
138
-
139
-
140
-
141
-
142
-
143
-
144
-
145
-
146
-
147
-
148
-
149
-
150
-
151
-
152
-
153
-
154
-
155
-
156
-
157
-
158
-
159
-
160
-
161
-
162
-
163
-
164
-
165
-
166
-
167
-
168
-
169
-
170
-
171
-
172
-
173
-
174
-
175
-
176
-
177
-
178
-
179
-
180
-
181
-
182
-
183
-
184
-
185
-
186
-
187
-
188
-
189
-
190
-
191
 |
 |
