Optoma H78DC3 User Manual - Page 30
Ceiling Mount Installation - specifications
 |
View all Optoma H78DC3 manuals
Add to My Manuals
Save this manual to your list of manuals |
Page 30 highlights
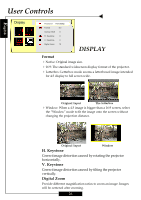
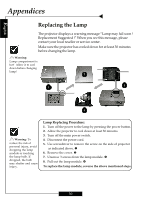
English Appendices Ceiling Mount Installation 1. To prevent damaging your projector, please use the ceiling mount package for installation. 2. If you wish to use a third party ceiling mount kit please ensure the screws used to attached a mount to the projector met the following specifications: 4 Screw type: M6,M8,M10 4 Screw length: 10,16,55 m/m ™Please note that damage resulting from incorrect installation will invalidate the warranty. 16.31" (414.34mm) 4.80" (122.00mm) 4.17" (106.00mm) 7.28" (185.00mm) 12.14" (308.28mm) 12.14" (308.28mm) 7.87" (200.00mm) 4.72" (120.00mm) 3.94" (100.00mm) 7.56" (191.98mm) 16.92" (429.74mm) Max. / Min. 24.00" (609.7mm) / 33.45" (849.7mm) 31
-
 1
1 -
2
-
3
-
4
-
5
-
6
-
7
-
8
-
9
-
10
-
11
-
12
-
13
-
14
-
15
-
16
-
17
-
18
-
19
-
20
-
21
-
22
-
23
-
24
-
 25
25 -
 26
26 -
 27
27 -
 28
28 -
 29
29 -
 30
30
 |
 |

E
nglish
31
4.72" (120.00mm)
7.56" (191.98mm)
16.92" (429.74mm)
16.31" (414.34mm)
3.94" (100.00mm)
7.87" (200.00mm)
4.80" (122.00mm)
4.17" (106.00mm)
7.28" (185.00mm)
12.14" (308.28mm)
12.14" (308.28mm)
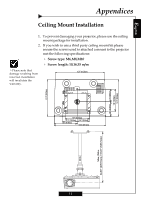
Ceiling Mount Installation
1.
To prevent damaging your projector, please use the ceiling
mount package for installation.
2.
If you wish to use a third party ceiling mount kit please
ensure the screws used to attached a mount to the projector
met the following specifications:
4
Screw type: M6,M8,M10
4
Screw length: 10,16,55 m/m
Please note that
damage resulting from
incorrect installation
will invalidate the
warranty.
Appendices
Max. / Min.
24.00” (609.7mm) / 33.45” (849.7mm)