Oregon Scientific WMR86 User Manual - Page 7
Clock / Calendar, Moon Phase, Auto Scanning Function, Weather Forecast, Temperature And Humidity - home weather station
 |
View all Oregon Scientific WMR86 manuals
Add to My Manuals
Save this manual to your list of manuals |
Page 7 highlights
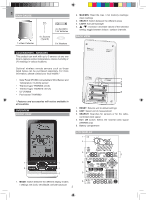
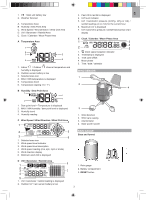
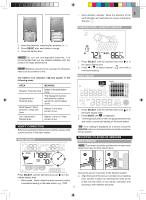
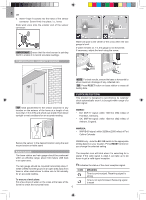
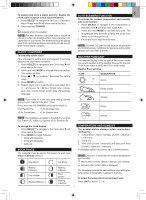
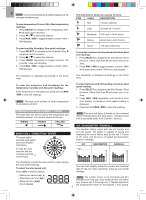
EN To enable (and force a signal search) / disable the clock radio reception (clock synchronization): 1. Press SELECT to navigate to the Clock / Calendar / Moon Phase Area. will show next to the Area. 2. Press and hold SEARCH. appears when it is enabled. NOTE For best reception, the base station should be placed on a flat, non-metallic surface near a window in an upper floor of your home. The antenna should be placed away from electrical appliances and not be moved around when searching for a signal. CLOCK / CALENDAR To manually set the clock: (You only need to set the clock and calendar if you have disabled the clock radio reception). 1. Press SELECT to navigate to the Clock Area. will show next to the Area. 2. Press and hold MODE to change the clock setting. The setting will blink. 3. Press / to increase / decrease the setting value. 4. Press MODE to confirm. 5. Repeat steps 3 to 4 to set the time zone offset hour (+ / -23 hours), 12 / 24 hour format, hour, minute, year, date / month format, month, date and weekday language. NOTE If you enter +1 in the time zone setting, this will give you your regional time plus 1 hour. If you are in the US (WMR86A only) set the clock to: 0 for Pacific time +1 for Mountain time +2 for Central time +3 for Eastern time. NOTE The weekday is available in English (E), German (D), French (F), Italian (I), Spanish (S) or Russian (R). AUTO SCANNING FUNCTION To activate the outdoor temperature and humidity auto-scan function: 1. Press SELECT to navigate to the Temperature or Humidity Area. will show next to the Area. 2. Press and hold MODE to activate auto-scan. The temperature and humidity display will scroll from indoor to ch1 through to ch3. 3. Press any key to stop the auto-scan. NOTE Channel 1 is used for the outdoor temperature and humidity sensor. Additional temperature and humidity sensors can use other channels. WEATHER FORECAST The weather display in the top part of the screen shows the current weather and the weather forecast for the next 12-24 hours within a 30-50 km (19-31 mile) radius. Weather Forecast Area ICON DESCRIPTION Sunny Partly cloudy Cloudy Rainy Snowy To change the clock display: 1. Press SELECT to navigate to the Clock Area. will show next to the Area. 2. Press MODE to toggle between: • Clock with Seconds • Clock with Weekday • Calendar MOON PHASE TEMPERATURE AND HUMIDITY The weather station displays indoor and outdoor readings for: 1. Temperature / relative humidity (current / maximum / minimum) 2. Trend line 3. Wind chill (current / minimum) and dew point level (current / maximum / minimum) The weather station can connect up to 3 remote sensors. The Calendar must be set for this feature to work (see Clock / Calendar section). NOTE Channel 1 is dedicated for outdoor temperature and humidity. New Moon Waxing Crescent First quarter Waxing Gibbous Full Moon Waning Gibbous Third quarter Waning Crescent shows which remote sensor's data you are viewing. appears when indoor data is displayed. The timestamp records the date and time when storing the temperature and humidity readings in memory. To select the temperature measurement unit: Press UNIT to select °C / °F. 7
-
 1
1 -
 2
2 -
 3
3 -
 4
4 -
 5
5 -
 6
6 -
 7
7 -
 8
8 -
 9
9 -
 10
10 -
 11
11
 |
 |