Panasonic AG-HPX600PJB Operating Instructions - Page 114
Properties
 |
View all Panasonic AG-HPX600PJB manuals
Add to My Manuals
Save this manual to your list of manuals |
Page 114 highlights
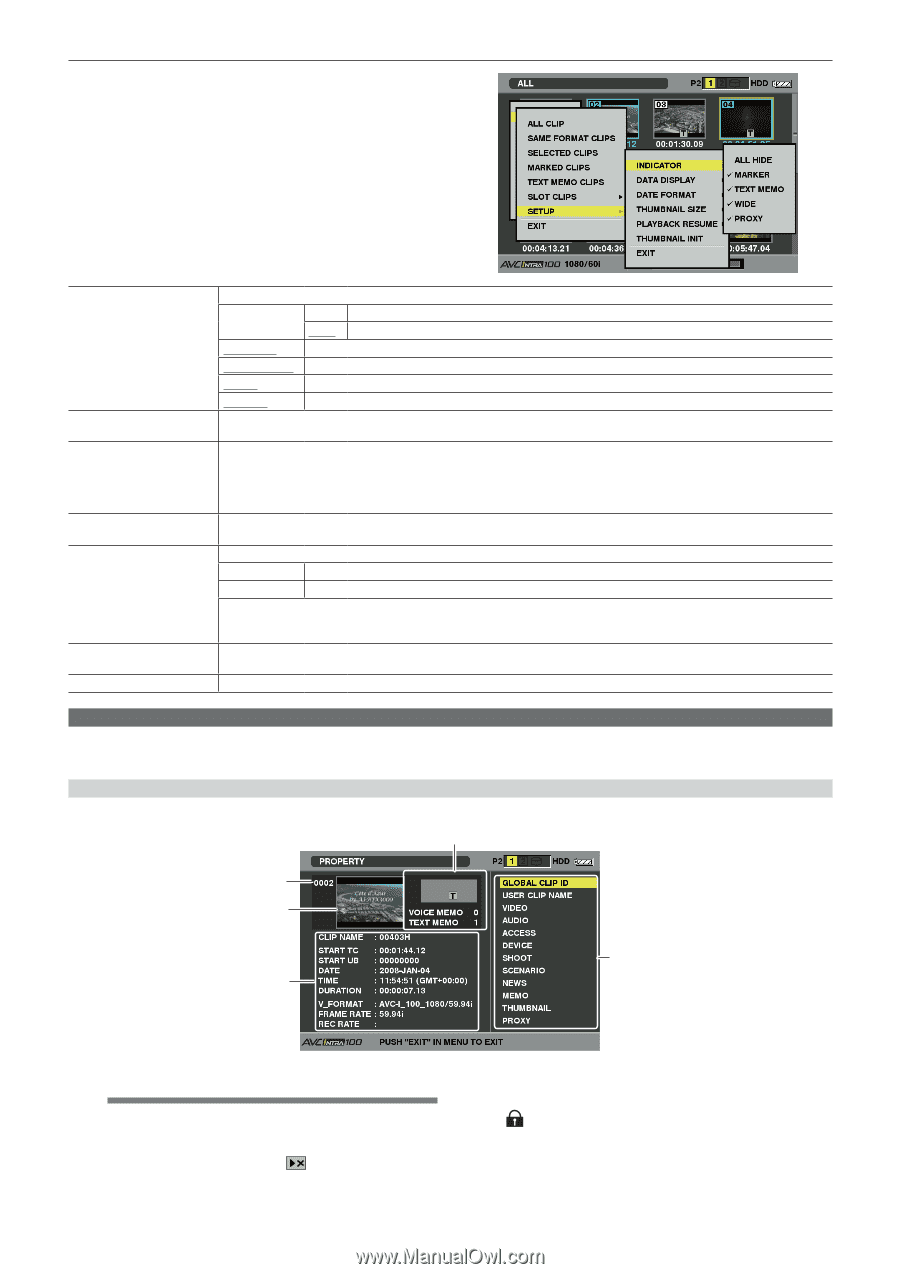
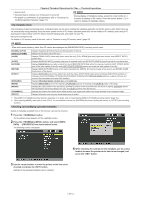
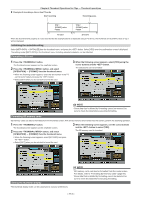
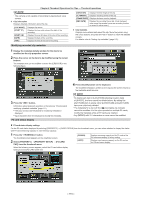
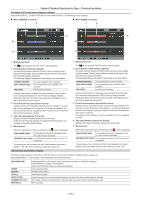
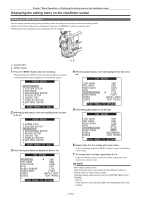
Chapter 6 Thumbnail Operations for Clips - Thumbnail operations 1 Press the button. The thumbnail screen appears on the viewfinder screen. 2 Press the button, and select [THUMBNAIL] → [SETUP] from the thumbnail menu. The following screen is displayed. [INDICATOR] [DATA DISPLAY] [DATE FORMAT] [THUMBNAIL SIZE] [PLAYBACK RESUME] [THUMBNAIL INIT] [EXIT] Select which indicators you want to show on thumbnails and which you want to hide. [ALL HIDE] [ON] Hides all indicators, [MARKER], [TEXT MEMO], [WIDE], and [PROXY]. [OFF] According to the following menu, sets show or hide. This setting is the factory setting. [MARKER] Switches the shot mark indicator between show and hide (on/off). The factory setting is on. [TEXT MEMO] Switches the text memo indicator between show and hide (on/off). The factory setting is on. [WIDE] Switches the wide indicator between show and hide (on/off). The factory setting is on. [PROXY] Switches the proxy indicator between show and hide (on/off). The factory setting is on. Select the time display field of the clip from the time code [TC]/user bits [UB]/shooting time [TIME]/shooting date [DATE]/shooting date and time [DATE TIME]/clip name [CLIP NAME]/user clip name [USER CLIP NAME]. The factory setting is the time code. Select display order for recording date and time from Y-M-D (Year-Month-Day), M-D-Y (Month-Day-Year), or D-M-Y (Day-MonthYear). The factory setting may vary depending on the region. (AG‑HPX600P: M-D-Y, AG‑HPX600EJ: D-M-Y, AG‑HPX600EN: D-M-Y) This setting is reflected in the recording date and time shown in the clip property and the shooting date and time shown when [DATE] is selected under the item [DATA DISPLAY]. Select the thumbnail displayed on the screen from either [LARGE] (displaying thumbnail in 3×2) or [NORMAL] (displaying thumbnail in 4×3). This item is set to [NORMAL] in the factory settings. Select a position to restart playback after stopping playback on the thumbnail screen using the button. [ON] Playback starts from the stop position. [OFF] Playback starts from the beginning of the clip indicated by the pointer. If the pointer is moved after stopping playback, playback will restart from the beginning of the clip where the pointer is placed regardless of the setting of the [PLAYBACK RESUME] item. Also, attempting to play back from the end of all the available clips will cause the screen to flash momentarily, indicating that there are no more clips which can be played back. Return the above thumbnail display settings to the factory settings. Move the cursor to the [THUMBNAIL INIT] item, and press the button. Select [YES] when the confirmation screen is displayed. Return to the previous menu. Properties Clip properties and P2 card status are displayed. It is possible to edit and rewrite recorded clip metadata while clip properties are displayed. Clip properties Select [PROPERTY] → [CLIP PROPERTY] from the thumbnail menu. The following screen appears. 3 1 2 5 4 1 Clip number @@NOTE tt For clips that cannot be played back, the number is displayed in red. tt When the [EVF TYPE] item on the setting menu [DISPLAY SETUP] screen is set to [B/W], the [ ] Not playable clip indicator is displayed. 2 Thumbnail 3 Clip information Displays the indicators added to the clip and the number of text and voice memos added to the clip. The [ ] mark appears if the clip is recorded on a write-protected P2 card. - 114 -
-
 1
1 -
2
-
3
-
4
-
5
-
6
-
7
-
8
-
9
-
10
-
11
-
12
-
13
-
14
-
15
-
16
-
17
-
18
-
19
-
20
-
21
-
22
-
23
-
24
-
25
-
26
-
27
-
28
-
29
-
30
-
31
-
32
-
33
-
34
-
35
-
36
-
37
-
38
-
39
-
40
-
41
-
42
-
43
-
44
-
45
-
46
-
47
-
48
-
49
-
50
-
51
-
52
-
53
-
54
-
55
-
56
-
57
-
58
-
59
-
60
-
61
-
62
-
63
-
64
-
65
-
66
-
67
-
68
-
69
-
70
-
71
-
72
-
73
-
74
-
75
-
76
-
77
-
78
-
79
-
80
-
81
-
82
-
83
-
84
-
85
-
86
-
87
-
88
-
89
-
90
-
91
-
92
-
93
-
94
-
95
-
96
-
97
-
98
-
99
-
100
-
101
-
102
-
103
-
104
-
105
-
106
-
107
-
108
-
 109
109 -
 110
110 -
 111
111 -
 112
112 -
 113
113 -
 114
114 -
 115
115 -
 116
116 -
 117
117 -
 118
118 -
 119
119 -
120
-
121
-
122
-
123
-
124
-
125
-
126
-
127
-
128
-
129
-
130
-
131
-
132
-
133
-
134
-
135
-
136
-
137
-
138
-
139
-
140
-
141
-
142
-
143
-
144
-
145
-
146
-
147
-
148
-
149
-
150
-
151
-
152
-
153
-
154
-
155
-
156
-
157
-
158
-
159
-
160
-
161
-
162
-
163
-
164
-
165
-
166
-
167
-
168
-
169
-
170
-
171
-
172
-
173
-
174
-
175
-
176
-
177
-
178
 |
 |