Panasonic AW-HS50 How-To Chroma Key with the HS50
Panasonic AW-HS50 Manual
 |
View all Panasonic AW-HS50 manuals
Add to My Manuals
Save this manual to your list of manuals |
Panasonic AW-HS50 manual content summary:
- Panasonic AW-HS50 | How-To Chroma Key with the HS50 - Page 1
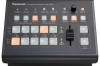
fill signal. - (Fig.1-B) * The chroma key functions as the self key, so the key fill signal is used as the key source signal. ③ Press KEY-F/S button to release the key bus selection mode of crosspoint buttons. (Figure 1: AW-HS50 Control Panel) (D) (A) (C) (E) (B) (Key setup) ⑤ Hold down the - Panasonic AW-HS50 | How-To Chroma Key with the HS50 - Page 2
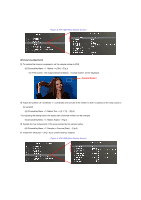
(Figure 2: AW-HS50 Menu Display Screen) (Chroma key adjustment) ⑧ To sample the chroma components, set the sample marker to [ON]. - [6] ChromaKey Menu > 1. Marker => [ON] - (Fig.3) * On PVW screen, "the image selected at Step② + sample marker" will be displayed. ( - Panasonic AW-HS50 | How-To Chroma Key with the HS50 - Page 3
menu items, you can adjust how the chroma key is to be defined. Set or adjust the settings for the menu items in [6] ChromaKey Menu. - (Fig.4) (Figure 4: AW-HS50 Menu Display Screen) 5. Settings for the of each item, please see pp. 15 - 16 of Operating Instructions .
-
 1
1 -
 2
2 -
 3
3
 |
 |

★
In chroma key, the key signal is created using a specific hue of the key fill signal as a reference.
For instance, the color of the background is sampled (detected) from the image of a person standing in front of a
specific background color so that the key signal is created, and a different background is combined.
As the color of
the background, green or blue is commonly used.
(Selecting the key materials)
①
Press KEY-F/S button – (Fig.1-A) to set the crosspoint buttons to key bus selection mode (KEY-F/S button lights up).
②
Using the B bus buttons, select the key fill signal. – (Fig.1-B)
* The chroma key functions as the self key, so the key fill signal is used as the key source signal.
③
Press KEY-F/S button to release the key bus selection mode of crosspoint buttons.
(Key setup)
⑤
Hold down the OSD ON button – (Fig.1-C) to open the menu. (To close it, hold down the button again.)
⑥
Use the OSD/TIME dial – (Fig.1-D) to set the key type to [Chroma] and the fill type to [Bus].
- [4] KEY Setup Menu > 1. Key Type => [Chroma] – (Fig.2)
- [4] KEY Setup Menu > 2. Fill => [Bus] – (Fig.2)
⑦
An image with key effects added can be output for PVW image to adjust and check the key.
* Put the setting for output signal to [MV], etc. in advance so that PVW can be checked.
- [4] KEY Setup Menu > 3. PVW => [On] – (Fig.2)
=
+
Chroma Keying
(Figure 1: AW-HS50 Control Panel)
(
A
)
(
B
)
(
C
)
(
D
)
(
E
)
Background
Key Source
Output Image