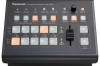
Panasonic AW-HS50 How-To Chroma Key with the HS50 - Page 2
Sample Marker - chroma key
 |
View all Panasonic AW-HS50 manuals
Add to My Manuals
Save this manual to your list of manuals |
Page 2 highlights
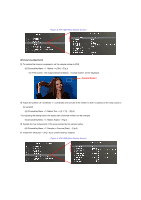
(Figure 2: AW-HS50 Menu Display Screen) (Chroma key adjustment) ⑧ To sample the chroma components, set the sample marker to [ON]. - [6] ChromaKey Menu > 1. Marker => [ON] - (Fig.3) * On PVW screen, "the image selected at Step② + sample marker" will be displayed. (Sample Marker) ⑨ Adjust the position (X: coordinate, Y: coordinate) and size (S) of the marker so that it is placed on the area (color) to be sampled. - [6] ChromaKey Menu > 3. Marker Pos => [X, Y, S] - (Fig.3) * By adjusting the setting below, the aspect ratio of sample marker can be changed. - [6] ChromaKey Menu > 4. Marker Aspect - (Fig.3) ⑩ Sample the hue components of the area selected by the sample marker - [6] ChromaKey Menu > 2. Sample => Execute [Start]. - (Fig.3) ⑪ Press KEY ON button - (Fig.1-E) to combine the key material. (Figure 3: AW-HS50 Menu Display Screen)
-
 1
1 -
 2
2 -
 3
3
 |
 |
