Panasonic AW-HS50 How-To Output Picture in Picture with the HS50 - Page 2
AW-HS50 Menu Display Screen
 |
View all Panasonic AW-HS50 manuals
Add to My Manuals
Save this manual to your list of manuals |
Page 2 highlights
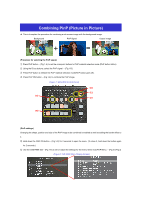
(Figure 3: AW-HS50 Menu Display Screen) 1. Setting for shape of PinP image to be combined 2. Adjustment of center position and size of PinP image X coordinate (X), Y coordinate (Y), size (S) 4. Setting for the width of PinP image border (B) * Set "0.0" when the border effect is not to be added Setting for the amount of soft effect on PinP image (S) 5. Setting for the color of PinP image border 6. Adjustment of hue (H), saturation (S) and luminance (L) of color that has been set for border * For the details, please see pp. 18 - 19 of Operating Instructions .
-
 1
1 -
 2
2
 |
 |

* For the details, please see pp. 18 – 19 of Operating Instructions <Operations and Settings>.
(Figure 3: AW-HS50 Menu Display Screen)
1. Setting for shape of PinP image to be combined
2.
Adjustment of center position and size of
PinP image
X coordinate (X), Y coordinate (Y), size (S)
4.
Setting for the width of PinP image border (B)
* Set “0.0” when the border effect is not to be added
Setting for the amount of soft effect on PinP image (S)
5.
Setting for the color of PinP image border
6.
Adjustment of hue (H), saturation (S) and
luminance (L) of color that has been set
for border