Panasonic BL-C140A Installation Guide - Page 19
Mount the flexible stand firmly to the wall using screw A included., joint by fastening screw B.
 |
UPC - 037988845415
View all Panasonic BL-C140A manuals
Add to My Manuals
Save this manual to your list of manuals |
Page 19 highlights
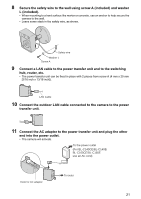
3 Mount the flexible stand firmly to the wall using screw A (included). • Do not drive the screws into a soft material. Drive the screws into a secure area of the wall, such as a column, otherwise the camera may fall and be damaged. • Use screws that are suited for the type of material the camera is mounted to. • Be careful not to nip the cable. • Make sure the flexible stand is firmly mounted on a beam (at least 25 mm [1 inch] thick) etc. When there is no beam, apply a board on the other side of the wall to make sure the camera does not drop. Screw A At least 25 mm (1 inch) 4 Pass the cable through the right-angle joint and attach the right-angle joint by fastening screw B. • Insert the LAN cable until it clicks into to place. • Make sure that the "↑UP" symbol is pointing up when attaching the right-angle joint to the camera. • Securely fasten all screws. 19
-
 1
1 -
2
-
3
-
4
-
5
-
6
-
7
-
8
-
9
-
10
-
11
-
12
-
13
-
 14
14 -
 15
15 -
 16
16 -
 17
17 -
 18
18 -
 19
19 -
 20
20 -
 21
21 -
 22
22 -
 23
23 -
 24
24 -
25
-
26
-
27
-
28
-
29
-
30
-
31
-
32
 |
 |
