Panasonic CT34WC15N CT26WC15 User Guide - Page 9
Optional Equipment Connections, Vcr, Cable Box, Vcr And Cable Box, English, Vcr Connection
 |
View all Panasonic CT34WC15N manuals
Add to My Manuals
Save this manual to your list of manuals |
Page 9 highlights
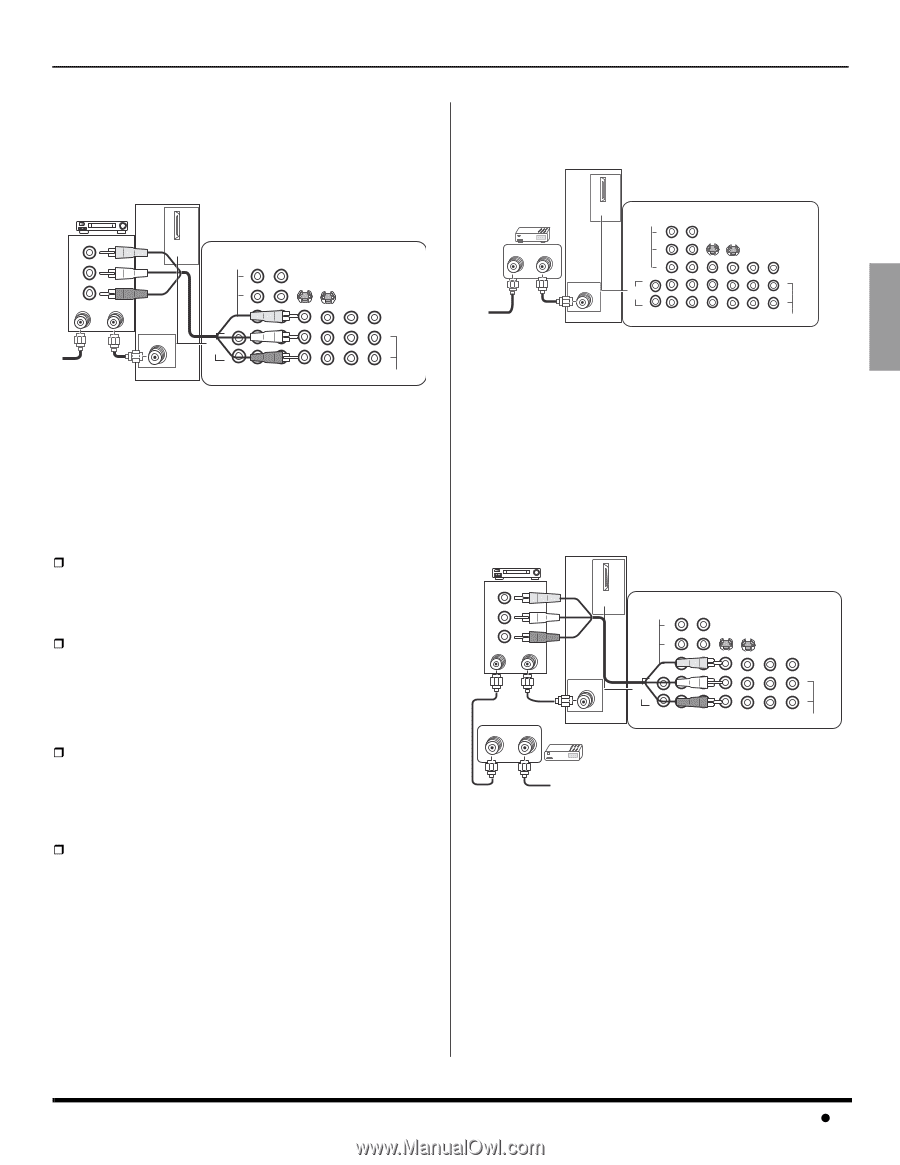
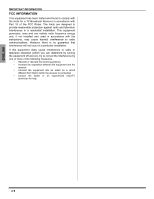
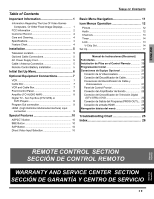
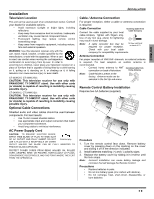
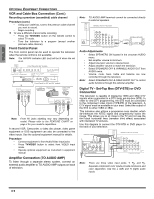
ENGLISH Optional Equipment Connections Note: The remote control must be programmed with supplied codes to operate the optional equipment. VCR Connection Follow this diagram when connecting your television to a VCR only. VCR PLAY R E FF W STOP VIDEO OUT L AUDIO OUT R ANT IN ANT OUT HDMI AV IN TERMINALS ON BACK OF TELEVISION VIDEO Y PB PR S-VIDEO VIDEO Incoming Cable ANT L AUDIO IN R L R 1 2 INPUT INPUT INPUT PROG COMPONENT 1 2 3 OUT TO AUDIO VIDEO INPUT AMP CABLES NOT INCLUDED Note: Rear A/V jacks may vary, depending on model. Please refer to the FEATURE CHART on page 4 for your model's capabilities. Viewing a television program Procedure • Tune the television to the program you want to view. Viewing a video tape Procedure ˆ Option A • Press the TV/VIDEO button on the remote control to select the video input (VIDEO 1, VIDEO 2, etc.) connected to your VCR. • Begin to play the video tape. ˆ Option B • Tune the television to Channel 3 or 4, depending on your VCR. • Begin to play the video tape. Recording a television program Procedure ˆ Option A (Recording and viewing the same program) • Tune the television to Channel 3 or 4, depending on your VCR. • Using the VCR, tune to the television program you want to record. • Begin recording. ˆ Option B (Recording one program while viewing another program) • Press the TV/VIDEO button on the remote control to select the video input (VIDEO 1, VIDEO 2, etc.) to which your VCR is connected. • Using the VCR, tune to the television program you want to record. • Begin recording. • Press the TV/VIDEO button on the remote control to switch back to TV mode. • Tune the television to the program you want to view. OPTIONAL EQUIPMENT CONNECTIONS Cable Box Connection Follow this diagram when connecting your television to a cable box only. TERMINALS ON BACK OF TELEVISION CABLE BOX 15 ANT IN ANT OUT HDMI AV IN VIDEO Y PB PR S-VIDEO VIDEO Incoming Cable Note: ANT L AUDIO IN R L R 1 2 INPUT INPUT INPUT PROG COMPONENT 1 2 3 OUT TO AUDIO VIDEO INPUT AMP CABLES NOT INCLUDED Rear A/V jacks may vary, depending on model. Please refer to the FEATURE CHART on page 4 for your model's capabilities. Viewing a premium (scrambled) cable channel Procedure • Tune the television to Channel 3. • Using the cable box, tune to the premium cable channel you want to view. VCR and Cable Box Connection Follow this diagram when connecting your television to both a VCR and a cable box. VCR PLAY R E FF W STOP VIDEO OUT L AUDIO OUT R ANT IN ANT OUT HDMI AV IN TERMINALS ON BACK OF TELEVISION VIDEO Y PB PR S-VIDEO VIDEO ANT OUT ANT IN ANT L AUDIO IN R CABLE BOX 15 L R 1 2 INPUT INPUT INPUT PROG COMPONENT 1 2 3 OUT TO AUDIO VIDEO INPUT AMP CABLES NOT INCLUDED Incoming Cable Note: Rear A/V jacks may vary, depending on model. Please refer to the FEATURE CHART on page 4 for your model's capabilities. Viewing a premium (scrambled) cable channel Procedure • Tune the television to Channel 3. • Using the cable box, tune to the premium cable channel you want to view. Recording a premium (scrambled) cable channel Procedure • Press the TV/VIDEO button on the remote control to select the video input (VIDEO 1, VIDEO 2, etc.) for your VCR. • Turn the VCR ON. • Tune the VCR to Channel 3 or 4, depending on the switch setting on the back of the VCR. 7z
-
 1
1 -
2
-
3
-
 4
4 -
 5
5 -
 6
6 -
 7
7 -
 8
8 -
 9
9 -
 10
10 -
 11
11 -
 12
12 -
 13
13 -
 14
14 -
15
-
16
-
17
-
18
-
19
-
20
-
21
-
22
-
23
-
24
-
25
-
26
-
27
-
28
-
29
-
30
-
31
-
32
-
33
-
34
-
35
-
36
-
37
-
38
-
39
-
40
-
41
-
42
-
43
-
44
-
45
-
46
-
47
-
48
-
49
-
50
-
51
-
52
-
53
-
54
-
55
-
56
-
57
-
58
-
59
-
60
-
61
-
62
-
63
-
64
 |
 |