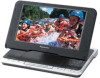
Panasonic DVDLS850 Portable Dvd Player - Page 19
Attaching the unit to the bracket., click
 |
View all Panasonic DVDLS850 manuals
Add to My Manuals
Save this manual to your list of manuals |
Page 19 highlights
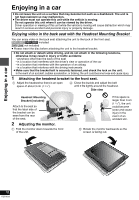
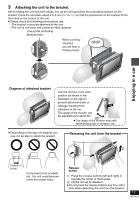
3 Attaching the unit to the bracket. While holding the unit with both hands, line up the unit just below the protruding sections on the bracket. Press the unit down about 4 to 5 mm q (5/32 to q 3/16 ) so that the protrusions on the bracket fit into the holes on the bottom of the unit. ≥ Please check the following points before use. -The bracket is securely fastened to the unit. -The unit is not loose and cannot be lifted upwards. Line up the protruding sections here. When correctly attached, you will hear a locking sound. click! Enjoying in a car Diagram of attached bracket Use the monitor in the open position as shown in the illustration to the right to prevent abnormal audio or damage resulting from vibrations in the car. The angle of the monitor can be adjusted up to about 30°. ≥ The angle of 30° the monitor may shift while driving due to vibration, etc. ≥ Depending on the type of headrest, you may not be able to attach the bracket. Releasing the unit from the bracket 23 cm (9 1/16q) or less In the event of an accident etc., the unit could become loose and cause injury. Release button 1 Press the release buttons (left and right) in towards the center of the bracket. 2 Lift the unit up to release it. ≥ Do not press the release buttons any time other than when detaching the unit from the bracket. 19 RQT8912
-
 1
1 -
2
-
3
-
4
-
5
-
6
-
7
-
8
-
9
-
10
-
11
-
12
-
13
-
 14
14 -
 15
15 -
 16
16 -
 17
17 -
 18
18 -
 19
19 -
 20
20 -
 21
21 -
 22
22 -
 23
23 -
 24
24 -
25
-
26
-
27
-
28
-
29
-
30
-
31
-
32
-
33
-
34
-
35
-
36
 |
 |
