Panasonic KX-FLB811 Mfp Laser Fax - Page 18
For KX-FLB801 users, If the top part of the extender is detached - kx flb801
 |
UPC - 037988809820
View all Panasonic KX-FLB811 manuals
Add to My Manuals
Save this manual to your list of manuals |
Page 18 highlights
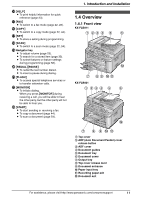
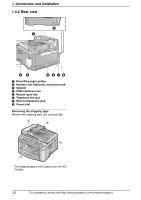
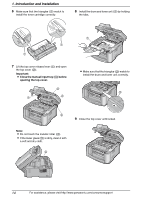
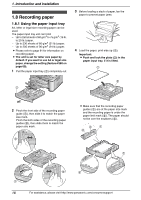
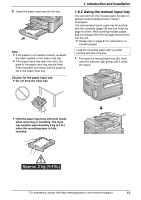
1. Introduction and Installation 2 Pull the output tray extender (1) forward gently until it clicks into place, then press the center part of the extender (2) to open. L Repeat from step 1 to install the upper output tray. 1.7.2 For KX-FLB801 users Pull the output tray extender (1) forward gently until it clicks into place, then press the center part of the extender (2) to open. 1 1 2 2 Note: L The upper output tray can hold up to approximately 100 sheets of printed paper. The lower output tray can hold up to approximately 50 sheets of printed paper. Remove the printed paper before the output tray becomes full. Note: L The output tray can hold up to approximately 150 sheets of printed paper. Remove the printed paper before the output tray becomes full. If the top part of the extender is detached 1. With the top part of the extender in the open position, insert the tab (1) into the left hole (2) of the extender. 2 1 16 For assistance, please visit http://www.panasonic.com/consumersupport
-
 1
1 -
2
-
3
-
4
-
5
-
6
-
7
-
8
-
9
-
10
-
11
-
12
-
 13
13 -
 14
14 -
 15
15 -
 16
16 -
 17
17 -
 18
18 -
 19
19 -
 20
20 -
 21
21 -
 22
22 -
 23
23 -
24
-
25
-
26
-
27
-
28
-
29
-
30
-
31
-
32
-
33
-
34
-
35
-
36
-
37
-
38
-
39
-
40
-
41
-
42
-
43
-
44
-
45
-
46
-
47
-
48
-
49
-
50
-
51
-
52
-
53
-
54
-
55
-
56
-
57
-
58
-
59
-
60
-
61
-
62
-
63
-
64
-
65
-
66
-
67
-
68
-
69
-
70
-
71
-
72
-
73
-
74
-
75
-
76
-
77
-
78
-
79
-
80
-
81
-
82
-
83
-
84
-
85
-
86
-
87
-
88
-
89
-
90
-
91
-
92
-
93
-
94
-
95
-
96
-
97
-
98
-
99
-
100
-
101
-
102
-
103
-
104
-
105
-
106
 |
 |
