Panasonic KXTG4321 Expandable Digital Cordless Answer Sys - Page 11
Battery installation and replacement, Preparation
 |
View all Panasonic KXTG4321 manuals
Add to My Manuals
Save this manual to your list of manuals |
Page 11 highlights
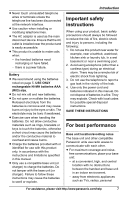
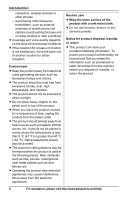
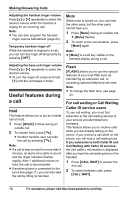
Note: L The AC adaptor must remain connected at all times. (It is normal for the adaptor to feel warm during use.) L The AC adaptor should be connected to a vertically oriented or floormounted AC outlet. Do not connect the AC adaptor to a ceiling-mounted AC outlet, as the weight of the adaptor may cause it to become disconnected. During a power failure The unit will not work during a power failure. We recommend connecting a corded-type telephone (without AC adaptor) to the same telephone line or to the same telephone line jack using a Panasonic T-adaptor (page 5). Emergency power can be supplied to the unit by connecting a Panasonic battery back-up power supply noted on page 5. If you subscribe to a DSL/ADSL service Please attach a DSL/ADSL filter (contact your DSL/ADSL provider) to the telephone line between the base unit and the telephone line jack in the event of the following: - noise is heard during conversations. - Caller ID features do not function properly. Preparation Battery installation and replacement Important: L Use the supplied rechargeable batteries (Part No. HHR-65AAABU). L When installing the batteries: - Wipe the battery ends (S, T) with a dry cloth. - Avoid touching the battery ends (S, T) or the unit contacts. - Ensure correct polarities (S, T). L When replacing the batteries: - USE ONLY rechargeable Ni-MH batteries AAA (R03) size. - Do NOT use Alkaline/Manganese/Ni-Cd batteries. - We recommend using the Panasonic rechargeable batteries noted on page 5, 7. 1 Press the notch on the handset cover firmly, and slide it in the direction of the arrow. To single-line telephone jack (RJ11C) 2 Insert the batteries negative (T) end first. Close the handset cover. Rechargeable Ni-MH ONLY DSL/ADSL filter For assistance, please visit http://www.panasonic.com/help 11
-
 1
1 -
2
-
3
-
4
-
5
-
 6
6 -
 7
7 -
 8
8 -
 9
9 -
 10
10 -
 11
11 -
 12
12 -
 13
13 -
 14
14 -
 15
15 -
 16
16 -
17
-
18
-
19
-
20
-
21
-
22
-
23
-
24
-
25
-
26
-
27
-
28
-
29
-
30
-
31
-
32
-
33
-
34
-
35
-
36
-
37
-
38
-
39
-
40
-
41
-
42
-
43
-
44
-
45
-
46
-
47
-
48
-
49
-
50
-
51
-
52
-
53
-
54
-
55
-
56
 |
 |
