Panasonic SAXR58 SAXR58 User Guide - Page 11
Connecting the antennas and AC mains lead, Using headphones, Rear panel
 |
View all Panasonic SAXR58 manuals
Add to My Manuals
Save this manual to your list of manuals |
Page 11 highlights
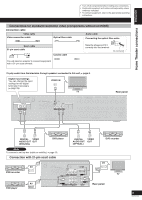
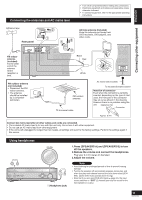
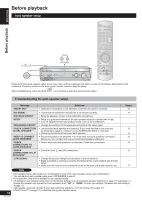
Connecting other equipment ENGLISH Connecting the antennas and AC mains lead • Turn off all components before making any connections. • Peripheral equipment and cables sold separately unless otherwise indicated. • To connect equipment, refer to the appropriate operating instructions. Adhesive tape Rear panel 2 1 1 AM loop antenna (included) Keep the antenna cord away from DVD recorders, DVD players, and other cords. 2 FM indoor antenna (included) Fix the other end of the antenna where reception is best. LOOP EXT LOOP ANT GND FM ANT DIGITAL IN AM ANT (TV/STB) (DVD RECORDER) (DVD PLAYER) (CD) OPTICAL1 OPTICAL2 COAXIAL1 COAXIAL2 3 OUT (DVD RECORDER) IN S VIDEO BlackVIDEO Red OUT IN IN IN OUT IN IN IN TV MONITOR DVD PLAYER DVD RECORDER TV/STB TV MONITOR DVD PLAYER DVD RECORDER VCR CENTER L IN TV/STB R IN CD White SUBWOOFER SURROUND FRONT IN IN DVD/DVD 6CH IN DVD RECORDER VCR AUDIO IN OUT TV/STB SUBWOOFER SURROUND R L SURROUND BACK R L FM outdoor antenna (not included) • Disconnect the FM indoor antenna. • The antenna should be installed by a competent technician. FM ANT FM outdoor antenna 75 Ω coaxial cable AC mains lead (included) To household mains socket Insertion of connector Even when the connector is perfectly inserted, depending on the type of inlet used, the front part of the connector may jut out as shown in the drawing. However there is no problem using the unit. Appliance inlet Connector Approx. 6 mm Connect AC mains lead after all other cables and cords are connected. • The included AC mains lead is for use with this unit only. Do not use it with other equipment. • Do not use an AC mains lead from other equipment. • If the unit is left unplugged for longer than two weeks, all settings will revert to the factory settings. Perform the settings again if this occurs. Using headphones VOLUME SPEAKERS A B AUTO ADVANCED SPEAKER SETUP DUAL AMP BI-AMP SPEAKERS A B SURROUND AUTO DETECTOR AUX S VIDEO IN VIDEO IN L AUDIO IN R TUNE SETUP MIC HDMI MENU SETUP INPUT SELECTOR RETURN ENTER VOLUME (Headphone jack) 1.Press [SPEAKERS A] and [SPEAKERS B] to turn off the speakers. 2.Reduce the volume and connect the headphones. Plug type: 6.3 mm stereo (in diameter) 3.Adjust the volume. Note • Avoid listening for prolonged periods of time to prevent hearing damage. • Turning the speakers off automatically engages stereo play, and when you play multi-channel sources they are down-mixed (2CH MIX). (Some DVD-Audio prohibit down-mixing.) • Note that if you are using DVD 6CH input (➡ page 20), the input source switches to "DVD" (2 channel) and only the sound for the front speakers is output. 11 RQTV0156
-
 1
1 -
2
-
3
-
4
-
5
-
 6
6 -
 7
7 -
 8
8 -
 9
9 -
 10
10 -
 11
11 -
 12
12 -
 13
13 -
 14
14 -
 15
15 -
 16
16 -
17
-
18
-
19
-
20
-
21
-
22
-
23
-
24
-
25
-
26
-
27
-
28
-
29
-
30
-
31
-
32
-
33
-
34
-
35
-
36
-
37
-
38
-
39
-
40
 |
 |
