Panasonic SCBTT270 SCBTT270 User Guide - Page 43
Troubleshooting guide
 |
UPC - 885170029880
View all Panasonic SCBTT270 manuals
Add to My Manuals
Save this manual to your list of manuals |
Page 43 highlights
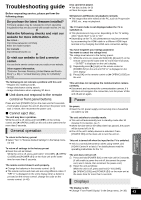
Troubleshooting Reference guide Before requesting service, please perform the following steps. Do you have the latest firmware installed? Firmware updates may be released to correct operating irregularities that are discovered with certain movies. (> 22) 4 Make the following checks and visit our website for more information. For U.S.A. : http://www.panasonic.com/help Enter the model number. For Canada : http://www.panasonic.ca 4 Or visit our website to find a service center. You can find a service center near you easily on our website. Other support information: "Customer Services Directory (United States and Puerto Rico)" (> 50) or "Limited Warranty (Only for CANADA)" (> 51) Disc cannot be played. ≥ The disc is dirty. (> 9) ≥ Check the region code. Still pictures (JPEG) do not playback normally. ≥ The images that were edited on the PC, such as Progressive JPEG, etc., may not playback. The TV tuner mode is not displayed when the TV is switched on. ≥ This phenomenon may occur, depending on the TV setting, when "Quick Start" is set to "On". ≥ Depending on the TV, this phenomenon may be prevented by reconnecting the HDMI cable to a different HDMI input terminal or by changing the HDMI auto connection setting. You have forgotten your ratings password. You want to cancel the ratings level. The ratings level returns to the factory preset. 1 While the unit is on, press and hold [OK], [B] and [Y] on the remote control at the same time for more than 5 seconds. j"00 RET" is displayed on the unit's display. 2 Repeatedly press [1] (right) on the remote control or [POWER Í/I] on the unit until "03 VL" is displayed on the unit's display. 3 Press [OK] on the remote control or [< OPEN/CLOSE] on the unit. The following do not indicate a problem with this unit: jRegular disc rotating sounds. jImage disturbance during search. jImage disturbance when replacing 3D discs. ∫ Unit does not respond to the remote control or front panel buttons. Press and hold [POWER Í/I] on the main unit for 5 seconds. jIf still unable to power the unit off, disconnect the power cord, wait 1 minute, then reconnect the power cord. ∫ Cannot eject disc. The unit may have a problem. While the unit is off, press and hold [9] on the remote control and [< OPEN/CLOSE] on the unit at the same time for more than 5 seconds. General operation To return to the factory preset ≥ Select "Yes" in "Restore Default Settings" in the Setup menu. (> 40) To return all settings to the factory preset ≥ Reset the unit as follows: While the unit is off, press and hold [+ VOLUME], [< OPEN/ CLOSE] and [POWER Í/I] on the main unit at the same time for more than 5 seconds. The remote control doesn't work properly. ≥ Change the batteries in the remote control. (> 9) ≥ The remote control and main unit are using different codes. If "SET " is displayed on the unit's display when a button is pressed on the remote control, change the code on the remote control. (> 40) This unit does not recognize the communication camera correctly. ≥ Disconnect and reconnect the communication camera. If it still does not recognize the connection, turn the power of this unit off and on again. Power No power. ≥ Insert the AC power supply cord securely into a household AC outlet. (> 18) The unit switches to standby mode. ≥ This unit will automatically turn to standby mode after 30 minutes if it is inactive. (> 7) ≥ When the time set for the sleep timer has passed, the power will be turned off. (> 6) ≥ One of the unit's safety devices is activated. Press [POWER Í/I] on the main unit to turn the unit on. This unit is turned off when the input for the TV is switched. ≥ This is a normal phenomenon when using VIERA Link (HDAVI Control 4 or later). For details please read the operating instructions for the TV. The unit does not turn off. 1 Press and hold [POWER Í/I] on the main unit for 5 seconds. (If still unable to power the unit off, disconnect the power cord, wait 1 minute, then reconnect the power cord.) 2 Reset the unit as follows: While the unit is off, press and hold [+ VOLUME], [< OPEN/CLOSE] and [POWER Í/I] on the main unit at the same time for more than 5 seconds. Displays Optional speaker settings Reference The display is dim. ≥ Change "Front Panel Display" in the Setup menu. (> 38) VQT3D27 43
-
 1
1 -
2
-
3
-
4
-
5
-
6
-
7
-
8
-
9
-
10
-
11
-
12
-
13
-
14
-
15
-
16
-
17
-
18
-
19
-
20
-
21
-
22
-
23
-
24
-
25
-
26
-
27
-
28
-
29
-
30
-
31
-
32
-
33
-
34
-
35
-
36
-
37
-
 38
38 -
 39
39 -
 40
40 -
 41
41 -
 42
42 -
 43
43 -
 44
44 -
 45
45 -
 46
46 -
 47
47 -
 48
48 -
49
-
50
-
51
-
52
 |
 |
