Panasonic SDR-S26 Sd Camcorder - Multi Language - Page 73
With other video devices
 |
UPC - 037988982615
View all Panasonic SDR-S26 manuals
Add to My Manuals
Save this manual to your list of manuals |
Page 73 highlights
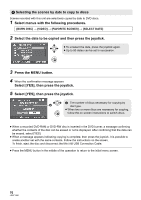
Playback With other products 3 With other video devices Recording (dubbing) images onto other video devices ≥ Use the AC adaptor to free you from worrying about the battery running down. VIDEO IN AUDIO IN A AV cable (supplied) ≥ Insert the plugs as far as they will go. ≥ Do not use any other AV cables except the supplied one. ≥ Select the video input on the video device and TV that this unit and the video device are connected to. 1 Connect this unit to a video device. 2 Turn on this unit, then rotate the mode dial to select . 3 Start playback on this unit. Then start recording on the connected device. To stop recording (dubbing) Stop recording on the connected device. Then stop playback on this unit. ∫ Using SD card slot or USB terminal of other video devices If you have a DVD recorder with an SD card slot or a USB terminal, images recorded by this unit can be copied (dubbed) onto the hard disk or a DVD disc. Refer to the operating instructions of your DVD recorder for information about whether or not it supports copying (dubbing) from an SD card or a USB terminal. When using a USB terminal Connect this unit to a DVD recorder with the USB cable (supplied), then select [PC/RECORDER] on the USB function selection screen. ≥ For details on how to copy (dub) the images, refer to the operating instructions of the DVD recorder. If you record (dub) images and then play them back on a wide-screen TV, they may be squeezed horizontally. In this case, refer to the operating instructions of the device you are recording (dubbing) to or read the operating instructions of the wide-screen TV and set the aspect setting to 16:9 (Full). 73 LSQT1488
-
 1
1 -
2
-
3
-
4
-
5
-
6
-
7
-
8
-
9
-
10
-
11
-
12
-
13
-
14
-
15
-
16
-
17
-
18
-
19
-
20
-
21
-
22
-
23
-
24
-
25
-
26
-
27
-
28
-
29
-
30
-
31
-
32
-
33
-
34
-
35
-
36
-
37
-
38
-
39
-
40
-
41
-
42
-
43
-
44
-
45
-
46
-
47
-
48
-
49
-
50
-
51
-
52
-
53
-
54
-
55
-
56
-
57
-
58
-
59
-
60
-
61
-
62
-
63
-
64
-
65
-
66
-
67
-
 68
68 -
 69
69 -
 70
70 -
 71
71 -
 72
72 -
 73
73 -
 74
74 -
 75
75 -
 76
76 -
 77
77 -
 78
78 -
79
-
80
-
81
-
82
-
83
-
84
-
85
-
86
-
87
-
88
-
89
-
90
-
91
-
92
-
93
-
94
-
95
-
96
-
97
-
98
-
99
-
100
-
101
-
102
-
103
-
104
-
105
-
106
-
107
-
108
-
109
-
110
-
111
-
112
-
113
-
114
-
115
-
116
 |
 |
