Panasonic SL-1200MK2PK Operating Instructions - Page 5
Putting The Player Together, Connections And Installation
 |
View all Panasonic SL-1200MK2PK manuals
Add to My Manuals
Save this manual to your list of manuals |
Page 5 highlights
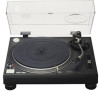
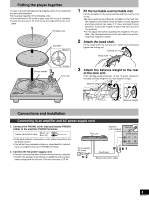
Putting the player together In order to prevent damage during shipping some of the equipment has been disassembled. Put the player together in the following order. •Do not connect the AC power supply cord until set up is complete. •Leave the dust cover off until set up and adjustments are com- plete. 1 Turntable mat Turntable Magnet 1 Fit the turntable and turntable mat. Put the turntable on the center spindle and then lay the mat on top. •Be very careful when putting the turntable on the main unit. The magnet on the bottom of the turntable is finely adjusted and sharp contact can cause it to move and lead to poor operation. Ensure the magnet remains free from dust and iron particles. •Do not adjust the screws attaching the magnet to the turntable. The rated performance of the unit cannot be guaranteed if the magnet is moved. 2 Attach the head shell. Fit the head shell into the tone arm, keep it horizontal and tighten the locking nut. Locking nut Head shell 32 Center spindle Screws Tone arm 3 Attach the balance weight to the rear of the tone arm. If the cartridge weighs between 10 and 13 grams, attach the included auxiliary weight to the main balance weight. Balance weight Auxiliary weight Connections and installation Connecting to an amplifier and AC power supply cord 1. Connect the PHONO earth lead and stereo PHONO cables to the amplifier PHONO terminals. Stereo connection cable White (L) Red (R) •If the earth lead isn't connected, a hum will be heard from the AC power source. •You will not have adequate volume or sound quality if connecting to an amplifier that has no PHONO terminals. 2. Connect the AC power supply cord. •Connect this cord only after all other connections are complete. •Confirm the wattage of AC outlets on amplifiers and receivers before using them for this unit. This unit consumes 13.5 W. This unit Amplifier (not included) SIGNAL GND PHONO TUNER To household AC outlet 2 Earth lead (L) (R) 11 Stereo connection cable 5 RQT7018
-
 1
1 -
 2
2 -
 3
3 -
 4
4 -
 5
5 -
 6
6 -
 7
7 -
 8
8 -
 9
9 -
 10
10 -
 11
11 -
12
 |
 |
