Pentax 18836 Operation Manual - Page 80
Setting the Sensitivity, Press the, button in, mode., Use the four-way controller
 |
UPC - 027075126442
View all Pentax 18836 manuals
Add to My Manuals
Save this manual to your list of manuals |
Page 80 highlights
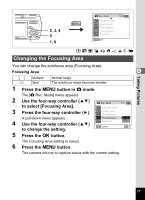
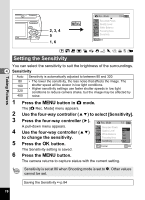
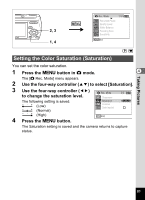
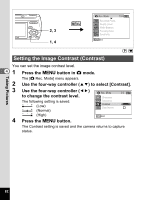
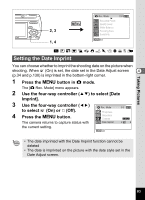
Taking Pictures 2, 3, 4 5 1, 6 MENU Rec. Mode 1/3 7M Recorded Pixels Quality Level AWB White Balance Focusing Area ISO AUTO Sensitivity MENU Exit R A C Y q < I i \ E P D > Setting the Sensitivity You can select the sensitivity to suit the brightness of the surroundings. 4 Sensitivity Auto Sensitivity is automatically adjusted to between 80 and 320. 80 • The lower the sensitivity, the less noise that affects the image. The 160 shutter speed will be slower in low light conditions. 320 • Higher sensitivity settings use faster shutter speeds in low light conditions to reduce camera shake, but the image may be affected by 400 noise. 1 Press the 3 button in A mode. The [A Rec. Mode] menu appears. 2 Use the four-way controller (23) to select [Sensitivity]. 3 Press the four-way controller (5). Rec. Mode 1/3 A pull-down menu appears. 7M Recorded Pixels 4 Use the four-way controller (23) to change the sensitivity. Quality Level AWB White Balance Focusing Area Auto 80 160 320 5 Press the 4 button. ISO AUTO Sensitivity 400 MENU Cancel OK OK The Sensitivity setting is saved. 6 Press the 3 button. The camera returns to capture status with the current setting. Sensitivity is set at 80 when Shooting mode is set to y. Other values cannot be set. Saving the Sensitivity 1p.84 78
-
 1
1 -
2
-
3
-
4
-
5
-
6
-
7
-
8
-
9
-
10
-
11
-
12
-
13
-
14
-
15
-
16
-
17
-
18
-
19
-
20
-
21
-
22
-
23
-
24
-
25
-
26
-
27
-
28
-
29
-
30
-
31
-
32
-
33
-
34
-
35
-
36
-
37
-
38
-
39
-
40
-
41
-
42
-
43
-
44
-
45
-
46
-
47
-
48
-
49
-
50
-
51
-
52
-
53
-
54
-
55
-
56
-
57
-
58
-
59
-
60
-
61
-
62
-
63
-
64
-
65
-
66
-
67
-
68
-
69
-
70
-
71
-
72
-
73
-
74
-
 75
75 -
 76
76 -
 77
77 -
 78
78 -
 79
79 -
 80
80 -
 81
81 -
 82
82 -
 83
83 -
 84
84 -
 85
85 -
86
-
87
-
88
-
89
-
90
-
91
-
92
-
93
-
94
-
95
-
96
-
97
-
98
-
99
-
100
-
101
-
102
-
103
-
104
-
105
-
106
-
107
-
108
-
109
-
110
-
111
-
112
-
113
-
114
-
115
-
116
-
117
-
118
-
119
-
120
-
121
-
122
-
123
-
124
-
125
-
126
-
127
-
128
-
129
-
130
-
131
-
132
-
133
-
134
-
135
-
136
-
137
-
138
-
139
-
140
-
141
-
142
-
143
-
144
-
145
-
146
-
147
-
148
-
149
-
150
-
151
-
152
-
153
-
154
-
155
-
156
-
157
-
158
-
159
-
160
-
161
-
162
-
163
-
164
 |
 |
