Pentax OPTIOA20 Operation Manual - Page 164
Changing the Date and Time, Select [Date Adjust] on
 |
UPC - 027075121355
View all Pentax OPTIOA20 manuals
Add to My Manuals
Save this manual to your list of manuals |
Page 164 highlights
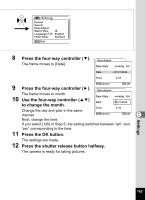
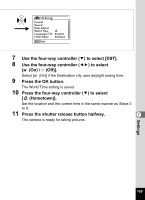
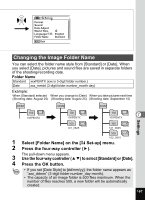
How to recall the [H Set-up] menu Shutter release button MENU Four-way controller OK button MENU button Rec. Mode Recorded Pixels Quality Level White Balance AF Setting AE Metering Sensitivity 10M AWB AUTO 800 MENU Exit Changing the Date and Time You can change the initial date and time settings. You can also set the style in which the date appears on the camera. Select [mm/dd/yy], [dd/mm/yy] or [yy/mm/dd]. 1 Select [Date Adjust] on the [H Set-up] menu. 2 Press the four-way controller (5). The Date Adjust screen appears. 3 Press the four-way controller (5). 4 7 The frame moves to [mm/dd/yy]. Use the four-way controller (23) to select the date display style. Date Adjust Date Style mm/dd/yy 24h Date 01/01/2006 Time 0:00 MENU Cancel OK OK 5 Press the four-way controller (5). Date Adjust The frame moves to [24h]. 6 Date Style mm/dd/yy 24h Use the four-way controller (23) Date 01/01/2006 to select [24h] (24-hour display) or [12h] (12-hour display). Time 0:00 7 Press the four-way controller (5). MENU Cancel OK OK The frame moves to [Date Style]. Settings 162
-
 1
1 -
2
-
3
-
4
-
5
-
6
-
7
-
8
-
9
-
10
-
11
-
12
-
13
-
14
-
15
-
16
-
17
-
18
-
19
-
20
-
21
-
22
-
23
-
24
-
25
-
26
-
27
-
28
-
29
-
30
-
31
-
32
-
33
-
34
-
35
-
36
-
37
-
38
-
39
-
40
-
41
-
42
-
43
-
44
-
45
-
46
-
47
-
48
-
49
-
50
-
51
-
52
-
53
-
54
-
55
-
56
-
57
-
58
-
59
-
60
-
61
-
62
-
63
-
64
-
65
-
66
-
67
-
68
-
69
-
70
-
71
-
72
-
73
-
74
-
75
-
76
-
77
-
78
-
79
-
80
-
81
-
82
-
83
-
84
-
85
-
86
-
87
-
88
-
89
-
90
-
91
-
92
-
93
-
94
-
95
-
96
-
97
-
98
-
99
-
100
-
101
-
102
-
103
-
104
-
105
-
106
-
107
-
108
-
109
-
110
-
111
-
112
-
113
-
114
-
115
-
116
-
117
-
118
-
119
-
120
-
121
-
122
-
123
-
124
-
125
-
126
-
127
-
128
-
129
-
130
-
131
-
132
-
133
-
134
-
135
-
136
-
137
-
138
-
139
-
140
-
141
-
142
-
143
-
144
-
145
-
146
-
147
-
148
-
149
-
150
-
151
-
152
-
153
-
154
-
155
-
156
-
157
-
158
-
 159
159 -
 160
160 -
 161
161 -
 162
162 -
 163
163 -
 164
164 -
 165
165 -
 166
166 -
 167
167 -
 168
168 -
 169
169 -
170
-
171
-
172
-
173
-
174
-
175
-
176
-
177
-
178
-
179
-
180
-
181
-
182
-
183
-
184
-
185
-
186
-
187
-
188
-
189
-
190
-
191
-
192
-
193
-
194
-
195
-
196
-
197
-
198
-
199
 |
 |
