Pfaff 72 Owner's Manual
Pfaff 72 Manual
 |
View all Pfaff 72 manuals
Add to My Manuals
Save this manual to your list of manuals |
Pfaff 72 manual content summary:
- Pfaff 72 | Owner's Manual - Page 1
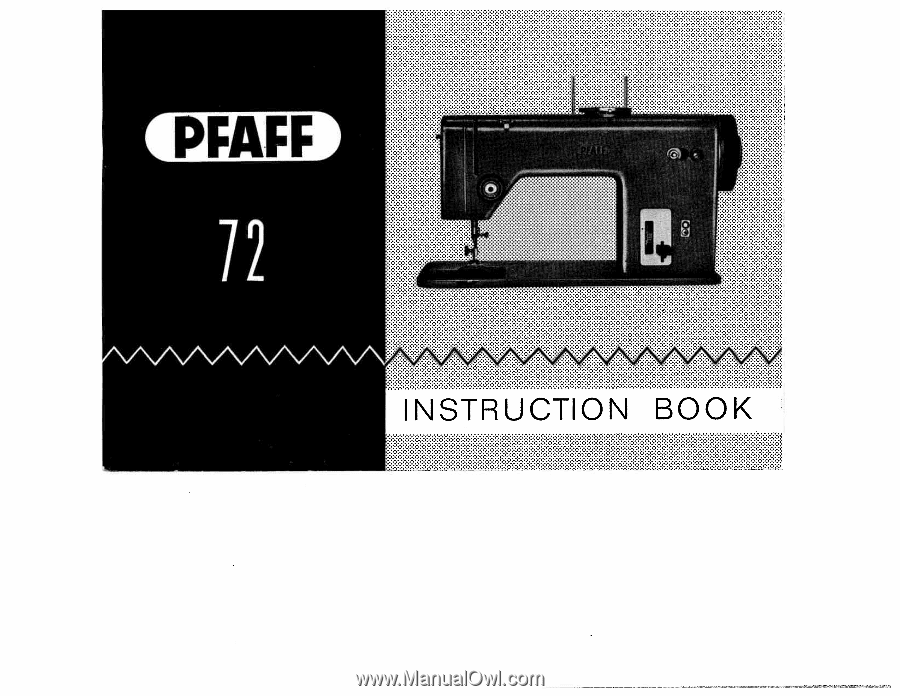
INSTRUCTION BOOK - Pfaff 72 | Owner's Manual - Page 2
, you will find this book a valuable guide to easy sewing. Follow these simple instructions and familiarize yourself with the exclusive features of your machine. You will find sewing exciting on your easy-to-operate Pfaff 72. If you have any sewing problems, please contact your Plaff dealer. He will - Pfaff 72 | Owner's Manual - Page 3
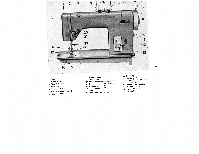
disengaging mechanism Bobbin winder thread retainer 12 Reverse feed control 13 Stitch length control 14 Bed slide 15 Pt aft rotary sewing hook 2 DR 849 16 Feed dog 17 Needle plate 18 Sewing foot thumb screw 19 Light switch 20 Needle thread tension 21 Presser bar lifter 22 Needle set screw 23 - Pfaff 72 | Owner's Manual - Page 4
before you begin sewing. • Never run a threaded machine unless you have fabric under the sewing foot. • Place both threads back under the sewing foot before you put fabric into the machine. • The machine will feed the material under the sewing foot automatically. All you have to do is guide the work - Pfaff 72 | Owner's Manual - Page 5
DR 506 Operation of Your Sewing Machine I Engaging the Sewing Mechanism Hold balance wheel and turn stop motion knob clockwise. Disengaging the Sewing Mechanism Hold balance wheel and turn stop motion knob counter-clockwise (toward you). The sewing mechanism is then disengaged for bobbin winding. - Pfaff 72 | Owner's Manual - Page 6
the cabinet within easy reach of your foot. Rest the right foot on the control pedal and press. The harder you press, the faster the machine will run. On some sewing cabinets, the foot control cord can be passed through the opening in the bedplate extension. R 7132 5 - Pfaff 72 | Owner's Manual - Page 7
DR 851 Straight Stitching For straight-stitch sewing set: Dial A = 0 Lever B = Center • Control G regulates the stitch length. For detailed instructions please refer to page 18. To backtack the end of a seam, simply depress the finger-tip control. DR 009A 6 - Pfaff 72 | Owner's Manual - Page 8
DR 851 Zigzag Sewing If you want to switch from straight (A on O") to zigzag stitching, turn can be moved from the center to the left or right of the slot, as desired. Control G lengthens zig zag stitches or packs them more closely together (so tin stitch). III- 7 The position of lever B (left - Pfaff 72 | Owner's Manual - Page 9
Removing the Bobbin Case The needle has to clear the needle-plate. Lift front end of bed slide and pull. Lift latch k with the thumb of your left hand and pull out bobbin case with bobbin. When you release the latch, the bobbin drops out. 8 - Pfaff 72 | Owner's Manual - Page 10
bobbin. Pass the thread through the righthand thread guide, down and around the thread retainer stud, and up to the bobbin. Wind a few turns of thread on the bobbin in clockwise direction. Push the bobbin to the right and start the machine. The bobbin winder will stop automatically when the bobbin - Pfaff 72 | Owner's Manual - Page 11
Types of Fabri. cs Hercerize Si.lk Needle Cotton Size Fine Fabrics such as georgette, chiffon, batiste, voile, lawn, silk. 80 0 60 to or 100 twist 70 Lightweight Fabrics such as dress silks and cottons, sheer woolens, shirting, dra- 70 to A&B twist 80 peries. 80 Medium Fabrics - Pfaff 72 | Owner's Manual - Page 12
Important Facts about Needles On Pfaff 72 sewing machines, System 130 R, flat-shank needles are used for all ordinary sewing and embroidery work. The last column in the chart on page 12 gives you the needle size required for the material in hand Genuine Pfaff needles, System 130 Fl, are available - Pfaff 72 | Owner's Manual - Page 13
Upper Threading Raise the presser bar lifter and swing the spool pins up to the vertical position. Place spool 1 on one of the spool pins and lead the thread behind both scrolls of thread retainer 2 (see ill. at top of p. 15). Seize the thread on the right and left of the thread retainer and pull it - Pfaff 72 | Owner's Manual - Page 14
St / / 9c iQ - Pfaff 72 | Owner's Manual - Page 15
pull needle thread to draw bobbin thread up through the needle hole. Place both threads back under the sewing foot. Correct Tension Regu'ation Balanced tensions are essential far sewing. If your tensicn is correct, you will have perfect seams as sketched below (Ill). Sketch I - The threads - Pfaff 72 | Owner's Manual - Page 16
Regulating the Thread Tension The bobbin thread tension has been set for a medium grade and need not be adjusted for all ordinary sewing operations. If a special sewing operation should require a looser or tighter tension, turn the small knurled screw on the bobbin case with the tip of your thumb - Pfaff 72 | Owner's Manual - Page 17
slot. (The position of the mark is indicated by an arrow in the illustration). I Reverse Sewing To sew in reverse, simply press the finger-tip control down. When the control is released, the machine resumes forward sewing. This feature is ideal for backtacking the beginning or end of a seam and for - Pfaff 72 | Owner's Manual - Page 18
Changing the Sewing Foot Lift both needle and presser bar to their highest positions and turn sewing foot thumb screw b to the left. Tilt the foot sideways and pull it down. DR 866 Ii it T Reverse procedure to slip on new foot and tighten screw b securely. DR 867 19 - Pfaff 72 | Owner's Manual - Page 19
the white arrow). The lever will be retained in this position and the fabric will cease feeding. The machine feed is dropped for darning, hoop embroidery and button sewing. To raise the machine feed, press the lever down and let it return to its original position. Darning and Embroidery Foot Remove - Pfaff 72 | Owner's Manual - Page 20
Foot (with Clear-View Shoe) All-purpose sewing foot No. 93-100 179-00 is attached as instructed on page 19. The transparency of its shoe facilitates all sewing operation where it is important to watch the needle penetrate the fabric. Special application possibilities are discussed in the second - Pfaff 72 | Owner's Manual - Page 21
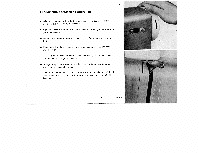
on regular and proper cleaning and oiling. Use Pfaff sewing machine oil only, Never lubricate machine with animal or vegetable oils. All moving and rotating parts require regular lubrication. Begin under the bedplate. If you have a portable machine, tilt it back, loosen the large thumb screw - Pfaff 72 | Owner's Manual - Page 22
.mTaatikmseoefot tuobtrtuthismeh.eb, Tobraebkmienoavceatosteohtehapnnidcekethdaelendbopblraebtmienoavanenddaccclcleeuaamnnuttlhhaeteiovmniscaicnohiftiynpeoafcfketehedde sewing hook. Before you begin needle-bar end of to the oil the mechanism under the bedplate and at the machine, remove the dirt - Pfaff 72 | Owner's Manual - Page 23
DR024 Changing the Light Bulb The built-in 15-watt sewing light illuminates the area of stitching perfectly. To change the light bulb, remove the face cover, push the bulb into its socket, turn left, and - Pfaff 72 | Owner's Manual - Page 24
Trouble Shooting 1. Machine Skips Stitches Cause: Needle incorrectly inserted. Wrong needle. Needle bent, Machine threaded improperly from chart on page 12. (For ordinary sewing, use System 130 R needles.) Insert new needle. Check and correct threading as instructed on pages 14 and 15. Use correct - Pfaff 72 | Owner's Manual - Page 25
strikes point of sewing hook. Needle too thread between tension discs. 5. Machine Feeds Improperly Cause: Feed dog dropped. Machine does not feed because stitch motion. Guide the material lightly. Push bobbin case until you hear it snap into place. Remedy: Adjust tensions as instructed. Use only - Pfaff 72 | Owner's Manual - Page 26
by pieces of thread. Mechanism clogged by inferior oil. Bobbin winder working while sewing. 7. Motor idles Cause: Motor disengaging lever raised. Remedy: Clean and oil hook raceway. Use only Pfaff sewing machine oil - never salad oil or glycerine. Stop bobbin winder. Remedy: Flick lever down - Pfaff 72 | Owner's Manual - Page 27
. Use right edge of foot as a guide. 'V Sew parallel rows of straight or zig zag stitches at various distances from the fabric edge by using adjustable seam guide No. 847 300 and the edge stitcher (without quilting gauge). The seam guide is fastened to the machine bed with the long thumb screw. For - Pfaff 72 | Owner's Manual - Page 28
DR 869 47 561 Flat Felled Seams Machine Setting: A = 0, B = * Flat felled seams are used to durably join two pieces of fabric. They are made in two operations. Flat felled seams usually are straight- - Pfaff 72 | Owner's Manual - Page 29
edge and close to the folded edge. Sew backwards as far as the rear fabric edge. Take the work out of the machine by pulling it forward. Don't trim the of hem, as shown in sketch 2. Then hem the second edge, as instructed above. Before you hem the last edge, cut away about 1/3" of the hem sewn first - Pfaff 72 | Owner's Manual - Page 30
Use a long wide zigzag stitch and sew edge with the needle taking one stitch into the fabric and the other over its edge (normal tension setting). You may overcas edges after fabric is cut and before the pieces are joined. DR 872 Butt Seaming Machine Setting: A = 3 or 4, B = u838 954 Two similar - Pfaff 72 | Owner's Manual - Page 31
of the fabric. Place the patch over the damaged I area. Sew it down with a wide zigzag stitch of medium length. V I For additional strength stitch over corners twice. Turn over and trim close to seams. u838 954 Attaching Lace Machine Setting: A = 2 B I You can attach lace edging in one simple - Pfaff 72 | Owner's Manual - Page 32
,-. - DF 033 338 954 Applique Work - Machine Setting: A = 2, B Applique is easy and modern. but essential sections of design with granito stitches. V Trim excess material close to the seam and sew over edges of applique with a mediumwide satin stitch. If you want to give the design a - Pfaff 72 | Owner's Manual - Page 33
Machine Seing: A = 0; B = + Stitch length: Medium 4 Insert twin hemstitching needle, System 130 ZwiHo, as instructed and so forth, can be obtained with Pfaffs System 130 twin needle. The harder the seam, turn fabric half a turn and sew second row. Guide fabric in such a way that wing needle - Pfaff 72 | Owner's Manual - Page 34
Pfaff dealer. Machine Setting: A 0 B , feed dog dropped. Place button under button sewing foot and align so that needle will enter left hole. Let one or two stitches. Raise needle. Turn dial A counter-clockwise, usually to 3, until centered over right hole. Start machine and sew as many zig zag - Pfaff 72 | Owner's Manual - Page 35
I Sewing Buttonholes Machine Setting: A = 1 '/2 (first notch) B = Stitch Length: Almost 0 (for seam. If you prefer more prominent buttonholes, pull a filler cord in the guide groove. To get the correct stitch length, sew on a piece of scrap material. In making buttonholes in soft or loosely - Pfaff 72 | Owner's Manual - Page 36
(h/io") from end of first row. 5 Turn dial A to second notch position. Make second tack, as instructed above (under 3). 6 Turn dial A to "0" and make 3 or 4 fastening stitches. 7 Trim both the sewing and filler threads. Open the buttonhole with your seam ripper. Be careful not to injure the bartacks - Pfaff 72 | Owner's Manual - Page 37
Machine setting: A 0, B Prepare your machine for darning as instructed on page 20. Place fabric into darning hoop, the damaged area being in the center of the hoop. Hoops may be obtained from your Pfaff with the machine running at high speed. Then turn the fabric at right angles and sew back and - Pfaff 72 | Owner's Manual - Page 38
meA 2h,s to 3, B =' The procedure below is primarily used for block letters. Set needle plate so that feed dog feeds the material. Attach all-purpose sewing foot and set machine for satin stitch. Sew outlines of monogram, making sure that seams do not overlap at joints of letters. DR 031 39 - Pfaff 72 | Owner's Manual - Page 39
Cording Machine Setting: A = 0 ' B To cord on your Pfaff 72, use a cording foot and a twin needle. Twin needles are available for needle distances special request and at extra cost. 'II Changing the N ee dIe and the Sewing Foot Bring take-up lever to highest point, loosen needle set screw a, and pull - Pfaff 72 | Owner's Manual - Page 40
foot with the guide attached. Thread Size Pin tucks and narrow cording are made with a No. 50 embroidery thread, wider cording with sewing silk in the needle and on the bobbin. Set the machine for a medium threads The bobbin thread is drawn up as instructed on page 16. To do this, hold - Pfaff 72 | Owner's Manual - Page 41
grooves of the foot and use it as a guide. For a larger spacing between tucks, use the adjustable guide (see ill, on page 41) which is (up to needle eye only), lift foot, turn fabric, lower foot, and continue sewing. To stitch an acute angle, turn fabric halfway, let needle make one stitch, turn - Pfaff 72 | Owner's Manual - Page 42
needle had sufficient practice. straight and position by Some of the designs you can make are illustrated below. For ornamental sewing, use all-purpose sewing foot or zigzag sewing foot - No. 838 954. L Interesting two-needle effects can be obtained by using a 1.6-mm twin needle (see page 40 - Pfaff 72 | Owner's Manual - Page 43
to medium. Buy coarse, four-ply embroidery thread in the desired co lors from your Pfaff dealer. Embroidery designs made with this thread are very attractive. They have dimensional quality and closely resemble manual embroidery work The adjoining designs were made with the zigzag stitch. To make the - Pfaff 72 | Owner's Manual - Page 44
the laundry. To butt seam the various sections of curtains, proceed as instructed on p. 31. Plastic Sheets Machine Setting: Stitch width lever A = 0 to 2; needle position lever after the sewing. To prevent plastic sheets from sticking to the sewing foot, wipe its sole with an oily cloth. 45 - Pfaff 72 | Owner's Manual - Page 45
Foot Dropping the Machine Feed Darning foot All-purpose Sewing Foot Contents Page 1 2 3 4 4 5 5 6 7 8 9 10 11 12 13 17 18 18 19 20 20 21 Care and Maintenance Cleaning and Oiling Removing and Replacing the Face Cover Changing the Ligth Bulb Trouble Shooting Using Sewing Feet and Attachments Zipper
-
 1
1 -
 2
2 -
 3
3 -
 4
4 -
 5
5 -
 6
6 -
 7
7 -
8
-
9
-
10
-
11
-
12
-
13
-
14
-
15
-
16
-
17
-
18
-
19
-
20
-
21
-
22
-
23
-
24
-
25
-
26
-
27
-
28
-
29
-
30
-
31
-
32
-
33
-
34
-
35
-
36
-
37
-
38
-
39
-
40
-
41
-
42
-
43
-
44
-
45
 |
 |
INSTRUCTION
BOOK