Pfaff SMARTER BY 260c Manual
Pfaff SMARTER BY 260c Manual
 |
View all Pfaff SMARTER BY 260c manuals
Add to My Manuals
Save this manual to your list of manuals |
Pfaff SMARTER BY 260c manual content summary:
- Pfaff SMARTER BY 260c | Manual - Page 1
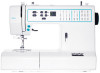
Owner's Manual 260c SMARTER BY PFAFF™ - inspired and developed by the premier PFAFF® sewing machine brand - Pfaff SMARTER BY 260c | Manual - Page 2
be left unattended when plugged in. Always unplug this sewing machine from the electric outlet immediately after using and before cleaning, removing covers, lubricating or when making any other user servicing adjustments mentioned in the instruction manual. WARNING -TO REDUCE THE RISK OF BURNS, FIRE - Pfaff SMARTER BY 260c | Manual - Page 3
or a similarly qualified person, in order to avoid a hazard. • This sewing machine is provided with double insulation. Use only identical replacement parts. See instructions for Servicing of Double-Insulated Appliances. SAVE THESE INSTRUCTIONS FOR EUROPE ONLY: This appliance can be used by children - Pfaff SMARTER BY 260c | Manual - Page 4
Connect to the power supply 10 Pack away after sewing 11 Free arm 11 Replacing the stitch plate 32 Troubleshooting 33 Technical specification 34 Leveling the machine base plate 11 Thread cutter 11 Spool pins 12 Threading the machine 13 Needle threader 14 Threading for twin needle 15 - Pfaff SMARTER BY 260c | Manual - Page 5
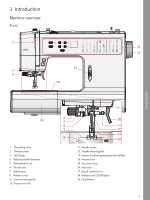
1 Introduction Machine overview Front Introduction 1. Threading slots 2. Thread cutter 3. LED lamp 4. Built-in needle threader 5. Buttonhole lever 6. Needle bar 7. Stitch plate 8. Bobbin cover 9. Lower thread guide 10. Presser foot lift 11. Needle screw 12. Needle thread guide 13. Presser foot - Pfaff SMARTER BY 260c | Manual - Page 6
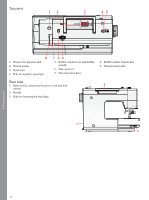
Top parts 1. Presser foot pressure dial 2. Thread guides 3. Spool caps 4. Hole for auxiliary spool pin 5. Bobbin winder lever and bobbin spindle 6. Take-up lever 7. Thread tension discs 8. Bobbin winder tension disc 9. Thread tension - Pfaff SMARTER BY 260c | Manual - Page 7
blindhem stitches. The toe on the foot guides the fabric. The red guide on the foot is designed to ride sew closer to zipper teeth. One-Step Buttonhole Foot 5B (shown as 5B in the LED Display) This foot has a space in the back for a button used to set the size of the buttonhole. The machine will sew - Pfaff SMARTER BY 260c | Manual - Page 8
Description Straight stitch For seaming and topstitching. Select from 15 different needle positions. Zigzag stitch Reinforce seams, clean finish, stretch sewing, lace insertion. 03 3 04 0 05 0 06 3 07 0 08 0 09 0 10 0 11 3 12 5B 2-4 Closed overlock Seam and overcast in one - Pfaff SMARTER BY 260c | Manual - Page 9
Quilt stitches Stitch № Presser foot 13 2A Thread tension 3-5 Name Pin stitch Description Decorative edge. 14 2A 15 2A 16 2A 17 2A 18 2A 3-5 Quilt stitch Quilting stitch using monofilament needle thread and increase needle thread tension. 3-5 Antique quilt Decorative quilting stitch. - Pfaff SMARTER BY 260c | Manual - Page 10
off the machine carrying case. 2. Remove all outer packing material and the plastic bag. Note: Your SMARTER BY PFAFF™ 260c machine is adjusted to ON to turn on power and light (C). For the USA and Canada This sewing machine has a polarized plug (one blade wider than the other). To reduce the risk - Pfaff SMARTER BY 260c | Manual - Page 11
tray. When attached, a hook keeps the accessory tray securely attached to the machine. Remove the tray by sliding it to the left. Leveling the machine base plate To make sure your machine stands steadily on your sewing surface you can adjust the base plate height. Turn the base plate adjusting - Pfaff SMARTER BY 260c | Manual - Page 12
all thread spools are manufactured in the same way. If you experience problems with the thread, turn the spool so that the thread reels off in or for a second spool when sewing with a twin needle. Insert the auxiliary spool pin into the hole at the top of the machine (A). Slide on a large spool cap - Pfaff SMARTER BY 260c | Manual - Page 13
Preparations Threading the machine Make sure that the presser foot is raised and the needle is in its highest position. 1. Place the thread on the spool pin and fit the appropriately sized spool cap. 2. Pull the thread into the thread guide (A) from front to back and thread guide (B) from back to - Pfaff SMARTER BY 260c | Manual - Page 14
through the needle eye. 2. Place the thread from the back over the thread guide (B) and under the small hook (C). 3. Let the needle threader gently swing back. some optional accessories that require manual threading of the needle. When threading the needle manually, make sure that the needle is threaded - Pfaff SMARTER BY 260c | Manual - Page 15
Preparations Threading for twin needle Replace the sewing needle with a twin needle. Make sure that the slot on the right side of the needle thread guide (G). Make sure that the threads do not become twisted together. 5. Thread the needles manually. Note: It may be necessary to reduce the stitch - Pfaff SMARTER BY 260c | Manual - Page 16
Bobbin winding 1. Place the thread spool on the spool pin. Slide a spool cap tightly against the spool. 2. Place the thread into the thread guide (A) from front to back. Pull the thread clockwise around the bobbin winder tension disc (B). 3. Thread through the hole in the bobbin (C) from the - Pfaff SMARTER BY 260c | Manual - Page 17
fully raised and the machine is turned off before stitch plate thread guide from (C) to (D). Pull the thread at the arrow markings into the stitch plate thread guide from (D) to presser foot pressure. For specialty techniques or when sewing on very light or heavy fabric, adjusting the pressure - Pfaff SMARTER BY 260c | Manual - Page 18
thread tension recommendation for all stitches. For the best stitch appearance and durability, make sure the needle thread tension is correctly adjusted. For general sewing, the threads evenly meet between the two layers of fabric. If the bobbin thread is visible on the top side of the fabric, the - Pfaff SMARTER BY 260c | Manual - Page 19
stitches, breakage or snapping of the thread. It can also damage the stitch plate. Do not use asymmetrical twin needles (C), they can damage your sewing machine. Changing the needle 1. Use the hole in the multi-purpose tool to hold the needle. 2. Loosen the needle screw. Use the screwdriver if - Pfaff SMARTER BY 260c | Manual - Page 20
when the lever is switched. Turn the handwheel one full turn or start sewing to re-engage the feed dogs. Presser foot lift The presser foot is lowered or raised with the presser foot lift. If you are sewing on heavy fabric or several layers of fabric, the presser foot can be - Pfaff SMARTER BY 260c | Manual - Page 21
5. Needle stop up/down 6. Stitch width or stitch positioning 7. Stitch length 8. Info button 9. Direct selection buttons Reverse If you press the reverse button while sewing, the machine sews in reverse for as long as you keep the button pressed. Start/stop Press this button to start or stop the - Pfaff SMARTER BY 260c | Manual - Page 22
moving and you continue pressing the foot control, the security switch will stop the machine completely. Restart the sewing machine by switching the ON/ OFF switch to the OFF position and then ON again. Note: If the problem is still not solved, please contact your local authorized PFAFF® dealer. 22 - Pfaff SMARTER BY 260c | Manual - Page 23
Sewing 3 Sewing When the machine is turned on, straight stitch 01 is selected by default. reset to default when another stitch is selected. The adjusted settings are not automatically saved when turning your machine off. Press "-" or "+" once next to the setting you wish to change. The set value - Pfaff SMARTER BY 260c | Manual - Page 24
threads toward the back. Press the foot control. Gently guide the fabric along the seam guide letting the machine feed the fabric. Note: Achieve more exact placement of your straight stitch when topstitching, inserting zippers or sewing piping by adjusting the needle position. Center needle position - Pfaff SMARTER BY 260c | Manual - Page 25
out easily and has the give needed for stretch fabrics. The reinforced straight stitch is also great for topstitching on heavier fabrics. Carefully guide the fabric while sewing as the fabric moves back and forth. Three-step zigzag stitch Three-step zigzag stitch is used to overcast raw edges. Make - Pfaff SMARTER BY 260c | Manual - Page 26
. It is perfect for stretch fabrics. The sewn result is more elastic than normal seams, very durable and quickly done. Use foot number 3. Tip: When sewing, guide the fabric edge along the metal pin of the foot. Stitches will form over the pin and prevent the fabric from puckering. Note: For stitch - Pfaff SMARTER BY 260c | Manual - Page 27
of fabric. If the stitches are visible on the right side, adjust edge guide A by turning adjusting screw B until the stitch that catches the hem just barely shows. Sewing on patches and appliqués To cover large holes it is necessary to sew a new piece of fabric onto the damaged area. Baste the new - Pfaff SMARTER BY 260c | Manual - Page 28
stitch or the threestep zigzag stitch. Trim the fabric underneath close to the stitching. Sewing on buttons Sew buttons quickly with your sewing machine. 1. Remove the presser foot and lower the feed dogs. 2. Set the machine for zigzag stitch and set the stitch length to 0. 3. Mark the fabric where - Pfaff SMARTER BY 260c | Manual - Page 29
. The buttonhole is sewn from the front of the presser foot to the back as illustrated. The machine ties off and stops sewing when the last buttonhole column is finished. 7. Once the buttonhole is finished, raise the presser foot. Pull the buttonhole lever towards you and push it - Pfaff SMARTER BY 260c | Manual - Page 30
Sewing Corded buttonhole Corded buttonholes that are sewn with gimp threads are more stable, durable and have a professional appearance. Use pearl cotton or a regular gimp thread. 1. - Pfaff SMARTER BY 260c | Manual - Page 31
left presser foot position (B). Center zipper 1. Sew the two fabrics right sides together along the ⅝″ (15mm) guide line (on the needle plate), stopping zipper in place from the right side of the fabric (C). 3. Set your machine for straight stitch 01 (see Select a stitch). Attach Zipper Foot 4 so - Pfaff SMARTER BY 260c | Manual - Page 32
Maintenance 4 Maintenance Cleaning the machine To keep your sewing machine operating well, clean it often. No lubrication (oiling) is needed. Wipe the exterior surface of your machine with a soft cloth to remove any dust or lint built up. Cleaning the bobbin area Raise the needle, lower the feed - Pfaff SMARTER BY 260c | Manual - Page 33
Maintenance Troubleshooting In this troubleshooting guide you will find solutions to the problems you may have with your machine. For further information please contact your local authorized PFAFF® dealer. General problems Fabric does not move? Make sure that the feed dogs are not lowered. The - Pfaff SMARTER BY 260c | Manual - Page 34
? Is the bobbin wound correctly? Technical specification Sewing machine Rated voltage Nominal consumption Light Sewing speed Machine dimensions: Length (mm) Width (mm) Height technical specifications and this owner's manual can be changed without prior notice. C-8001 DC 15V, max. 3mA Maintenance - Pfaff SMARTER BY 260c | Manual - Page 35
to change the machine equipment and the assortment of accessories without prior notice, or make modifications to the performance or design. Such modifications, however, will always be to the benefit of the user and the product. INTELLECTUAL PROPERTY PFAFF, and SMARTER BY PFAFF are trademarks of - Pfaff SMARTER BY 260c | Manual - Page 36
www.pfaff.com 4134208-26A · Inhouse · © 2014 KSIN Luxembourg II, S.ar.l. · All rights reserved · Printed in China on enviromental friendly paper.
-
 1
1 -
 2
2 -
 3
3 -
 4
4 -
 5
5 -
 6
6 -
 7
7 -
8
-
9
-
10
-
11
-
12
-
13
-
14
-
15
-
16
-
17
-
18
-
19
-
20
-
21
-
22
-
23
-
24
-
25
-
26
-
27
-
28
-
29
-
30
-
31
-
32
-
33
-
34
-
35
-
36
 |
 |

SMARTER BY PFAFF
™
–
inspired and developed by the premier PFAFF® sewing machine brand
Owner's
Manual
260c