Pfaff SMARTER BY 260c Manual - Page 29
Standard buttonhole, Attach the One-Step Buttonhole Foot 5B. Push
 |
View all Pfaff SMARTER BY 260c manuals
Add to My Manuals
Save this manual to your list of manuals |
Page 29 highlights
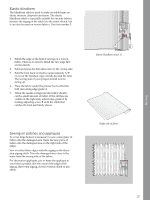
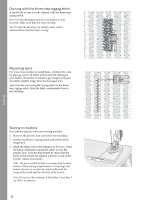
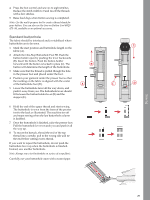
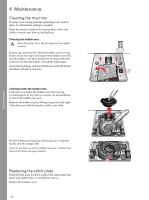
Sewing 4. Press the foot control and sew six to eight stitches. Reduce the stitch width to 0 and tie-off the threads with a few stitches. 5. Raise feed dogs when button sewing is completed. Note: Use the multi-purpose tool to create a thread shank for your button. You can also use the Sew-on Button Foot #820 473-96, available as an optional accessory. Standard buttonhole The fabric should be interfaced and/or stabilized where buttonholes are to be sewn. 1. Mark the start position and buttonhole length on the fabric (A). 2. Attach the One-Step Buttonhole Foot 5B. Push the button holder open by pushing the lever backwards (B). Insert the button. Push the button holder forward until the button is locked in place (C). The button will determine the length of the buttonhole. 3. Make sure that the thread is pulled though the hole in the presser foot and placed under the foot. 4. Position your garment under the presser foot so that the marking on the fabric is aligned with the center of the buttonhole foot (D). 5. Lower the buttonhole lever all the way down, and push it away from you. The buttonhole lever should fit between the button holder lever (B) and the stopper (E). 6. Hold the end of the upper thread and start sewing. The buttonhole is sewn from the front of the presser foot to the back as illustrated. The machine ties off and stops sewing when the last buttonhole column is finished. 7. Once the buttonhole is finished, raise the presser foot. Pull the buttonhole lever towards you and push it all the way up. 8. To secure the bartack, thread the end of the top thread into a needle, pull to the wrong side and tie the end before cutting excess thread. If you want to repeat the buttonhole, do not push the buttonhole lever up when the buttonhole is finished. Instead, sew another buttonhole. Note: Always sew a test buttonhole on a piece of scrap fabric. Carefully cut your buttonhole open with a seam ripper. 00 00 0 29
-
 1
1 -
2
-
3
-
4
-
5
-
6
-
7
-
8
-
9
-
10
-
11
-
12
-
13
-
14
-
15
-
16
-
17
-
18
-
19
-
20
-
21
-
22
-
23
-
 24
24 -
 25
25 -
 26
26 -
 27
27 -
 28
28 -
 29
29 -
 30
30 -
 31
31 -
 32
32 -
 33
33 -
 34
34 -
35
-
36
 |
 |
