Pfaff classicstyle home 1529 Owner's Manual - Page 53
The trouser zipper
 |
View all Pfaff classicstyle home 1529 manuals
Add to My Manuals
Save this manual to your list of manuals |
Page 53 highlights
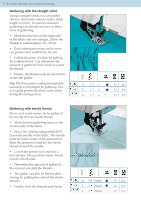
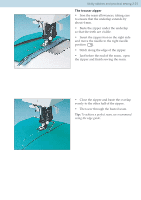
Utility stitches and practical sewing 2:21 The trouser zipper • Iron the seam allowances, taking care to ensure that the underlap extends by about 4 mm. • Baste the zipper under the underlap so that the teeth are visible. • Insert the zipper foot on the right side and move the needle to the right needle position . • Stitch along the edge of the zipper. • Just before the end of the seam, open the zipper and Ànish sewing the seam. • Close the zipper and baste the overlap evenly to the other half of the zipper. • Then sew through the basted seam. Tip: To achieve a perfect seam, we recommend using the edge guide.
-
 1
1 -
2
-
3
-
4
-
5
-
6
-
7
-
8
-
9
-
10
-
11
-
12
-
13
-
14
-
15
-
16
-
17
-
18
-
19
-
20
-
21
-
22
-
23
-
24
-
25
-
26
-
27
-
28
-
29
-
30
-
31
-
32
-
33
-
34
-
35
-
36
-
37
-
38
-
39
-
40
-
41
-
42
-
43
-
44
-
45
-
46
-
47
-
 48
48 -
 49
49 -
 50
50 -
 51
51 -
 52
52 -
 53
53 -
 54
54 -
 55
55 -
 56
56 -
 57
57 -
 58
58 -
59
-
60
-
61
-
62
-
63
-
64
-
65
-
66
-
67
-
68
-
69
-
70
-
71
-
72
-
73
-
74
-
75
-
76
 |
 |

2:21
Utility stitches and practical sewing
The trouser zipper
•
Iron the seam allowances, taking care
to ensure that the underlap extends by
about 4 mm.
•
Baste the zipper under the underlap
so that the teeth are visible.
•
Insert the zipper foot on the right side
and move the needle to the right needle
position
.
•
Stitch along the edge of the zipper.
•
Just before the end of the seam,
open
the zipper and
À
nish sewing the seam.
•
Close the zipper and baste the overlap
evenly to the other half of the zipper.
•
Then sew through the basted seam.
Tip:
To achieve a perfect seam, we recommend
using the edge guide.