Pfaff coverlock 4772 Owner's Manual - Page 12
Pfaff coverlock 4772 Manual
 |
View all Pfaff coverlock 4772 manuals
Add to My Manuals
Save this manual to your list of manuals |
Page 12 highlights
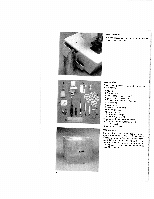
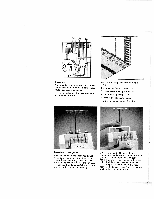
Trimming waste container Insert the upper latches of the trimming waste container (38) into the upper slot of the hook cover 18). Apply pressure to the lower part of the con tainer until the lower latches click into place in the lower slots of the looper cover. To remove the trimming waste container, re peat this procedure in the reverse order. Looper cover Push the looper cover
-
 1
1 -
2
-
3
-
4
-
5
-
6
-
 7
7 -
 8
8 -
 9
9 -
 10
10 -
 11
11 -
 12
12 -
 13
13 -
 14
14 -
 15
15 -
 16
16 -
 17
17 -
18
-
19
-
20
-
21
-
22
-
23
-
24
-
25
-
26
-
27
-
28
-
29
-
30
-
31
-
32
-
33
-
34
-
35
-
36
-
37
-
38
-
39
-
40
-
41
-
42
-
43
-
44
-
45
-
46
-
47
-
48
-
49
-
50
-
51
-
52
-
53
-
54
-
55
-
56
-
57
-
58
-
59
-
60
-
61
-
62
-
63
-
64
-
65
-
66
-
67
-
68
-
69
-
70
-
71
-
72
-
73
-
74
-
75
-
76
-
77
-
78
-
79
-
80
-
81
 |
 |

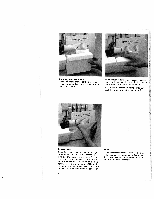
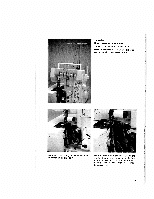
Push
the
looper
cover
<8)
fully
to
the
right
and
then
swivel
it
down.
Each
threading
path
and
the
mounting
procedure
for
the
converter
are
portrayed
in
color
on
the
insi
de
of
the
machine.
The
threading
method
for
the
lower
overedge
looper
117)
and
the
most
common
stitch
types
are
shown
sym
bolically
on
the
inside
of
the
looper
cover.
Note
The
electricity
supply
of
the
machine
is
cut
off
as
soon
as
the
looper
cover
is
opened
for
safety
reasons,
i.e.
sewing
with
the
ma
chine
is
no
longer
possible.
Trimming
waste
container
Insert
the
upper
latches
of
the
trimming
waste
container
(38)
into
the
upper
slot
of
the
hook
cover
18).
Apply
pressure
to
the
lower
part
of
the
con
tainer
until
the
lower
latches
click
into
place
in
the
lower
slots
of
the
looper
cover.
To
remove
the
trimming
waste
container,
re
peat
this
procedure
in
the
reverse
order.
Looper
cover
S