Pfaff creative coverlock 4874 Owner's Manual - Page 82
Important notes on sewing with, the top cover stitch
 |
View all Pfaff creative coverlock 4874 manuals
Add to My Manuals
Save this manual to your list of manuals |
Page 82 highlights
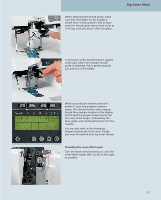
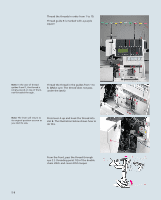
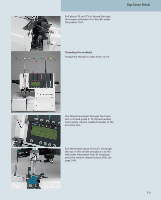
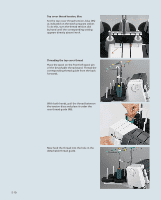
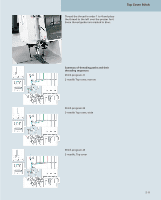
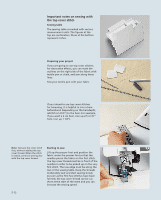
Important notes on sewing with the top cover stitch Sewing table The sewing table is marked with various measurement units. The figures at the top are centimeters, those at the bottom represent inches. Preparing your project If you are going to use top cover stitches for decorative effects, you can mark the outlines on the right side of the fabric with textile pen or chalk, and sew along these lines. Test your textile pen with your fabric. If you intend to use top cover stitches for hemming, it is helpful to iron a hem beforehand. Depending on the hemdepth, add 0.5 cm (1/4") to the hem. For example, if you want a 2 cm hem, iron up 2.5 cm (1" hem, iron up 1 1/4"). Note: Test sew the cover stitch first, without adding the top cover thread. When the stitch is tested, continue sewing also with the top cover thread. Starting to sew Lift up the presser foot and position the fabric under the presser foot so that the needles pierce the fabric on the first stitch. The top cover thread must be in front of the needles in order to be picked up on the very first stitch. The raw edge must be along the two of the sewing table. Keep the threads moderately taut and start sewing slowly. As soon as the first few stitches have been formed, the top cover thread can be cut short at the start of the seam and you can increase the sewing speed. 5-12
-
 1
1 -
2
-
3
-
4
-
5
-
6
-
7
-
8
-
9
-
10
-
11
-
12
-
13
-
14
-
15
-
16
-
17
-
18
-
19
-
20
-
21
-
22
-
23
-
24
-
25
-
26
-
27
-
28
-
29
-
30
-
31
-
32
-
33
-
34
-
35
-
36
-
37
-
38
-
39
-
40
-
41
-
42
-
43
-
44
-
45
-
46
-
47
-
48
-
49
-
50
-
51
-
52
-
53
-
54
-
55
-
56
-
57
-
58
-
59
-
60
-
61
-
62
-
63
-
64
-
65
-
66
-
67
-
68
-
69
-
70
-
71
-
72
-
73
-
74
-
75
-
76
-
 77
77 -
 78
78 -
 79
79 -
 80
80 -
 81
81 -
 82
82 -
 83
83 -
 84
84 -
 85
85 -
 86
86 -
 87
87 -
88
-
89
-
90
-
91
-
92
-
93
-
94
-
95
-
96
-
97
-
98
-
99
-
100
-
101
-
102
-
103
-
104
-
105
-
106
-
107
-
108
-
109
-
110
-
111
-
112
-
113
-
114
-
115
-
116
-
117
-
118
-
119
-
120
-
121
-
122
-
123
-
124
-
125
-
126
-
127
-
128
-
129
-
130
-
131
-
132
-
133
-
134
-
135
-
136
-
137
-
138
-
139
-
140
-
141
-
142
-
143
-
144
 |
 |
