Pfaff kayser 44 Owner's Manual - Page 21
buttonhole
 |
View all Pfaff kayser 44 manuals
Add to My Manuals
Save this manual to your list of manuals |
Page 21 highlights
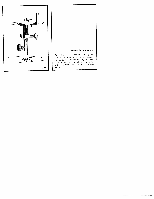
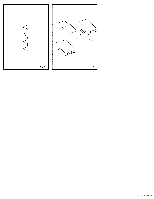
A c B A D Fig. 24 Sew first seam from A to B (Fig. 24). Leave needle down in the material on the right of its throw Raise sewing foot, turn fabric through 180 lower sewing foot. and raise needle. Turn stitch width control to snap-in position 4, and sew a number of bartacking stitches up to C. Raise needle out of material, turn con trot to 2 and sew second seam from C to D. Again raise the needle. Turn stitch width control to snap-in position between 4' and "5" and sew a number of bartacking stitches up to E. Set stitch width control to 0, then sew a number 01 tying stitches. Take a seam ripper and carefully cut the buttonhole open between the seams, making sure that you do not damage them. Important' Do not forget to raise the needle out of the material before sew ing each bartack.
-
 1
1 -
2
-
3
-
4
-
5
-
6
-
7
-
8
-
9
-
10
-
11
-
12
-
13
-
14
-
15
-
 16
16 -
 17
17 -
 18
18 -
 19
19 -
 20
20 -
 21
21 -
 22
22 -
 23
23 -
 24
24 -
 25
25 -
 26
26 -
27
-
28
-
29
-
30
-
31
-
32
-
33
-
34
-
35
-
36
-
37
-
38
 |
 |
