Pfaff select 1528 Owner's Manual - Page 38
Standard buttonhole with gimp thread, Sewing on buttons, Securing
 |
View all Pfaff select 1528 manuals
Add to My Manuals
Save this manual to your list of manuals |
Page 38 highlights
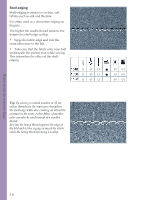
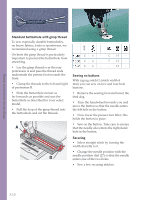
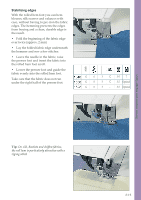
Utility stitches and practical sewing stitch Standard buttonhole with gimp thread To sew especially durable buttonholes, on heavy fabrics, knits or sportswear, we recommend using a gimp thread. On knits the gimp thread is particularly important to prevent the buttonhole from stretching. • Lay the gimp thread over the rear protrusion A and pass the thread ends underneath the presser foot towards the front. • Clamp the threads to the left and right of protrusion B. • Slide the buttonhole runner as far forwards as possible and sew the buttonhole as described for your select model. • Pull the loop of the gimp thread into the buttonhole and cut the threads. A B G4- G4- G4- 2-3 - 2-3 - 2-3 - Sewing on buttons With zigzag stitch G (stitch width 4 mm) you can sew on two and four hole buttons. • Remove the sewing foot and lower the feed dog. • Turn the handwheel towards you and move the button so that the needle enters the left hole in the button. • Now lower the presser foot lifter; this holds the button in place. • Sew on the button. Take care to ensure that the needle also enters the right-hand hole in the button. Securing • Select straight stitch by turning the width dial (26) to 0. • Change the needle position with the needle position dial (27) so that the needle enters one of the two holes. • Sew a few securing stitches. 2:10
-
 1
1 -
2
-
3
-
4
-
5
-
6
-
7
-
8
-
9
-
10
-
11
-
12
-
13
-
14
-
15
-
16
-
17
-
18
-
19
-
20
-
21
-
22
-
23
-
24
-
25
-
26
-
27
-
28
-
29
-
30
-
31
-
32
-
 33
33 -
 34
34 -
 35
35 -
 36
36 -
 37
37 -
 38
38 -
 39
39 -
 40
40 -
 41
41 -
 42
42 -
 43
43 -
44
-
45
-
46
-
47
-
48
-
49
-
50
-
51
-
52
 |
 |
