Pfaff smarter by c1100 pro Owner's Manual - Page 22
Lcd Screen Brightness Control, Understanding The Lcd Screen
 |
View all Pfaff smarter by c1100 pro manuals
Add to My Manuals
Save this manual to your list of manuals |
Page 22 highlights
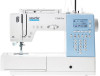
UNDERSTANDING THE LCD SCREEN Elongation Auto-stop Mirror Stitch Stitch number Magnification Tension Stitch width Stitch length Bobbin winding Single needle Sound on/off Needle up position Suggested presser foot and identification letter Memory Memory group Number of current unit Total number of unit Stitch width Stitch length Stitch to edit Bobbin winding Tension Mirror Sound on/off Needle up position Auto-stop LCD SCREEN BRIGHTNESS CONTROL The LCD screen brightness control dial is located at the right of LCD screen. Use this to dial adjust the sharpness of the LCD screen. If no indication is shown on the screen after switching on the power, adjust the LCD screen brightness with the dial. LCD screen brightness : Turn the dial to the right toward the "+". LCD screen darkness : Turn the dial to the left toward the "". 21 GETTING READY
-
 1
1 -
2
-
3
-
4
-
5
-
6
-
7
-
8
-
9
-
10
-
11
-
12
-
13
-
14
-
15
-
16
-
 17
17 -
 18
18 -
 19
19 -
 20
20 -
 21
21 -
 22
22 -
 23
23 -
 24
24 -
 25
25 -
 26
26 -
 27
27 -
28
-
29
-
30
-
31
-
32
-
33
-
34
-
35
-
36
-
37
-
38
-
39
-
40
-
41
-
42
-
43
-
44
-
45
-
46
-
47
-
48
-
49
-
50
-
51
-
52
-
53
-
54
-
55
-
56
-
57
-
58
-
59
-
60
-
61
-
62
-
63
-
64
-
65
-
66
-
67
-
68
-
69
-
70
-
71
-
72
-
73
-
74
-
75
-
76
-
77
-
78
-
79
-
80
-
81
-
82
-
83
-
84
-
85
-
86
-
87
-
88
-
89
-
90
-
91
-
92
-
93
-
94
-
95
-
96
-
97
-
98
-
99
-
100
-
101
-
102
-
103
-
104
-
105
-
106
-
107
-
108
 |
 |
