Philips 20PF5120 Quick start guide
Philips 20PF5120 - 20" LCD TV Manual
 |
UPC - 037849962930
View all Philips 20PF5120 manuals
Add to My Manuals
Save this manual to your list of manuals |
Philips 20PF5120 manual content summary:
- Philips 20PF5120 | Quick start guide - Page 1
FIRE OR SHOCK HAZARD REMOTE CONTROL OPERATION 3 S-VIDEO CONNECTIONS 7 DO NOT EXPOSE THIS UNIT TO RAIN OR EXCESSIVE. ANTENNA TV 4 COMPONENT (HD) CONNECTIONS . . .7 BASIC CABLE TV CONNECTION . . . . . 4 PC (MONITOR) INPUTS 8 Espãnol Português INSTALLING LCD TV ON THE WALL The stand of your - Philips 20PF5120 | Quick start guide - Page 2
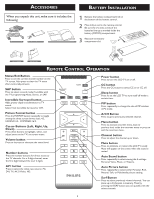
switch the TV on or off. • Aim remote control at infrared sensors to activate TV controls. 2 3 Rear connectors Remove the cable cover to access the connectors at the rear of the LCD TV. 4 Bottom connectors Located at the bottom of the set. 4 DC IN 16V DVI-I IN AUDIO IN DVI (HDCP / PC ANALOG - Philips 20PF5120 | Quick start guide - Page 3
it includes the following: Power adapter & cable Guide Tuner L-Adapter WarranWtyaCrraarndty Card Warranty Card User's Manual & Quick Use and Hookup Guide 1 Remove the battery compartment lid on the bottom of the remote control. 2 Place lithium cell in the remote control. Be sure the (+) and - Philips 20PF5120 | Quick start guide - Page 4
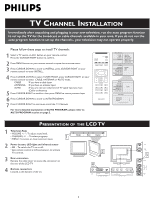
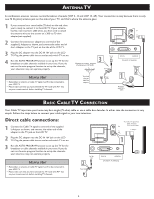
first be connected to your LCD TV. • Please make sure that you have selected the TV mode with AV+ key on your remote control, before installing TV channels. The Cable TV signal from Cable Company (75 Ω coaxial cable) L Adapter TV 1 DC IN 16V 2 Power Cable DVI-I IN AUDIO IN DVI (HDCP / PC ANALOG - Philips 20PF5120 | Quick start guide - Page 5
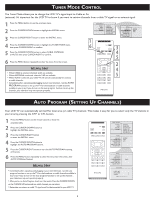
or cable TV signal must first be connected to your LCD TV. MAIN CONTROLS PICTURE AUDIO FEATURES INSTALL INSTALL LANGUAGE TUNER MODE AUTO PROGRAM CHANNEL EDIT MANUAL FINE TUNE FACTORY RESET LANGUAGE TUNER MODE AUTO PROGRAM CHANNEL EDIT MANUAL FINE TUNE FACTORY RESET ANTENNA CABLE AUTO INSTALL - Philips 20PF5120 | Quick start guide - Page 6
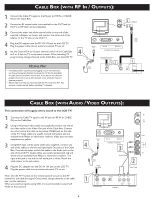
Power Cable DVI-I IN AUDIO IN DVI (HDCP / PC ANALOG) 75 Ω Coaxial Cable The Cable TV signal from the Cable Company 12 CABLE IN TO TV 5 OUTPUT CH 3 4 AV / S-VIDEO CABLE BOX (WITH AUDIO / VIDEO OUTPUTS): This connection will supply stereo sound to the LCD TV. 1 Connect the Cable TV - Philips 20PF5120 | Quick start guide - Page 7
button on the DVD Player. 4 Note: • The Philips LCD TV remote control can not be used to operate other video/audio equipment. 7 DC IN 16V 3 Power Cable DVI-I IN AUDIO IN DVI (HDCP / PC ANALOG) Y Pb Pr COMPONENT VIDEO L R AUDIO IN COMPONENT HD/SD COMPONE NT V IDE OCA B L E S (Green - Philips 20PF5120 | Quick start guide - Page 8
PC (MONITOR) INPUTS: This LCD TV can be used as a PC. Your computer will have to be equipped with a VGA type video output and interface cable (not supplied). (One end with VGA type connector, the other end with DVI-I type connector.) 1 Connect VGA end of the interface cable (not supplied) to the
-
 1
1 -
 2
2 -
 3
3 -
 4
4 -
 5
5 -
 6
6 -
 7
7 -
8
 |
 |

3138 155 24011
1
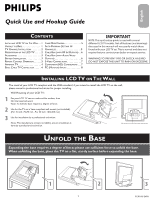
Expanding the base requires a degree of force; please use sufficient force to unfold the base.
When unfolding the base, place the TV on a flat, sturdy surface before expanding the base.
U
NFOLD
THE
B
ASE
Quick Use and Hookup Guide
C
ONTENTS
IMPORTANT
NOTE: This quick setup guide is used with several
different LCD TV models. Not all features (and drawings)
discussed in this manual will necessarily match those
found with your LCD TV set. This is normal and does not
require that you contact your dealer or request service.
WARNING: TO PREVENT FIRE OR SHOCK HAZARD
DO NOT EXPOSE THIS UNIT TO RAIN OR EXCESSIVE.
I
NSTALLING
LCD TV
ON
T
HE
W
ALL
. . 1
U
NFOLD
THE
B
ASE
. . . . . . . . . . . . . . .
1
TV C
HANNEL
I
NSTALLATION
. . . . . . . . 2
P
RESENTATION
OF
THE
LCD TV . . . . . 2
A
CCESSORIES
. . . . . . . . . . . . . . . . . . . . 3
B
ATTERY
I
NSTALLATION
. . . . . . . . . . . . 3
R
EMOTE
C
ONTROL
O
PERATION
. . . . . . 3
A
NTENNA
TV . . . . . . . . . . . . . . . . . .
4
B
ASIC
C
ABLE
TV C
ONNECTION
. . . . .
4
T
UNER
M
ODE
C
ONTROL
. . . . . . . . . . . . . 5
A
UTO
P
ROGRAM
(S
ETTING
U
P
C
HANNELS
) . . . . . . . . . . . . . . . . . . . . 5
C
ABLE
B
OX
(
WITH
RF I
N
/O
UTPUTS
) . . 6
C
ABLE
B
OX
(
WITH
A
UDIO
/V
IDEO
O
UTPUTS
) . . . . . . . . . . . . . . . . . . . . . 6
S-V
IDEO
C
ONNECTIONS
. . . . . . . . . . . 7
C
OMPONENT
(HD) C
ONNECTIONS
. . . 7
PC (M
ONITOR
) I
NPUTS
. . . . . . . . . . . 8
I
NSTALLING
LCD TV
ON
T
HE
W
ALL
The stand of your LCD TV complies with the VESA standard, if you intend to install the LCD TV on the wall,
please consult a professional technician for proper installing.
Wall Mounting of your LCD TV :
Put your LCD TV set on a safe and flat surface, then
fold the base backward.
Note: To fold the base requires a degree of force.
Use for the TV set a Vesa compliant wall mount (not included).
(For 15 inch: 75x75 mm , For 20 inch: 100x100 mm)
Use for installation by a professional technician.
Note: The manufacture accepts no liability, ensure installation is
done by a professional technician.
1
2
3
English