Philips 26PF9966 Quick start guide - Page 1

Philips 26PF9966 - 26" LCD TV Manual

Page 1 highlights

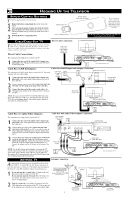
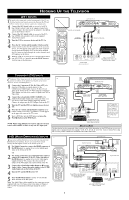
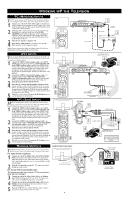
LCD TV Quick Use and Hookup Guide CONTENTS Important Notice/Warning 1 LCD Stand Assemble 1 Basic TV Operation 1 Remote Control Button Descriptions 1 Hooking up the Television Remote Battery Installation 2 Basic Cable/Cable Box TV Connections 2 Basic Antenna TV Connections 2 AV1 Input Connections 3 Component Video Input Connections 3 High Definition Input Connections 3 PC (Monitor) Connection 4 AV2 Input Connections 4 AV3 Input Connection 4 Monitor Output Connections 4 IMPORTANT NOTE: This owner's manual is used with several different television models. Not all features (and drawings) discussed in this manual will necessarily match those found with your television set. This is normal and does not require that you contact your dealer or request service. WARNING: TO PREVENT FIRE OR SHOCK HAZARD DO NOT EXPOSE THIS UNIT TO RAIN OR EXCESSIVE MOISTURE. BASIC LCD TV OPERATION First, assemble the LCD TV using the steps below: 2 2 3 TOP AY W INSERT THIS 1 3 LIFT HERETO OPEN LCD TELEVISION This LCD television has a set of controls located on the side of the cabinet for use when the remote control is not needed. 1 After you have connected the power cord to the TV and plugged the cord into a wall outlet, press the POWER button on the front of the TV cabinet to turn the TV ON. 2 Press the VOLUME + button to increase the sound level or the VOLUME - button to lower the sound level. Pressing both buttons at the same time will display the onscreen menu. After you are in the menu, use these buttons to make adjustments or selections. 3 Press the PROGRAM + or - button to select TV channels. Use these buttons to make adjustments or selections in the onscreen menu. REMOTE CONTROL BUTTONS Power Button - Press to turn the TV ON and OFF. Status/Exit Button - Press to see the current channel number on the TV screen. Also press to clear the TV menu after control adjustments. Sleep Button - Press to set the TV to automatically turn itself OFF at a given amount of time. Active Control - Press to optimize the quality of the picture according to the quality of reception. TV Mode / 4 button - Press to directly enter TV mode. Also, press to rewind a video tape or CD/DVD disc during playback. Format Button - Press to toggle the different screen format options. PC Mode / 7 button - Press to directly enter PC mode. Also, press to stop a video tape or CD/DVD disc during playback. Menu Button - Press for the onscreen menu to appear. Pressing the menu button after menu selections are made will exit the menu from the TV screen. Mute Button - Press to turn the TV sound OFF . Press again to return the sound to its previous level. Volume (+) or (-) Buttons - Press to adjust the TV sound level. Auto Sound Button - Press to select an AutoSound™ control. Choose from three factory-set controls (VOICE, MUSIC, and THEATRE) and a PERSONAL to tailor the TV sound to enhance the particular type of program you are watching. Number Buttons - Press the number buttons for direct access to the TV channels. For a 2-digit channel, enter the 2nd digit before the dash disappears. For a 3-digit channel, enter the first digit followed the next 2 digits. AV+ (Source) Button - Press and hold AV+ button and loop from AV1 (CVI), AV2, Rear, HD and PC to select the appropriate channel. Alternately, press AV+ button followed by the Number 1, 2, 3, 4 or 5. Number 1 allows you to select AV1 (CVI), Number 2 to select AV2 channel, Number 3 to select Rear channel, Number 4 to select HD and Number 5 to select PC. 4 2 3 Volume and Channel buttons are located on the side of the television cabinet. PHILIPS 3139 125 xxxxx 4 TV/DVD/AUX/ACC Select Button - Press button repeatedly to select the required device mode to perform the activities for the selected device. PIP / Record 0 Button - When in TV mode, you can call up a PIP window for the PC. Likewise, when in PC mode, you can call up a PIP window for TV channels. When in VCR mode, press button to do recording. Pixel Plus / Pause ; Button - Press to activate the demo, which illustrates the benefits of Pixel Plus™. Press again to turn the demo off. Press and the TV screen will be divided in half displaying the Pixel Plus™ Demo. The left side will show the picture with Pixel Plus™ switched off. The right side of the screen will show the picture with Pixel Plus™ switched onWhen in TV mode, this button has no function.When in VCR/VCD/DVD mode, press button to do pause the programme you are watching. Press button again to release pause mode. HD (High Definition) Mode / button - Press to directly enter Radio mode. Also, press to begin playback of a video tape or CD/DVD disc. CC Button - Press to select Closed Captioning options within the menu. FM Radio Mode / 2 button - Press to directly enter Radio mode. Also, press to begin playback of a video tape or CD/DVD disc. Cursor Buttons (Left, Right, Up, Down) - Press these buttons to highlight, select, and adjust items on the TV's onscreen menu. Program List / OK Button - When in TV mode, press to display a list of channel numbers. Each channel will appear as a selectable menu item. When in Accessory mode, it confirms selections or adjustments in Accessory device. Channel (+) or (-) Buttons - Press to access the next or previous channel. Auto Picture Button - Press to select an AutoPicture™ control. Choose from four factory-set controls (MOVIES, SPORTS, WEAK SIGNAL, and MULTI MEDIA) and a PERSONAL control that you set according to your own preferences through the onscreen PICTURE menu. The four factory-set controls will tailor the TV picture so as to enhance the particular type of program you are watching, or to improve the picture of a program that has a weak signal. Surf Button - Press to select previously viewed channels. You can place up to 10 channels in memory. Then by pressing the SURF button you can quickly view the select channels.

  • 1
  • 2
  • 3
  • 4

3139 125 xxxxx
Quick Use and Hookup Guide
Important Notice/Warning . . . . . . . . . . . . . . . . . . . . .1
LCD Stand Assemble
. . . . . . . . . . . . . . . . . . . . . . . .1
Basic TV Operation . . . . . . . . . . . . . . . . . . . . . . . . . .1
Remote Control Button Descriptions . . . . . . . . . . . .1
Hooking up the Television
Remote Battery Installation
. . . . . . . . . . . . . . . . . . .2
Basic Cable/Cable Box TV Connections
. . . . . . . . .2
Basic Antenna TV Connections . . . . . . . . . . . . . . . .2
AV1 Input Connections
. . . . . . . . . . . . . . . . . . . . . .3
Component Video Input Connections
. . . . . . . . . . .3
High Definition Input Connections . . . . . . . . . . . . .3
PC (Monitor) Connection . . . . . . . . . . . . . . . . . . . .4
AV2 Input Connections
. . . . . . . . . . . . . . . . . . . . . .4
AV3 Input Connection . . . . . . . . . . . . . . . . . . . . . . .4
Monitor Output Connections . . . . . . . . . . . . . . . . . .4
IMPORTANT
NOTE: This owner's manual is used with several
different television models.
Not all features (and
drawings) discussed in this manual will necessarily
match those found with your television set. This is
normal and does not require that you contact your
dealer or request service.
WARNING: TO PREVENT FIRE OR SHOCK
HAZARD DO NOT EXPOSE THIS UNIT TO
RAIN OR EXCESSIVE MOISTURE.
LCD TV
LCD TV
C
ONTENTS
B
ASIC
LCD TV O
PERATION
T
his LCD television has a set of controls located on the side of
the cabinet for use when the remote control is not needed.
1
After you have connected the power cord to the TV and
plugged the cord into a wall outlet,
press the POWER button
on the front of the TV cabinet to turn the TV ON.
2
Press the VOLUME + button
to increase the sound level
or
the VOLUME – button
to lower the sound level.
Pressing both buttons at the same time
will display the
onscreen menu. After you are in the menu, use these buttons to
make adjustments or selections.
3
Press the PROGRAM
+
or –
button to select TV chan-
nels.
Use these buttons to make adjustments or selections in the
onscreen menu.
LCD T
ELEVISION
2
3
4
PHILIPS
Volume and Channel buttons are located
on the side of the television cabinet.
R
EMOTE
C
ONTROL
B
UTTONS
Power Button -
Press to turn the TV ON and OFF.
Status/Exit Button -
Press to see the current channel number on the TV
screen. Also press to clear the TV menu after control adjustments.
Sleep Button -
Press to set the TV to automatically turn itself OFF at a given
amount of time.
Active Control -
Press to optimize the quality of the picture according to
the quality of reception
.
TV Mode /
4
button -
Press to directly enter TV mode. Also, press to
rewind a video tape or CD/DVD disc during playback.
Format Button -
Press to toggle the different screen format options.
PC Mode /
7
button -
Press to directly enter PC mode. Also, press to stop
a video tape or CD/DVD disc during playback.
Menu Button -
Press for the onscreen menu to appear. Pressing the menu
button after menu selections are made will exit the menu from the TV
screen.
Mute Button -
Press to turn the TV sound OFF . Press again to return the
sound to its previous level.
Volume (+) or (–) Buttons -
Press to adjust the TV sound level.
Auto Sound Button -
Press to select an AutoSound™ control.
Choose from
three factory-set controls (VOICE, MUSIC, and THEATRE) and a PERSON-
AL to tailor the TV sound to enhance the particular type of program you are
watching.
Number Buttons -
Press the number buttons for direct access to the TV
channels. For a 2-digit channel, enter the 2nd digit before the dash disap-
pears. For a 3-digit channel, enter the first digit followed the next 2 digits.
AV+ (Source) Button -
Press and hold AV+ button and loop from AV1
(CVI), AV2, Rear, HD and PC to select the appropriate channel.
Alternately, press AV+ button followed by the Number 1, 2, 3, 4 or 5.
Number 1 allows you to select AV1 (CVI), Number 2 to select AV2 chan-
nel, Number 3 to select Rear channel, Number 4 to select HD and Number
5 to select PC.
TV/DVD/AUX/ACC Select Button -
Press button repeatedly to select
the required device mode to perform the activities for the selected device.
PIP / Record
0
Button -
When in TV mode, you can call up a PIP win-
dow for the PC. Likewise, when in PC mode, you can call up a PIP win-
dow for TV channels. When in VCR mode, press button to do recording.
Pixel Plus / Pause
;
Button -
Press to activate the demo, which illus-
trates the benefits of Pixel Plus™. Press again to turn the demo off.
Press and the TV screen will be divided in half displaying the Pixel
Plus™ Demo. The left side will show the picture with Pixel Plus™
switched off. The right side of the screen will show the picture with
Pixel Plus™ switched on
When in TV mode, this button has no func-
tion.When in VCR/VCD/DVD mode, press button to do pause the pro-
gramme you are watching. Press button again to release pause mode.
HD (High Definition) Mode /
button -
Press to directly enter Radio
mode. Also, press to begin playback of a video tape or CD/DVD disc.
CC Button -
Press to select Closed Captioning options within the menu.
FM Radio Mode /
2
button -
Press to directly enter Radio mode. Also,
press to begin playback of a video tape or CD/DVD disc.
Cursor Buttons (Left, Right, Up, Down) -
Press these buttons to highlight,
select, and adjust items on the TV's onscreen menu.
Program List / OK Button -
When in TV mode, press to display a list of
channel numbers. Each channel will appear as a selectable menu item.
When in Accessory mode, it confirms selections or adjustments in
Accessory device.
Channel (+) or (–) Buttons -
Press to access the next or previous chan-
nel.
Auto Picture Button -
Press to select an AutoPicture™ control.
Choose
from four factory-set controls (MOVIES, SPORTS, WEAK SIGNAL,
and MULTI MEDIA) and a PERSONAL control that you set according
to your own preferences through the onscreen PICTURE menu. The four
factory-set controls will tailor the TV picture so as to enhance the particu-
lar type of program you are watching, or to improve the picture of a pro-
gram that has a weak signal.
Surf Button -
Press to select previously viewed channels. You can place
up to 10 channels in memory. Then by pressing the SURF button you can
quickly view the select channels.
4
2
3
LIFT HERE TO OPEN
TOP
2
1
3
First, assemble the LCD TV using the steps below: