Philips AZ101817 User manual - Page 3
Controls, Power Supply - lighting
 |
View all Philips AZ101817 manuals
Add to My Manuals
Save this manual to your list of manuals |
Page 3 highlights
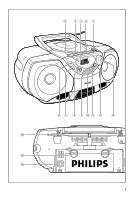
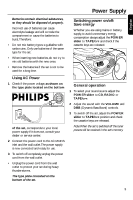
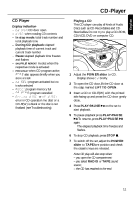
Controls Power Supply English Top and front panels 1 Power slider: CD, RADIO, TAPE/OFF - selects source of sound CD, RADIO, TAPE/OFF, and the power on/ off switch 2 LIFT TO OPEN - opens/ closes the CD door 3 Display - shows the status of the set 4 CASSETTE RECORDER: PAUSE ; - pauses recording or playback STOP•OPEN 9/ - stops the tape; opens the cassette door SEARCH 5 or 6 - fast rewinds / winds the tape PLAY 1 - starts playback RECORD 0 - starts recording 5 BATT LOW - indicator lights up if battery power is running low 6 PLAY•PAUSE 2; - starts or pauses CD playback 7 STOP 9 - stops CD playback; erases a CD program 8 SEARCH ∞ , § CD: skips or searches a passage/track backwards or forward RADIO - tunes to a radio station (up, down) 9 FM•AM - selects FM/ AM waveband 10 PRESET 3, 4 - selects a preset station (up, down) 11 CD MODE/ PROGRAM CD - programs and reviews programmed track numbers; - plays tracks CD/ program in random order ; - repeats a track/CD/ program RADIO - programs radio preset stations 12 DBB (Dynamic Bass Boost) - enhances bass response 13 VOLUME - adjusts volume level Back Panel 14 Telescopic antenna - to improve FM reception 15 Battery door - open to insert 6 x 1.5V R14/UM2/ C-cell batteries 16 AC MAINS - inlet for power cord Power Supply Whenever convenient, use the power supply if you want to conserve battery life. 6 x 1.5V R14/ UM2/ C CELL Make sure you remove the plug from the set and wall outlet before inserting batteries. Batteries (not included) 1 Open the battery compartment and insert six batteries, type R-14, UM-2 or C-cells, (preferably alkaline) with the correct polarity as indicated by the "+" and "-" symbols inside the compartment. 2 Close the compartment door, and make sure the batteries are firmly and correctly in place.The set is now ready to operate. ➜ If BATT LOW lights up, battery power is running low.The BATT LOW indicator eventually goes out if the batteries are too weak. 8
-
 1
1 -
 2
2 -
 3
3 -
 4
4 -
 5
5 -
 6
6 -
 7
7 -
 8
8 -
 9
9 -
10
-
11
 |
 |
