Philips DC6210 User manual - Page 12
Set time and date, Turn on, Connect power
 |
UPC - 609585190139
View all Philips DC6210 manuals
Add to My Manuals
Save this manual to your list of manuals |
Page 12 highlights
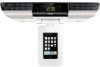
1 Open the battery compartment. 2 Insert one CR2025 battery with correct polarity (+/-) as indicated. 3 Close the battery compartment. Connect power Caution • Risk of product damage! Ensure that the power voltage corresponds to the voltage printed on the back or underside of the apparatus. • Risk of electric shock! When you unplug the AC adapter, always pull the plug from the socket. Never pull the cord. • Before connecting the AC adapter, ensure you have completed all other connections. Note • The type plate is located on the rear of the main unit. 1 Connect one end of the AC adapter to the DC IN socket on the main unit. Set time and date 1 Dock the iPod / iPhone on the unit. 2 Open the iPod / iPhone. » Time and date information on the iPod / iPhone transfers to the unit automatically. To set time and date manually: 1 In standby mode, press and hold CLOCK for 2 seconds. » The hour digits begins to blink. 2 Rotate the knob clockwise/counter- clockwise or press / to set the hour. 3 Press CLOCK to confirm. » The minute digits begin to blink. 4 Repeat steps 2-3 to set the minute, year, month, and day. » The week day is displayed automatically. 5 Repeat steps 2-3 to select the 12/24 hour format. 6 Press CLOCK to confirm. Turn on 1 Press . » The unit switches to the last selected source. Switch to standby 1 Press again to switch the unit to standby mode. » The time is displayed. 2 Connect the other end of the AC adapter to the wall outlet. 12 EN
-
 1
1 -
2
-
3
-
4
-
5
-
6
-
 7
7 -
 8
8 -
 9
9 -
 10
10 -
 11
11 -
 12
12 -
 13
13 -
 14
14 -
 15
15 -
 16
16 -
 17
17 -
18
-
19
 |
 |
