Philips DVDR75 Quick start guide
Philips DVDR75 Manual
 |
View all Philips DVDR75 manuals
Add to My Manuals
Save this manual to your list of manuals |
Philips DVDR75 manual content summary:
- Philips DVDR75 | Quick start guide - Page 1
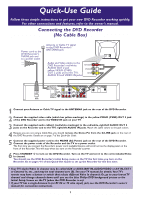
Quick-Use Guide Follow these simple instructions to get your new DVD Recorder working quickly. For other connections and features, refer to the owner's manual. Connecting the DVD Recorder (No Cable Box) Antenna or Cable TV signal to the DVD Recorder's ANTENNA jack Power cord to the DVD Recorder - Philips DVDR75 | Quick start guide - Page 2
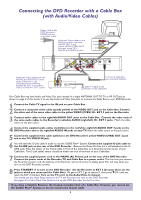
on the Cable Box 1 Connect the Cable TV signal to the IN jack on your Cable Box. The IN jack may be labelled differently. See the Cable Box owner's manual for details. 2 Connect an RF coaxial cable to the OUT jack of the Cable Box and to the ANTENNA jack on the rear of the DVD Recorder. The OUT - Philips DVDR75 | Quick start guide - Page 3
the Cable Box so it faces the remote sensor of your Cable Box. The G-Link cable's sensor should be within one inch of the front of your Cable Box. 7 Connect the supplied power cord to the MAINS (AC Power) jack on the rear of the DVD Recorder. Connect the power cords of the Recorder,TV, and Cable Box - Philips DVDR75 | Quick start guide - Page 4
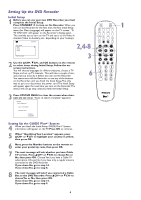
on the remote to enter your postal zip code, then press OK. 7 The next message will ask whether you have Cable TV service. Press 8CH+ or 9CH- to choose Yes or No, then press OK. Choose Yes if you have a Cable TV subscription. Choose No if you have only a regular antenna connected to the DVD Recorder - Philips DVDR75 | Quick start guide - Page 5
Plus+® System information. For best results, turn off the DVD Recorder overnight so it can receive the GUIDE Plus+® System programming information. Leave the Cable Box turned on. 9-16 REC/OTR STANDBY TIMER REC MODE PLAY MODE TV/DVD MONITOR DIM RETURN T/C •TV DISC MANAGER FSS SELECT SUBTITLE - Philips DVDR75 | Quick start guide - Page 6
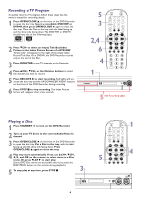
a TV program, follow these steps. See the owner's manual for recording details. 1 Press OPEN/CLOSE A on the front of the DVD Recorder to open the disc tray. Insert a recordable DVD+RW or DVD+R, then press OPEN/CLOSE A again to close the disc tray. Place the Disc in the tray with the label facing up - Philips DVDR75 | Quick start guide - Page 7
Plus+® System Your DVD Recorder has the GUIDE Plus+® System, which lists TV programs available in your area. Use it to select or record TV programs. Complete details are in the accompanying owner's manual. 1 Press GUIDE/TV to see the GUIDE Plus+® System screen. The TV channel you were viewing will - Philips DVDR75 | Quick start guide - Page 8
Menu to set up features of the DVD Recorder or Discs. Access the System Menu by pressing the SYSTEM MENU but- ton on the remote.The symbols in the System Menu have these meanings. For details, see the accompanying owner's manual. W X YZ User Title/Track Chapter Preferences Audio Subtitle
-
 1
1 -
 2
2 -
 3
3 -
 4
4 -
 5
5 -
 6
6 -
 7
7 -
8
 |
 |
•
Your TV’s Audio/Video In channel may be called AUX or AUXILIARY IN,AUDIO/VIDEO or A/V IN, EXT1
or External In, etc., and may be near channel zero (0). See your TV manual for details.Your TV’s
remote may have a button or switch that selects different Video In channels.Or, go to your lowest TV
channel and change channels down until you see the blue Philips DVD background picture or the
Initial Setup Screen on the TV (when the DVD Recorder is on).
• If your TV has a single Antenna In (or RF IN or 75 ohm input) jack,see the DVD Recorder’s owner’s
manual for connection instructions.
1
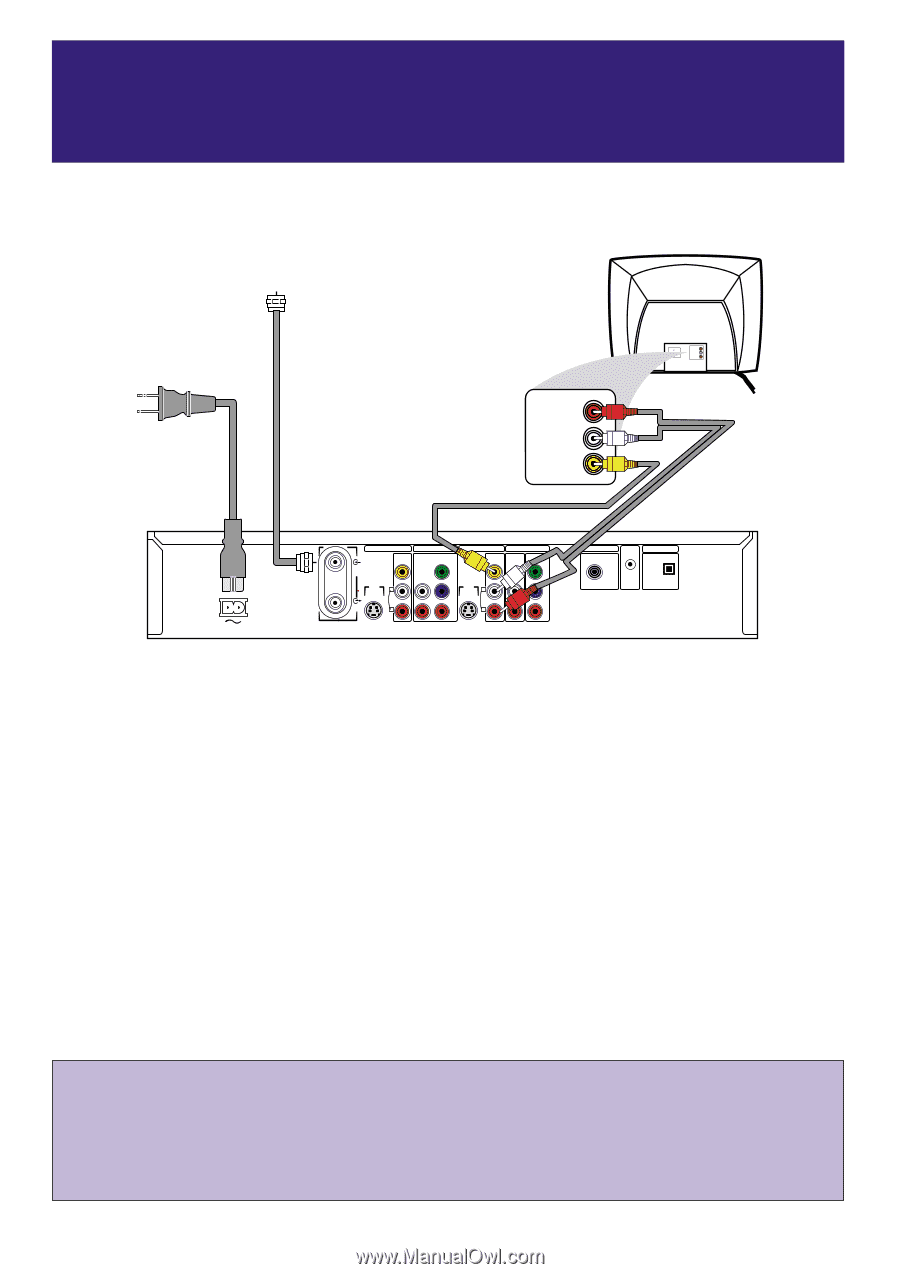
Connect your Antenna or Cable TV signal to the ANTENNA jack on the rear of the DVD Recorder.
2
Connect the supplied video cable (which has yellow markings) to the yellow VIDEO (CVBS) OUT 2 jack
of the DVD Recorder and to the VIDEO IN jack on your TV.
3
Connect the supplied audio cable(s) (red/white markings) to the red/white, right/left AUDIO OUT 2
jacks on the Recorder and to the TV’s right/left AUDIO IN jacks.
Match the cable colors to the jack colors.
4
Because you are not using a Cable Box, you should
remove the Demo Pin from the G-LINK jack
on the rear of
the DVD Recorder.
Details are on page 7 of this Quick-Use Guide.
5
Connect the supplied power cord to the MAINS (AC Power) jack on the rear of the DVD Recorder.
Connect the power cords of the Recorder and the TV to a power outlet.
The first time you connect the Recorder’s power cord,available features will scroll across the display panel on the
front of the Recorder.This will stop when you turn on the Recorder’s power.
6
Press STANDBY
y
to turn on the DVD Recorder. Turn on the TV and set it to the correct Audio/Video
In channel.
You should see the DVD Recorder’s Initial Setup menu on the TV the first time you turn on the
Recorder. Go to pages 4-5 of this Quick-Use Guide to set up the Recorder for the first time.
Quick-Use Guide
Follow these simple instructions to get your new DVD Recorder working quickly.
For other connections and features, refer to the owner’s manual.
1
S-VIDEO
(Y/C)
ANTENNA
TV
S-VIDEO
(Y/C)
VIDEO
(CVBS)
VIDEO
(CVBS)
COMPONENT
VIDEO
AUDIO
COMPONENT
VIDEO
AUDIO
Y
P
B
P
R
Y
P
B
P
R
IN -
EXT 2
IN - EXT 1
OUT 2
OUT 1
480p/480
i
IN -
EXT 1
COAX OUT
G-LINK
DIGITAL AUDIO OUT
OPTICAL OUT
MAINS
AUDIO
L
R
AUDIO
L
R
Audio and Video cables to the
DVD Recorder's red/white
AUDIO OUT 2 and
yellow VIDEO (CVBS)
OUT 2 jacks and to the TV's
AUDIO IN and VIDEO IN jacks
Power cord to the
DVD Recorder's
MAINS jack and
to a power outlet
LEFT AUDIO IN
RIGHT AUDIO IN
VIDEO IN
Antenna or Cable TV signal
to the DVD Recorder's
ANTENNA jack
Connecting the DVD Recorder
(No Cable Box)