Philips HTS3566D User manual
Philips HTS3566D Manual
 |
UPC - 609585146945
View all Philips HTS3566D manuals
Add to My Manuals
Save this manual to your list of manuals |
Philips HTS3566D manual content summary:
- Philips HTS3566D | User manual - Page 1
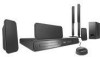
and get support at www.philips.com/welcome HTS3565D HTS3566D STOP Thank you for choosing Philips. Need help fast? Read your Quick Start Guide and/or User Manual first for quick tips that make using your Philips product more enjoyable. Register your product and get support at www.philips.com - Philips HTS3566D | User manual - Page 2
power to keep you happy with your purchase for many years to come. As a member of the PHILIPS "family," you're entitled to protection by one of the most comprehensive warranties and outstanding service literature closely to prevent operating and maintenance problems. WARNING: To reduce the risk of - Philips HTS3566D | User manual - Page 3
manufacturer´s instructions. 8. .Protect the power cord from SCAN PICTURE PROBLEMS, IT PLAYER, PLEASE CONTACT OUR CUSTOMER SERVICE servicing to qualified service personnel. Servicing is required when the apparatus has been damaged in any way, such as power , lighted candles Electronic Industries - Philips HTS3566D | User manual - Page 4
Type Wave length Output Power Beam divergence Semiconductor laser HTS3565D, HTS3566D Trade Name: Philips Responsible Party: Philips Consumer Electronics A Division of Philips Electronics and polyethylene (bags, protective foam sheet.) Your system consists of materials which can be recycled and - Philips HTS3566D | User manual - Page 5
licensing LLC. The USB-IF Logos are trademarks of Universal Serial Bus Implementers Forum, Inc. NOTE: This equipment installed and used in accordance with the instructions, may cause harmful interference to radio communications Corporation, and is intended for home and other limited viewing uses only - Philips HTS3566D | User manual - Page 6
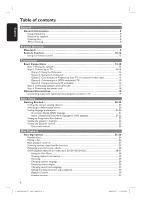
About recycling...8 Product Overview Main Unit ...9 Remote Control ...10-12 Using the remote control ...12 Connections Basic Connections ...13- speakers and subwoofer 17 Step 4: Connecting the power cord...18 Optional Connections ...19 Connecting audio from cable box/recorder/game console or TV 19 - Philips HTS3566D | User manual - Page 7
supported devices Playback - iPod ...35 Playing music from compatible iPod device 35 Preparing the docking station...35 Playing from iPod...35 Playback - USB Device 36 Playing from USB device...36 Playback - Other Audio Player 37 Playing from other portable audio player...37 Troubleshooting...53 - Philips HTS3566D | User manual - Page 8
this unit near the AC outlet where the AC power plug can be easily reached. Space for ventilation - lighted candles.) Accessories supplied - 1 subwoofer - 1 center speaker - 2 front and 2 rear speakers - 1 remote instructions have been printed on non-polluting paper. The electronic equipment - Philips HTS3566D | User manual - Page 9
The following jacks are under the flap at the right corner of the front panel, OPEN . h MP3 LINK jack - Phono input for connecting to the headphone out jack on your portable audio player. i (USB) jack - Input for USB flash drive or USB memory card reader. 1_hts3565-66D_37_eng2_final813.i9 9 9 2008 - Philips HTS3566D | User manual - Page 10
English Remote Control 1 2 3 4 5 6 7 8 9 10 11 a 2 (Standby-On) - Turns on this unit or turns off to standby mode. b ç (Open/Close) - Opens/closes the disc tray. c Source buttons - AUX (MP3 LINK): switches to AUX1, AUX2, DI (DIGITAL IN) or MP3 LINK external source mode. - RADIO: switches to FM - Philips HTS3566D | User manual - Page 11
English Remote Control (continued) l OK - Confirms an entry or selection. m b BvV - DISC or shuffle modes; turns off repeat or shuffle mode. - RADIO: press this button to start manual preset programming. - RADIO: press and hold this button to start automatic preset programming. 1_hts3565- - Philips HTS3566D | User manual - Page 12
control directly at the remote sensor (iR) on the front panel. E Select the source you wish to control by pressing the AUX (MP3 LINK), RADIO, USB, DOCK or DISC button on the remote control. F Then select the desired function (for example í, ë.) 12 1_hts3565-66D_37_eng2_final813.i12 12 2008-03 - Philips HTS3566D | User manual - Page 13
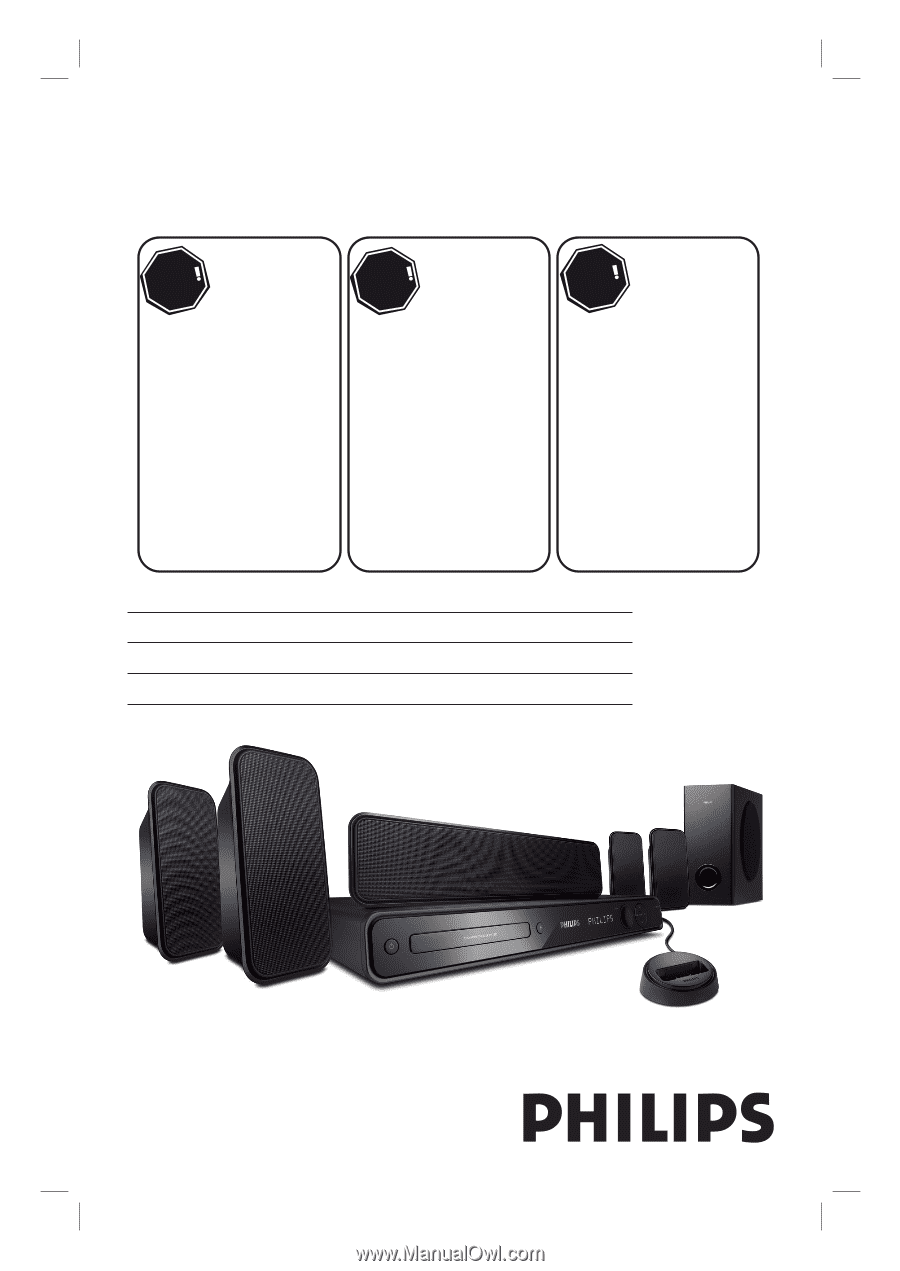
CENTER RFRIGOHNTT REAR RIGHT SUBWOOFER * Tallboy rear speakers for HTS3566D model. Step 1: Placing the speakers The Philips Home Theater System is simple to install. However, proper system placement is critical to ensure an optimum sound experience. A Place the front left and right speakers at - Philips HTS3566D | User manual - Page 14
important to connect this unit directly to the TV in order to enjoy optimum video quality. - To hear the TV audio through this unit, see chapter 'Optional Connection Connecting audio from cable box/recorder/ game console or TV' for details. Option 1: Using the Video jack Use the supplied composite - Philips HTS3566D | User manual - Page 15
}' for details. Helpful Hints: - The HDMI is backward compatible with some DVI devices using an appropriate adaptor plug. - If a DVI device is connected, an additional audio cable is required for audio transmission. 15 2008-03-27 3:11:58 PM - Philips HTS3566D | User manual - Page 16
in order to view the DVD playback on the TV. See your electronics retailer or contact Philips for details about RF modulator availability and operations. A Use the supplied ANTENNA IN jack on the TV. C Connect the Antenna or Cable TV service signal to the ANTENNA IN or RF IN jack on the RF modulator - Philips HTS3566D | User manual - Page 17
of the cables and sockets are matched. Helpful Hint: - To prevent unwanted noise, never place the speakers too close to the main unit, subwoofer, AC power adapter, TV or any other radiation sources. 17 1_hts3565-66D_37_eng2_final813.i17 17 2008-03-27 3:11:59 PM - Philips HTS3566D | User manual - Page 18
Basic Connections (continued) English AUX 2 AUX 1 Step 4: Connecting the power cord After everything is connected properly, connect the AC power cord into the power outlet. The standby LED on the main unit lights up. Helpful Hints: - Refer to the type plate at the rear or bottom of the product for - Philips HTS3566D | User manual - Page 19
Home Theater System in order to enjoy the multi-channel surround sound capabilities. Use an audio cable (not supplied) to connect the AUDIO IN-AUX1 or AUDIO IN-AUX2 jacks on the main unit to the AUDIO . To listen to the audio output from this connection, press AUX (MP3 LINK) repeatedly until 'DI - Philips HTS3566D | User manual - Page 20
to your TV user manual on how to select the correct input on your TV. Switching to different play source On the main unit Press the SOURCE button on the main unit repeatedly to select: DISC USB FM AUX1 AUX2 DI MP3 LINK DOCK DISC ... On the remote control 20 1_hts3565-66D_37_eng2_final813.i20 - Philips HTS3566D | User manual - Page 21
on the user manual. On-screen display A In disc mode, press OPTIONS on the remote control. { General Setup } icon appears. B Code Auto English Français Espanõl Press OPTIONS to exit menu D Use keys to select a language and press OK to confirm. Audio Audio Subtitle Disc Menu Parental PBC MP3/ - Philips HTS3566D | User manual - Page 22
to enter the 4-digit language code 'XXXX' (see 'Language Code') and press OK to confirm. E Repeat steps C ~ D for other settings. Helpful Hints: - During DVD playback, you can press the AUDIO SYNC or SUBTITLE on the remote control to change the audio or subtitle language respectively. However - Philips HTS3566D | User manual - Page 23
interlaced scanning (ordinary normal TV system.) With nearly double the number your TV progressive scan mode, refer to your TV user manual. A message appears on the TV. H Confirm your Press ç on the remote control. B Press on the remote control. C Press AUDIO SYNC on the remote control. Helpful Hints - Philips HTS3566D | User manual - Page 24
settings are not accessible. A In disc mode, press OPTIONS on the remote control. B Press repeatedly to select { Audio Setup } icon, then press . C Select { Speakers Volume } and press . Audio Setup Speakers Volume Speakers Delay HDMI Audio CD Upsampling Speakers Level Setup Front Left 0dB - Philips HTS3566D | User manual - Page 25
to watch TV programme or start play on other connected device. This Home Theatre unit automatically switches to the corresponding audio input and output the sound from its speakers system. One touch power off Press STANDBY/POWER button to turn off this unit and all the HDMI CEC compliant devices - Philips HTS3566D | User manual - Page 26
cause the unit to malfunction. Your DVD home theater system plays: - Digital Versatile Discs (DVDs) - Video CDs (VCDs) - Super Video CDs (SVCDs) - Finalized DVD Recordable (DVD±R), DVD Rewritable (DVD±RW) - Audio Compact Discs (CDs) - MP3/ Windows Media™ Audio discs, picture (Kodak, JPEG) files on - Philips HTS3566D | User manual - Page 27
playback from the beginning. - This is a power-saving feature, this unit automatically switches to a disc, press REPEAT (PROGRAM) on the remote control repeatedly to choose a repeat/shuffle play random play) RPT OFF (exit repeat mode) MP3/Windows Media™ Audio/ DivX® RPT ONE (repeat track) RPT ALL - Philips HTS3566D | User manual - Page 28
features described here might not be possible for certain discs. Always refer to the instructions supplied with the discs. Using the Disc Menu Depending on the disc format, a keys or numeric keypad 0-9 on the remote control, then press OK to start playback. To access or remove the menu Press - Philips HTS3566D | User manual - Page 29
can be done without interrupting disc playback. A During playback, press INFO. A list of available disc information appears on the TV. Menu Title Chapter Audio Subtitle Bitrate 7 DVD 01/01 02/99 2ch Chi Off Title Elapsed VCD/SVCD Menu Track Disc Time Track Time Repeat 09/16 1:16:05 0: - Philips HTS3566D | User manual - Page 30
by the disc (STEREO, MONO LEFT, MONO RIGHT or MIX MONO). Setting the delay times for audio playback This feature allows you to adjust the audio delay times if the video playback is slower than the audio output streams, hence resulting in 'Lip-sync'. The only way to correct 'Lip-sync' error caused - Philips HTS3566D | User manual - Page 31
English Disc Operations (continued) Preview function This function allows you to preview the contents of a VCD/SVCD. A Press DISC. Select Digest Type: Track Digest Disc Interval Track Interval To go to the previous or next page, press í / ë. To return to the main menu, select { Menu } on the - Philips HTS3566D | User manual - Page 32
digital contents during internet downloading. - If any special characters are present in the MP3/WMA track name (ID3) or album name, it might not be displayed correctly on the screen because this unit does not support the characters. 32 1_hts3565-66D_37_eng2_final813.i32 32 2008-03-27 3:12:03 PM - Philips HTS3566D | User manual - Page 33
display the disc content due to the large number of songs/pictures compiled into one disc. Supported file format: - The file extension has to be '*.JPG' and not '*.JPEG'. - clockwise. Rotate the picture anticlockwise. Remote control 1_hts3565-66D_37_eng2_final813.i33 33 33 2008-03-27 3:12:04 PM - Philips HTS3566D | User manual - Page 34
DivX registration code of this unit (see 'Setup Menu Options - { General Setup > DivX(R) VOD Code }' audio tracks, you can press AUDIO SYNC on the remote control to change the audio stream. Use m / M on the remote .smi, .sub, .ssa, .ass) are supported but do not appear on the file navigation menu. - Philips HTS3566D | User manual - Page 35
compatible iPod device Music on your Apple iPod can be played on this unit with the support of the docking station. It enables you to enjoy the superior sound output from the speaker system. The docking station supports the following iPod range: iPod 4th gen iPod Nano 3rd gen iPod 5th gen iPod - Philips HTS3566D | User manual - Page 36
view the data files (JPEG, MP3, Windows Media™ Audio or DivX®) in the USB flash cable (not supplied) is required. - This unit can only support up to a maximum of 300 folders and 648 files. - You Press USB to select device C Press USB on the remote control to access the data in the drive. When - Philips HTS3566D | User manual - Page 37
the speaker system. However, controlling of playback is only possible on the portable audio player. A Use a 3.5mm stereo audio cable (not supplied) to connect the MP3 LINK jack on this unit to the 'headphone' output jack on your portable audio player. B Press AUX (MP3 LINK) on the remote control - Philips HTS3566D | User manual - Page 38
the previously selected item. Instructions and explanations of the options Code Press OPTIONS to exit menu See 'General Setup' on this Chapter Audio Setup Speakers Volume Speakers Delay HDMI Audio CD Upsampling Audio Sync Press OPTIONS to exit menu See 'Audio Audio Subtitle Disc Menu Parental PBC MP3 - Philips HTS3566D | User manual - Page 39
standby mode automatically. { Off } - Turn off the sleep mode function. DivX(R) VOD Code Philips provides you with the DivX® VOD (Video On Demand) registration code that allows you to rent or purchase videos from DivX® VOD service at www.divx.com/vod. All the downloaded videos from DivX® VOD can - Philips HTS3566D | User manual - Page 40
the sound output through the speaker system. { All } - The HDMI audio output will be same as the audio stream being played back. In the case when the playback audio format is not supported, the audio output will be changed to PCM (Pulse Code Modulation) automatically. Notes: - It may take - Philips HTS3566D | User manual - Page 41
if you switch to Multi-channel mode. - If you press SURROUND on the remote control, it turns off the CD upsampling feature. Audio Sync This feature allows you to adjust the audio delay times if the video playback is slower than the audio output streams. Use keys to set the delay times for the - Philips HTS3566D | User manual - Page 42
of disc (PAL or NTSC disc) on this unit. { NTSC } - For NTSC-system TV. { Multi } - For TV that is compatible with both PAL and NTSC. TV on progressive scan mode. Read the instructions on the TV and confirm your action by pressing OK on the remote control. Picture Setting This unit - Philips HTS3566D | User manual - Page 43
resolution that is compatible with your TV display capability. { Auto } It detects and selects the best supported video resolution automatically. { 480p, 576p, 720p, 1080i, 1080p } Manually select a video resolution. 'p' for progressive and 'i' for interlaced. Note: If no display appears on the TV - Philips HTS3566D | User manual - Page 44
devices to control each other with a single remote control. Notes: - Your TV and other EasyLink controls. See your TVs/ devices manual for details. - Philips does not guarantee 100% interoperability with all feature, select { Off }. { System Standby } Press STANDBY/POWER button to turn off this unit - Philips HTS3566D | User manual - Page 45
Setup (underlined options are the factory default settings) HDMI Setup Continued... { System Audio Control } This unit automatically switches to the audio input of the active device and output the sound from its speakers system. To enable this feature, select { On }. Then proceed to { HDMI Input - Philips HTS3566D | User manual - Page 46
preferred disc menu language for DVD playback. Note: If the selected audio/subtitle/disc menu language is not available on the DVD, the level from 1 to 8 and press OK. 2) Use the numeric keypad 0-9 on the remote control to enter your six-digit password. Notes: - The ratings are country-dependent ('1' - Philips HTS3566D | User manual - Page 47
Display all the files contained in the MP3/ Picture disc. { With Menu } - Display the folder menu of the MP3/Picture disc. Note: This unit can Password New Password Confirm PWD OK 2) Use the numeric keypad 0-9 on the remote control to enter your existing six-digit password at { Old Password }. Note: - Philips HTS3566D | User manual - Page 48
Setup Menu Options (continued) Preferences (underlined options are the factory default settings) DivX Subtitle Select the font type that supports the recorded DivX® subtitle. { Standard } - Display a standard list of Roman subtitle fonts provided by this unit. { Central Europe }- Display - Philips HTS3566D | User manual - Page 49
auto install (for first time setup only) - Using automatic preset - Using manual preset Helpful Hints: - This unit exits presetting mode if no button is on the display panel (or press RADIO on the remote control.) B Press / on the remote control to start tuning. The frequency indication starts to - Philips HTS3566D | User manual - Page 50
and hold REPEAT (PROGRAM) until 'START ...' appears on the display panel. All previously stored radio stations will be replaced. Using manual preset Use manual presetting to store your favorite radio stations. A Tune to your desired radio station (see 'Tuning to radio stations'). B Press REPEAT - Philips HTS3566D | User manual - Page 51
English Sound and Volume Controls Volume control Press VOL +/- to increase or decrease the volume level. To turn off the volume temporarily Press %. Playback continues without sound and 'MUTE' appears. To restore the volume, press % again, or increase the volume level. Selecting surround sound - Philips HTS3566D | User manual - Page 52
Info }, then press OK. Preferences Disc Menu Parental PBC MP3/JPEG Nav Password Divx Subtitle Default Version Info Press OPTIONS to exit menu C Write down the version number, then press OPTIONS to exit the menu. D Go to www.philips.com/support to check the latest software version available for this - Philips HTS3566D | User manual - Page 53
system for repair. If you are unable to solve a problem by following these instructions, consult your dealer or Philips for help. Problem (General) No picture. Solution - Refer to your TV manual remote control. 3) Press AUDIO SYNC (for progressive scan) or ZOOM (for HDMI video) on the remote - Philips HTS3566D | User manual - Page 54
some items in the setup/system menu. - Press Ç twice before selecting the system setup menu. - Depending on the disc availability, some menu items cannot be selected. Unable to play DivX movies. - Ensure that the DivX file is encoded according to the 'Home Theater Profile' with the DivX encoder - Philips HTS3566D | User manual - Page 55
Troubleshooting (continued) Problem (USB/HDMI/DOCK) Solution The contents of the USB flash - The USB flash drive format is not compatible with this drive cannot be read. unit. - Drive is formatted with a different file system which is not supported for details. No audio from iPod playback. - - Philips HTS3566D | User manual - Page 56
standard 4:3 screen. AUDIO IN jacks: Red and white jacks on the back of the unit that receive audio from another system (TV, Stereo, etc etc., recorded on a DVD. DivX: The DivX code is a patent-pending, MPEG-4 based video compression Pro Logic decoders.) EasyLink: Philips EasyLink uses the HDMI CEC - Philips HTS3566D | User manual - Page 57
compression ratio. Files are recognized by their file extension 'JPG' or 'JPEG.' MP3: A file format with a sound data compression system. 'MP3' is the abbreviation of Motion Picture Experts Group 1 (or MPEG-1) Audio Layer3. By using the MP3 format, one CD-R or CD-RW can contain about 10 times more - Philips HTS3566D | User manual - Page 58
power: - Home Theater mode: 1000 W - FTC* output power: 640 W Frequency Response: 180 Hz - 14 kHz / ±3 dB Signal-to-Noise Ratio: > 60 dB (A-weighted) Input Sensitivity - AUX 1: 400 mV - AUX 2: 400 mV - MP3 286 Vp-p, 75Ω Audio DAC 24 Bits / Class Support Hi-Speed (HTS3565D) System: - Philips HTS3566D | User manual - Page 59
Philips product, (b) to damage caused by service performed by anyone other than Philips or Philips Authorized Service /signal source systems outside of power line Manual. TO OBTAIN ASSISTANCE IN THE U.S.A., PUERTO RICO, OR U.S. VIRGIN ISLANDS... Contact Philips Customer Care Center at: 1-888-PHILIPS
-
 1
1 -
 2
2 -
 3
3 -
 4
4 -
 5
5 -
 6
6 -
 7
7 -
8
-
9
-
10
-
11
-
12
-
13
-
14
-
15
-
16
-
17
-
18
-
19
-
20
-
21
-
22
-
23
-
24
-
25
-
26
-
27
-
28
-
29
-
30
-
31
-
32
-
33
-
34
-
35
-
36
-
37
-
38
-
39
-
40
-
41
-
42
-
43
-
44
-
45
-
46
-
47
-
48
-
49
-
50
-
51
-
52
-
53
-
54
-
55
-
56
-
57
-
58
-
59
 |
 |
HTS3565D
HTS3566D
Register your product and get support at
www.philips.com/welcome
EN
DVD Home Theater System
6
FR_CA
Système Home Cinéma DVD
60
ES_LA
Sistema de Home Theater con DVD
116
Thank you for choosing Philips.
Need help fast?
Read your Quick Start Guide and/or
User Manual first for quick tips
that make using your Philips product
more enjoyable.
Register your product and
get support at
www.philips.com/welcome
or call
1-888-PHILIPS (744-5477)
while with your product
(and Model / Serial number)
STOP
Philips vous remercie de
votre confiance.
Besoin d'une aide
rapide?
Le Guide rapide de début et
Manuel de l'utilisateur regorgent
d'astuces destinées à simplifier
l'utilisation de votre produit Philips.
ou formez le
1-800-661-6162 (Francophone)
1-888-PHILIPS (744-5477)
(English speaking)
Veillez à avoir votre produit à
portée de main
(et model / serial nombre)
ARRÊT
Gracias por escoger Philips
Necesita ayuda
inmediata?
Lea primero la Guía rápida del
comienzo o el Manual del usuario,
en donde encontrará consejos que
le ayudarán a disfrutar plenamente
de su producto Philips.
o llame al teléfono
1-888-PHILIPS (744-5477)
y tenga a mano el producto
(y número de model / serial)
ALTO
Enregistrez votre produit et
accédez à l'assistance sur
www.philips.com/welcome
Visite
www.philips.com/welcome
para registrar su producto y
obtener información de
contacto y asistencia.
1_hts3565-66D_37_eng2_final813.i1 1
1_hts3565-66D_37_eng2_final813.i1
1
2008-03-27 3:11:49 PM
2008-03-27
3:11:49 PM