Philips LC4746 User Manual
Philips LC4746 Manual
 |
View all Philips LC4746 manuals
Add to My Manuals
Save this manual to your list of manuals |
Philips LC4746 manual content summary:
- Philips LC4746 | User Manual - Page 1
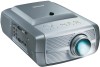
XP cClear10 English (good) 24-07-2003 15:52 Pagina 1 Philips multimedia projector cClear English User guide - Philips LC4746 | User Manual - Page 2
4 Optional accessories 5 Service accessories 5 2. Functional overview 6-11 Controls 6-9 Remote control 10 Connections 11 remote control 14 4. Installation 15-23 General information 15 Computer input 15 RS-232 connection 15 Universal Philips Multimedia Projector 2 English User guide cClear - Philips LC4746 | User Manual - Page 3
Cleaning 41 Cleaning the cabinet 41 Cleaning the lens 41 Cleaning the dust filter 41 Lamp 42 Lamp replacement 43 Resetting the lamplife time 43 7.Troubleshooting 44-47 Philips Multimedia Projector 3 English User guide cClear - Philips LC4746 | User Manual - Page 4
years of enjoyment.You will want to keep this manual handy, as it is a convenient source of XG1 Brilliance cClear - SV10 Projector - Lens cap cClear - XG1 Wireless Laser pointer remote control Philips Multimedia Projector Cd-rom (with Projection Assistant, Warranty card, SecurityMax, User Guide, - Philips LC4746 | User Manual - Page 5
Service accessories The following accessories are available via the Philips Projectors Service organisation only: • Compact remote Control - 3139 228 60500 • Laser pointer remote Video adapter - 2422 033 00345 • User Guide (Cd- rom) - 3122 438 71130 Philips Multimedia Projector 5 English User - Philips LC4746 | User Manual - Page 6
Lights up orange when lamp life has almost expired. - Lights up red when lamp life has expired. - Fast blinks red when lamp start has failed. IR sensor 9 Receives the signals from the remote sure your operating system supports USB or PS/2. Philips Multimedia Projector 6 English User guide cClear - Philips LC4746 | User Manual - Page 7
by Source Lamp Temp Menu OK 6789 0! Controls > Focus ring @ Adjusts the focus of the projected image. Zoomring # Adjusts the size of the projected image. @# Philips Multimedia Projector 7 English User guide cClear - Philips LC4746 | User Manual - Page 8
Controls > $%^ cClear Wireless version only Power indicator $ Lights up green when wireless operation is activated. Ready indicator % Lights up green when the projector operates in a wireless button for this could damage the button. Philips Multimedia Projector 8 English User guide cClear - Philips LC4746 | User Manual - Page 9
projector. Dust filter $ Mains inlet socket % To connect the projector to the mains. Lock slit ^ To insert an optional locking device (Kensington lock). Lamp compartment & Philips Multimedia Projector 9 English User guide cClear - Philips LC4746 | User Manual - Page 10
VOLUME MENU OK AV MUTE Stand by On SOURCE Mode Select Window ! 0 9 8 Remote control < Laser 1 Activates the laser pointer to indicate items on the screen. Note: the USB or PS/2 connectors. Make sure your operating system supports USB or PS/2. OK ! Confirms actions in the menu when the - Philips LC4746 | User Manual - Page 11
Out Data 1 (DVI) S-Video CVBS Video Audio R Video Audio L Service Data Audio 2 1 RS-232 PS/2 USUBS/UBSB Audio 987 6 remote control. Audio information from the computer will be heard via the projector speaker. When the bSure2 Brilliance Philips Multimedia Projector 11 English User guide cClear - Philips LC4746 | User Manual - Page 12
Standby button on projector or remote control to switch the projector on. - The Standby indicator lights up orange. - When the projection lamp is on, the Standby indicator lights up green and the start into Power/Standby mode immediately. Philips Multimedia Projector 12 English User guide cClear - Philips LC4746 | User Manual - Page 13
to Power/Standby ('SmartSave' - SV10 and XG1 Brilliance versions only). This setting can be changed in the Out Data 1 (DVI) S-Video CVBS VViideo Audio L VViiddeeoo AAuuddiioo RR Service 1 Data Audio 2 RS-232 PS/2 USB/USB Audio A B To Philips Multimedia Projector 13 English User guide cClear - Philips LC4746 | User Manual - Page 14
parts. If you need to transport the projector, please follow these packing instructions to prevent accidental damage to the projector. • When you are hand- . Note The maximum range of the remote control is approximately 15 m (± 50 feet). Philips Multimedia Projector 14 English User guide cClear - Philips LC4746 | User Manual - Page 15
remote control.The Mouse Left/Right keys on the remote control function as Left and Right mouse keys of your pc. Audio (only with bSure2 Brilliance your own code protected Universal Serial Bus. For this feature see the 'Security Max' user guide on the Cd-rom. Philips Multimedia Projector 15 English - Philips LC4746 | User Manual - Page 16
Macintosh computer users could experience incomplete or erratic USB -functionality.These problems are not related to the performance of your projector. External monitor off projector and external equipment before making any connections. Philips Multimedia Projector 16 English User guide cClear - Philips LC4746 | User Manual - Page 17
and on the screen, using Cursor Control on the remote control. When using the USB connection, make sure Windows 98 now be heard via the projector speaker (only with bSure2 Brilliance version). • When no USB connection has been made, Philips Multimedia Projector 17 English User guide cClear - Philips LC4746 | User Manual - Page 18
' (4c) to the VGA cable (5) of the monitor. 4 Switch on your Computer, projector and external monitor. - The image projected is simultaneously shown on the monitor. Philips Multimedia Projector 18 English User guide cClear - Philips LC4746 | User Manual - Page 19
and on the screen, using Cursor Control on the remote control. When using the USB connection, make sure Windows 98 now be heard via the projector speaker (only with bSure2 Brilliance version). • When no USB connection has been made, Philips Multimedia Projector 19 English User guide cClear - Philips LC4746 | User Manual - Page 20
/Cr R YG Pb/Cb B Audio AudioOOutut Data 1 (DVI) S-Video CVBS Video Audio L Video Audio R Service Data Audio 21 Data Audio 1 RS-232 PS/2 USB/USB Audio 1a 1b 2 S-VHS (S-Video) only VCR . S-Video Scart adapter (not for USA version) Philips Multimedia Projector 20 English User guide cClear - Philips LC4746 | User Manual - Page 21
projector. For this, use an optional audio connection cable (2). - Audio information from the Component- or HDTV-video equipment will be played via the projector speaker. Philips Multimedia Projector 21 English User guide cClear - Philips LC4746 | User Manual - Page 22
projector. For this, use an optional audio connection cable (4). - Audio information from the Component- or HDTV-video equipment will be played via the projector speaker. Philips Multimedia Projector 22 English User guide cClear - Philips LC4746 | User Manual - Page 23
Select Window - The menu bar appears on the screen 3 Use Cursor Control to move to 'Audio'. 4 Select 'Audio Out' using Cursor Control and select 'On'. Philips Multimedia Projector • The volume can be adjusted, using the Volome control of the amplifier or the - Volume + keys of the - Philips LC4746 | User Manual - Page 24
General 1 Press the Standby button on projector or remote control to switch on the projector. Menu OK 6 indicator lights up orange. - When the projection lamp is on, the Standby indicator lights up format; - source; - language. Philips Multimedia Projector 24 English User guide cClear - Philips LC4746 | User Manual - Page 25
- the local keyboard or remote control is used when Key lock is activated. Error messages Error messages are displayed when there is a serious technical problem.They can occur at any time has almost expired; - lamplife time has expired. Philips Multimedia Projector 25 English User guide cClear - Philips LC4746 | User Manual - Page 26
On Screen Displays and with help of Menu, OK and Cursor Control on the projector or the remote control. The projector is set to standard settings at the factory. However, you can adjust these -RGP DVI-YPbPr On Off Off, 4x, 9x, 16x Philips Multimedia Projector 26 English User guide cClear - Philips LC4746 | User Manual - Page 27
select Freeze Zoom Auto Image Horizontal Size Phase Shift Main, Second window On Off Off, 4x, 9x, 16x Off On 0 100 0 100 Cursor controlled Shift Philips Multimedia Projector 27 English User guide cClear - Philips LC4746 | User Manual - Page 28
Start-up screen Lamp counter Smar tSave (SV10 and XG1 Brilliance versions only) Feedback On Off Auto RGB sync YPbPr RGB Mutimedia Wireless (only available on cClear wireless version) DVI-RGP DVI-YPbPr OK OK Off On Philips Logo capture None OK (3 sec) Off, 1-10, 15, 20, 25, 30, 35 - Philips LC4746 | User Manual - Page 29
. 5 Select the next item to be adjusted in the sub menu and adjust as described above. 6 Press Menu to close the On Screen Menu Display. Philips Multimedia Projector 29 English User guide cClear - Philips LC4746 | User Manual - Page 30
the menu bar.The following 'Display' adjustments can now be made, following the instructions under 'General explanation': - Window mode selects projection from one or two input mode; - Freeze captures a moving picture (still picture); Philips Multimedia Projector 30 English User guide cClear - Philips LC4746 | User Manual - Page 31
menu bar. The following 'Picture' adjustments can now be made, following the instructions under 'General explanation': - Brightness adjusts brightness of the projected image; - red, green and blue) can also be adjusted individually. Philips Multimedia Projector 31 English User guide cClear - Philips LC4746 | User Manual - Page 32
the menu bar.The following 'Display' adjustments can now be made, following the instructions under 'General explanation': - Window mode selects projection from one or two input sources still picture); - Zoom enlarges a part of the picture; Philips Multimedia Projector 32 English User guide cClear - Philips LC4746 | User Manual - Page 33
can now be made for both Computer, Component and Video/S-video input, following the instructions under 'General explanation': - Volume adjusts the sound level; - Bass adjusts the the - Volume + keys on the remote control and local keyboard. Philips Multimedia Projector 33 English User guide cClear - Philips LC4746 | User Manual - Page 34
('Panning'). By pressing the D(igital) Zoom button on the remote control you enter directly into the zoom centre selection screen ( screen. 2 Use Cursor Control to select 'Shift' in the 'Display' menu. Philips Multimedia Projector 3 Press OK to activate Shift. 4 Use Cursor Control to position the - Philips LC4746 | User Manual - Page 35
- The required Window mode (Default, Double Window, PIP) can also be selected with 'Window mode' on the remote control. - 'Main Window' and 'Second Window' can also be selected with Window Select on the remote control. - The tabel on the next pages tells you which sources can be combined in PIP mode - Philips LC4746 | User Manual - Page 36
B Audio Out Data 1 (DVI) S-Video CVBS Video Audio R Video Audio L Service Data Audio 2 1 RS-232 PS/2 USUBS/UBSB Audio Second source (in PIP G, B/CVBS Y, Pb, Pr Data 2 Data 1 (analog) Data 1 (digital) Wireless data - - - - - + + - Philips Multimedia Projector 36 English User guide cClear - Philips LC4746 | User Manual - Page 37
YG Pb/Cb B Audio Out Data 1 (DVI) S-Video CVBS Video Audio R Video Audio L Service Data Audio 2 1 RS-232 PS/2 USUBS/UBSB Audio Second source (in PIP window or second CVBS Y, Cb, Cr Y, Cb, Pr Data 2 Data 1 (analog) Wireless data Philips Multimedia Projector 37 English User guide cClear - Philips LC4746 | User Manual - Page 38
missing at the top or the bottom of the screen. With Cursor Control you can adjust the position of the projected image upwards or downwards. Philips Multimedia Projector 38 English User guide cClear - Philips LC4746 | User Manual - Page 39
-up screen (for bSure2 Brilliance projectors only) All settings described under 'General adjustments/settings' can be made, following the instructions under 'On Screen Display projector. For this see 'Resetting the projector' hereafter. Philips Multimedia Projector 39 English User guide cClear - Philips LC4746 | User Manual - Page 40
any button on projector or remote control to switch on the projector. - The Standby indicator lights up orange. - When the projection lamp is on, the Standby indicator lights up green and your personal ™ start-up screen will then appear. Philips Multimedia Projector 40 English User guide cClear - Philips LC4746 | User Manual - Page 41
a filter of the same type (12 nc: 3122 434 0157 0). The projector power cannot be switched on again unless the filter holder is installed correctly. Philips Multimedia Projector 41 English User guide cClear - Philips LC4746 | User Manual - Page 42
the screen. - When the lamplife has expired, the lamp indicator lights up red and the message 'Warning: lamplife has expired' is caution and warning labels on the lamp holder. 5 Unscrew screw B. B Philips Multimedia Projector 6 Grasp the lamp holder handle and carefully pull the lamp guide cClear - Philips LC4746 | User Manual - Page 43
not drop, as the impact may cause the lamp to break. 8 Place the lamp holder in the guiding slots and insert into the lamp compartment. 9 Tighten screw B again. B 10 Put the lamp door back item you wish to adjust or press Menu to exit. Philips Multimedia Projector 43 English User guide cClear - Philips LC4746 | User Manual - Page 44
Troubleshooting > If a fault occurs, first check the points listed below before taking the projector for repair. If you are unable to solve a problem by following these hints, consult your dealer or service option in the 'Settings' menu. Philips Multimedia Projector 44 English User guide cClear - Philips LC4746 | User Manual - Page 45
:52 Pagina 45 7.Troubleshooting > In Data mode - Input resolution is too high (and keystoning is applied). • If you wish to keep the keystone correction, decrease the input resolution until the image is correctly displayed. For this, refer to the User Guide or support information of the computer - Philips LC4746 | User Manual - Page 46
the mains. Reconnect and restart. If this does not resolve the problem, replace the lamp. See 'Maintenance'. Temperature indicator - red: temperature or remote control - 'Keylock' active. • Press OK for 10 seconds to cancel 'Keylock.' Philips Multimedia Projector 46 English User guide cClear - Philips LC4746 | User Manual - Page 47
Troubleshooting < The mouse cursor does not react when using the cursor control on the remote control General: • Check that the batteries have been installed properly in the remote not work there is a problem with the computer. • Also refer to the User Guide or support information of the computer.
-
 1
1 -
 2
2 -
 3
3 -
 4
4 -
 5
5 -
 6
6 -
 7
7 -
8
-
9
-
10
-
11
-
12
-
13
-
14
-
15
-
16
-
17
-
18
-
19
-
20
-
21
-
22
-
23
-
24
-
25
-
26
-
27
-
28
-
29
-
30
-
31
-
32
-
33
-
34
-
35
-
36
-
37
-
38
-
39
-
40
-
41
-
42
-
43
-
44
-
45
-
46
-
47
 |
 |

multimedia projector
cClear
Philips
User guide
English
XP cClear10 English (good) 24-07-2003 15:52 Pagina 1